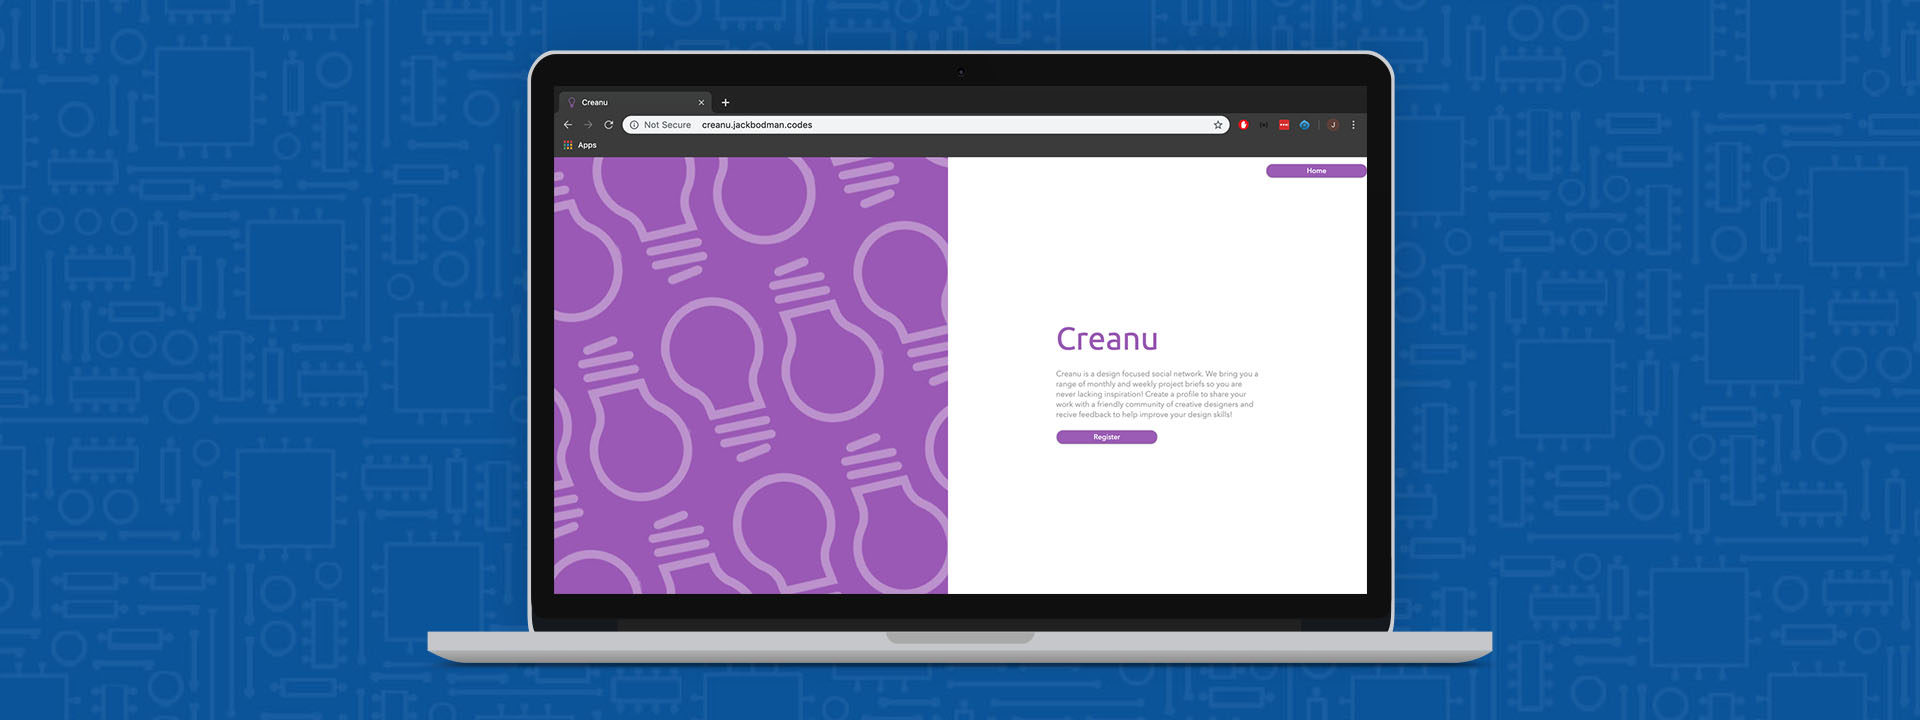
Creanu
A Social Media Experience For Student Designers
Introduction
 NLT 2 Document
About the Project
Creanu is the feature rich and more in depth successor to my semester one project called Project Box. Project Box allowed me to scrape the surface of what was possible within the Laravel Framework. Having enjoyed getting to grips with and gaining a basic understanding of the framework, I wanted to dive deeper, in an effort to substantiate myself as a competent laravel developer and learn more about what the framework had to offer.
At the end of semester one I made a list of features I would like to include within the web application when taking it further. This feature list was used as a loose guide during semester two, allowing me to experiment with more technologies and create an almost fully functional social media website/web application.
Personal Goals
The first of my personal goals within this project continuation was to create a big final year ‘showpiece’ that would help me to stand out to Laravel employers after finishing University. The task of developing a social media website is something that can take a lot of time and dedication, while also using a range of technologies and systems that will also help to improve my employability.
My second goal is linked to my choice of continuing with the Laravel project rather than learning something new. I personally believe that it would be more beneficial for me to focus on improving my skills within Laravel than learning an entirely new system. This could help to improve my chances of being employed as a Laravel Developer, as I would have already gained a competent understanding of the framework.
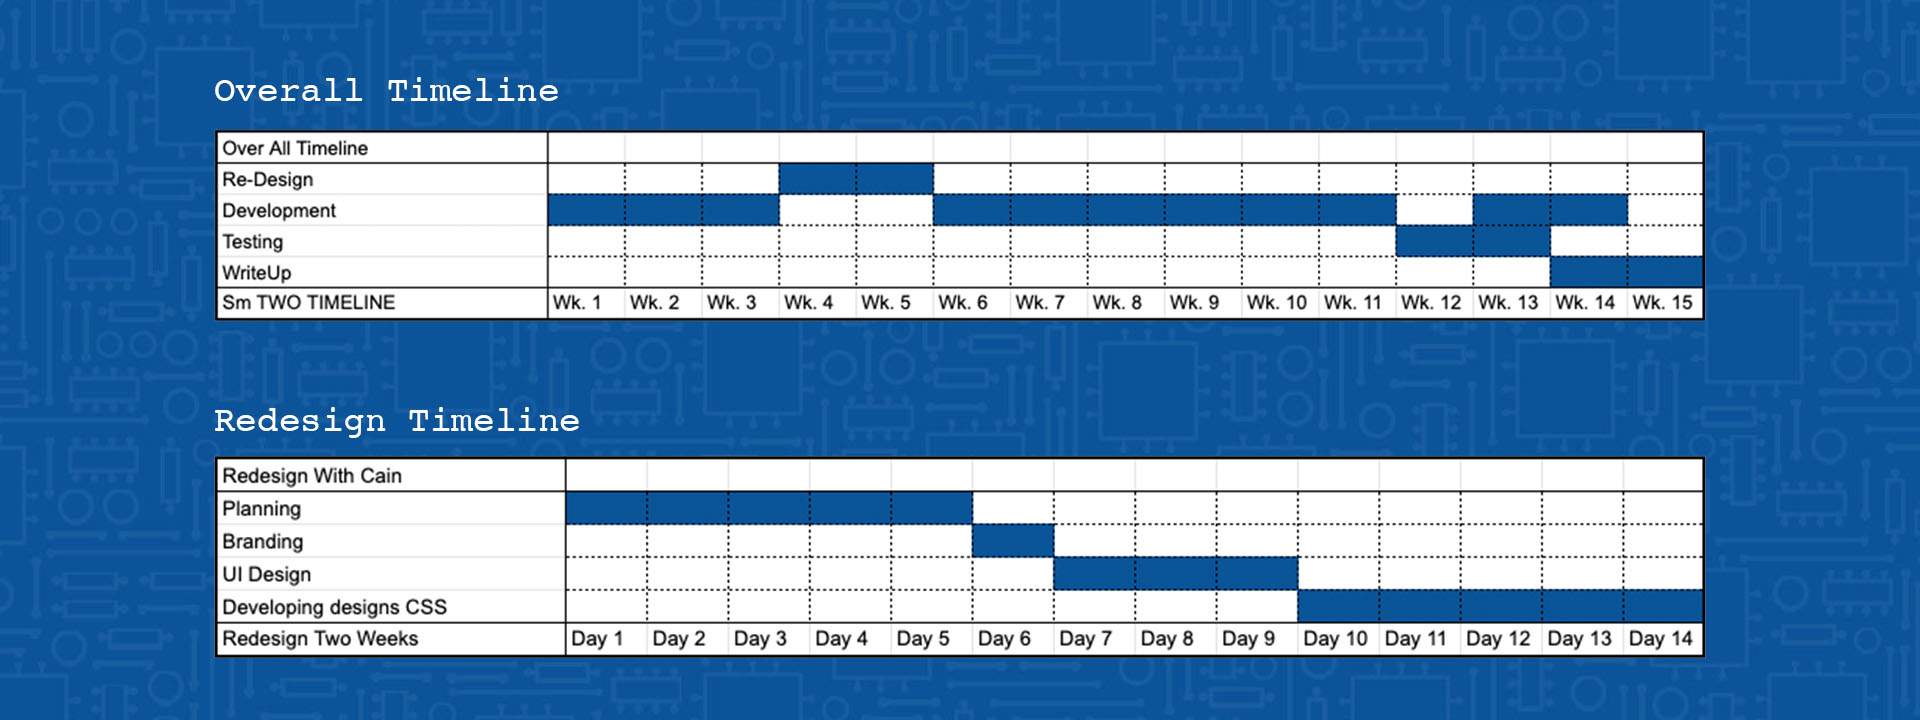
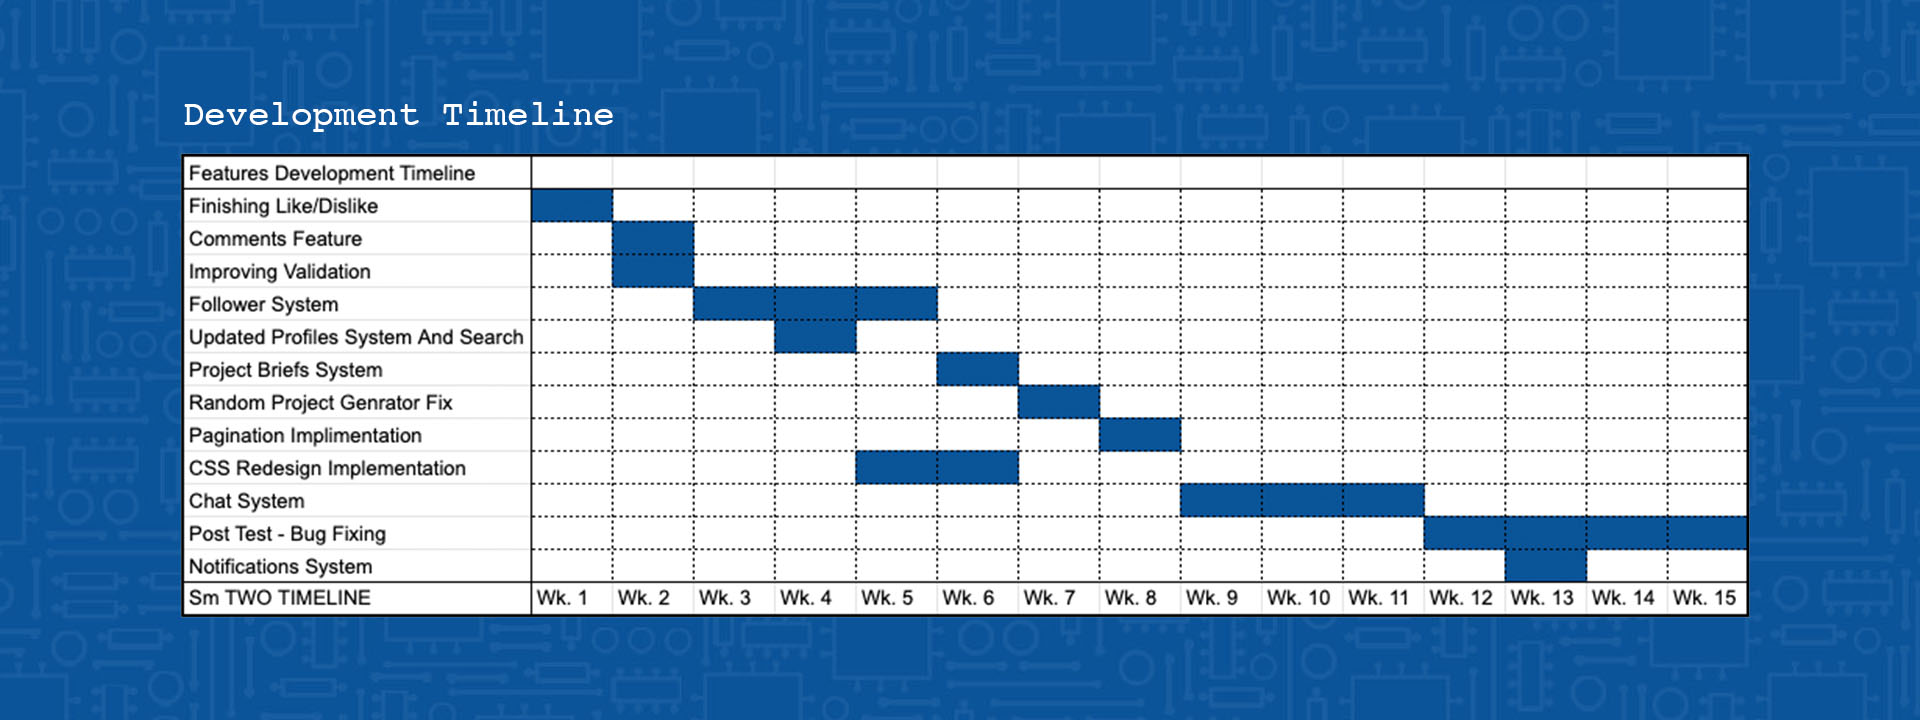
Timescales and Development Process
As the development write up for my project is laid out in a way which is easier to follow when reading rather than my actual development process, this section has a series of gantt charts outlining my overall timeline and time management during the development of the project.
Research
As this project was a continuation of my first semester project, the majority of my research into the laravel framework itself was completed in semester one. Because of this the research I undertook during this semester was done during the development. However, this research allowed me to gain a better understanding of some of the technologies I used this semester, which I have detailed below (Research Links can be found at the bottom of this project write up).
Javascript Ajax: AJAX, which stands for Asynchronous JavaScript And XML is a technique used to access web servers from the frontend of a web page, without refreshing or linking to a backend function. I make use of this at multiple points throughout the web app in order to send and receive server data without having to re load the users display.
Laravel Third Party Packages: Being an Open framework the laravel community are able to create their own packages and bits of code that can be added to a project using composer. These packages can be used to speed up the development process, for example I made use of third party package ‘Backpack’ to create and admin system on my website.
Laravel Relationships: Within a laravel model you can easily create relationships between the different data tables. This system makes the process of getting related data extremely easy. For example I made use of relationships to create a link between the sender_id column of the messages table and the ID column of the users table. This meant that when I get a certain message I can also get the details of the account used to send the message.
Command Line SSH: SSH (Secure Shell) is a way of remotely connecting to a server through terminal or similar command lines. I made use of this connection protocol in order to run my web apps setup commands such as ‘php artisan migrate’, which automatically creates the web apps database tables based on the migration schemas.
Development
Project Box to Creanu - New Branding and Design
This section is dedicated to the redesign of the platform, working with designer Cain Mackenzie-Yapa, I wanted to incorporate a more polished and clean Brand/UI design that would be more appropriate and visually appealing to the intended audience of student designers and creatives.
The Brand
Name Change
One aspect of the rebrand included changing the name from Project Box to Creanu, I personally felt that project box was a bit too bland having been the name of the app in its simplest form --a random project generator--. The application was now much more than that, and I wanted a name that would be more appealing and inclusive to all the new features I was adding.
Taking inspiration from sites like Behance, I decided to name the application Creanu, which is a combination two Welsh(I’m From Wales) words that translate to create and share.
Logo
I decided to stick with the lightbulb logo as this is an icon commonly related to the birth of an idea or realisation, something that often fuels creativity and design. However to fit with the new visual appearance, Cain Cleaned up the original design by Jordan Harper, creating a smarter and more professional Icon and Text based combination logo.

Visual Appearance and Aethstetic
Inspiration for the visual appearance of the site comes from the popular social media website and application Instagram. Instagram has a very bland appearance using only a combination of black, white and greys to build up the UI. I personally find this helps to focus all attention on the user content.
Being a website focussed around visuals and design, I wanted to incorporate this style of UI within my web app in order to boost the visual effect of the content posted by users and draw attention to those aspects. This resulted in a one colour brand that is used only to highlight interactive aspects of the site, with all other colour being that posted by users.
The User Interface
Content And Layout
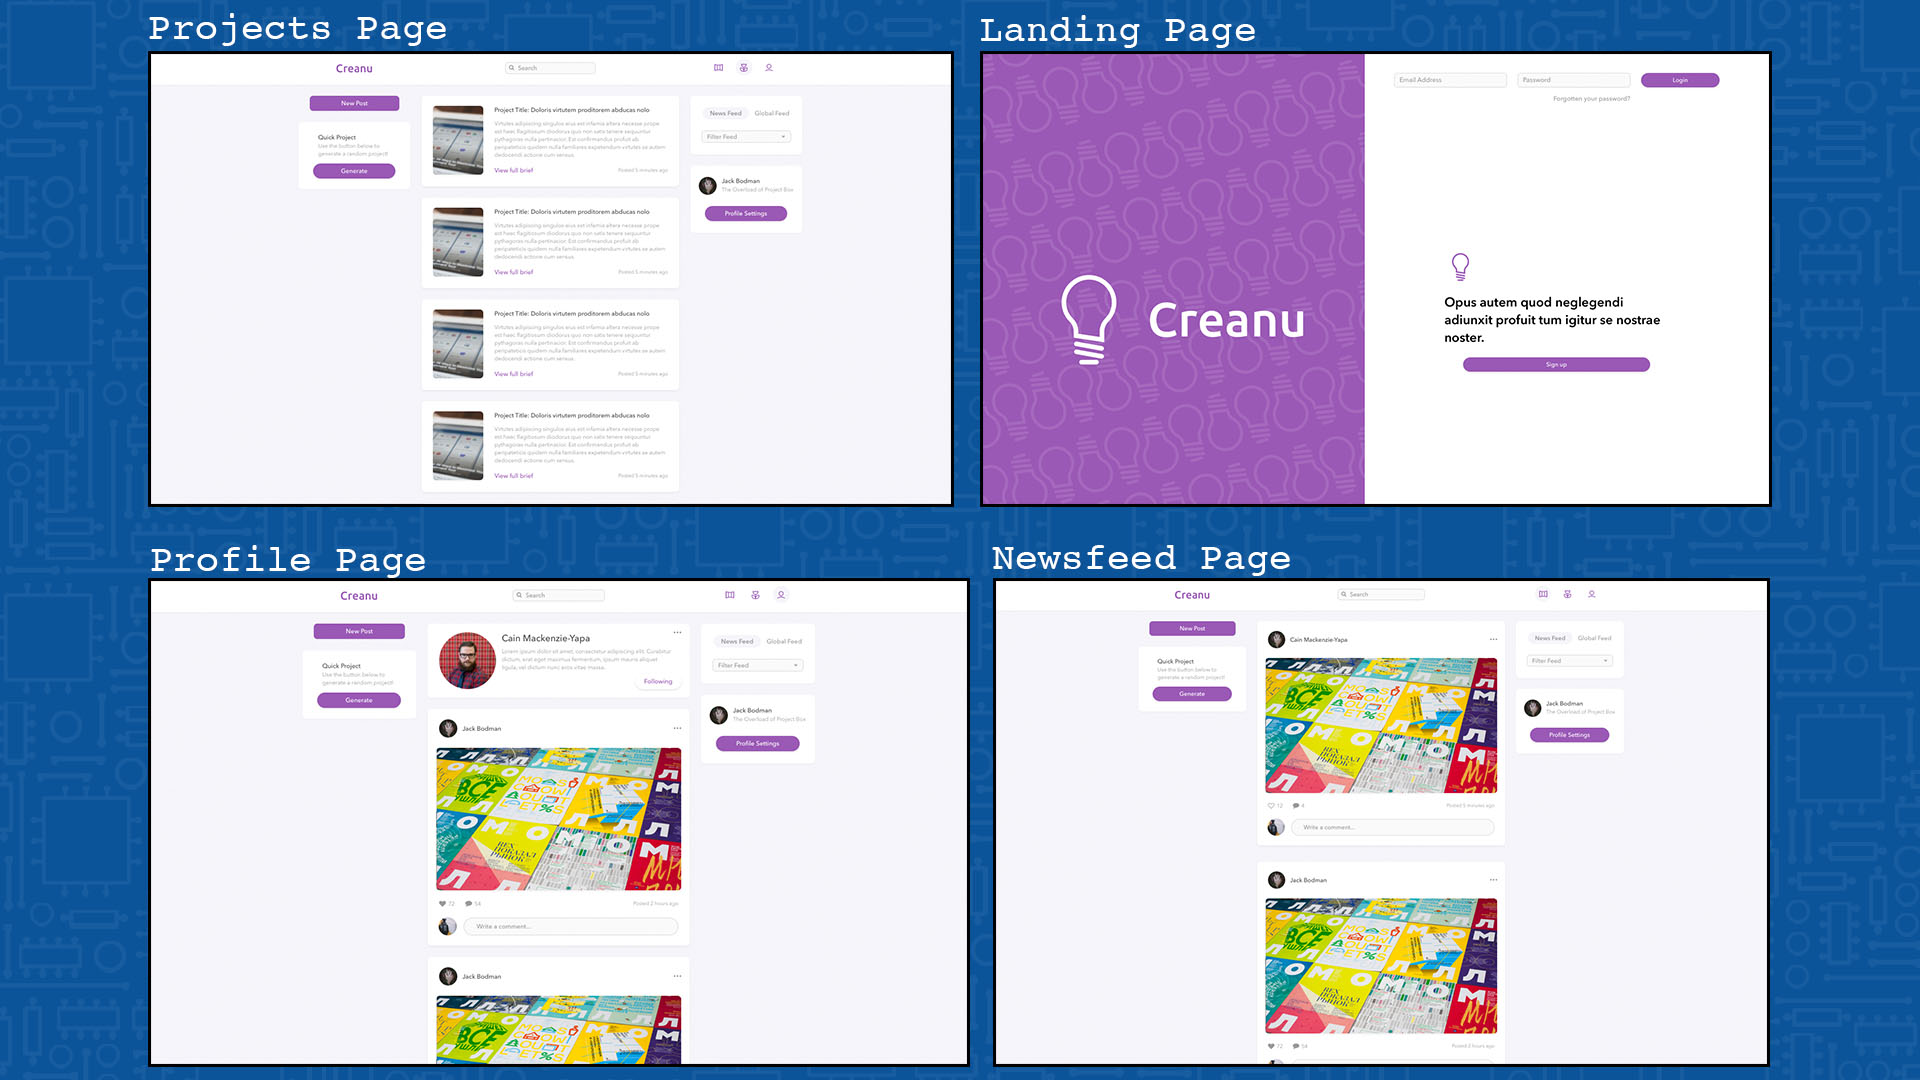
With a better idea of the features I would be adding, I worked with cain to create a simple but effective and intuitive user interface, the image below breaks down the key areas with in the new layout through a simple wireframe. This wireframe was given to Cain as a basic layout idea for him to work off of.
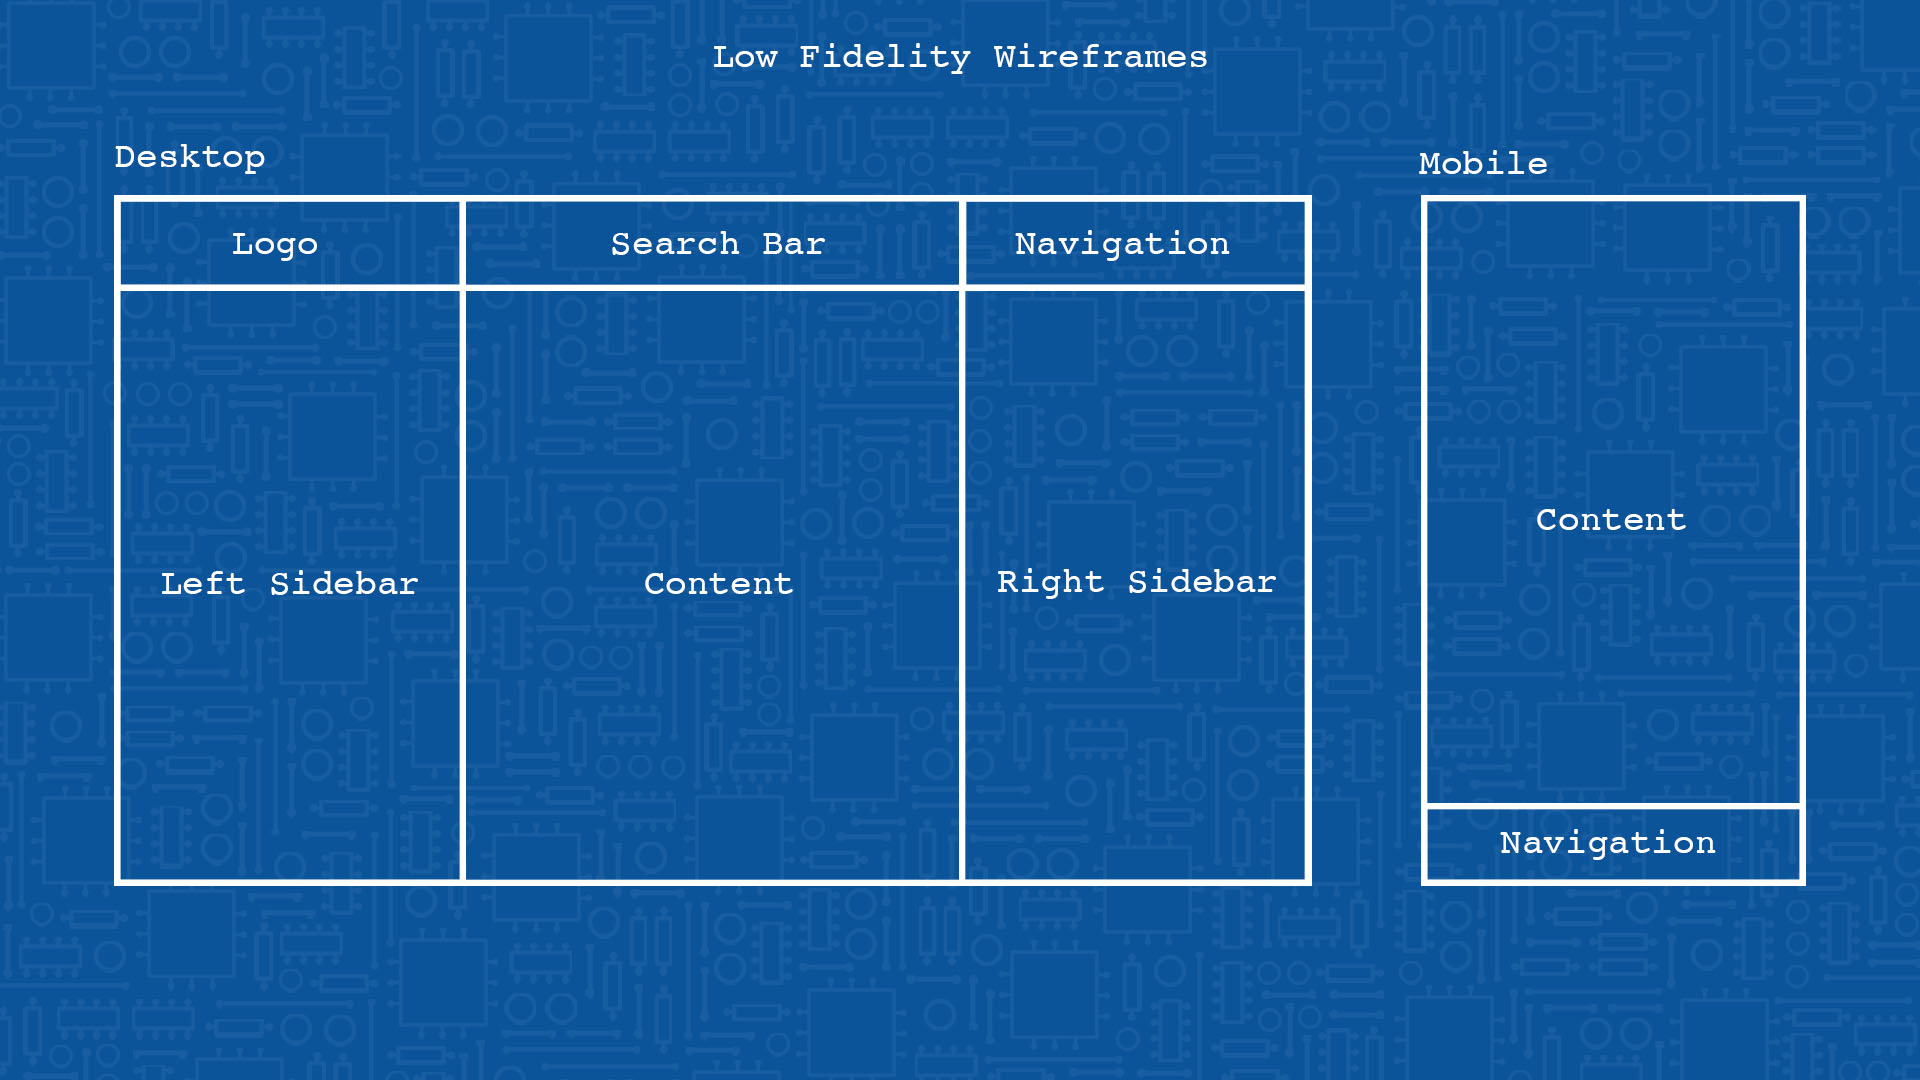
At the top of the page we have the Navigation bar, which holds a selection of universal features such as site navigation, site search bar, and the sites name.
On the left side of the app we have a selection of global features which can be accessed from anywhere on the site. The features added to this sidebar are some of the main features of the site such as the random project generator and create post functions. The idea to include global features, stems from an aspect of Twitters UI, in which a small floating button within the mobile app, allows users to make a tweet from any page of the application and prevents them from losing their place within the application.
On the right sidebar I decided to add the Logged in user info, which is common to have on many social media websites, as it gives the user instant verification of the account they are currently using regardless of what page they are on. This section also provides access to the profile settings, which allows the user to update their profile picture and biography. This is also where I decided to keep the logout button in order to make it accessible on all pages.
Below the user info section of the right sidebar is an area reserved for page specific functions, such as the filter posts by category function that can be found on the global feed.
Finally located dead centre between the sidebars is the area for each pages main content. This follows common and expected standards of most social media websites. The image below shows some of the main page designs completed by Cain.
Building Features - Main Development
Finishing the Like/Unlike System
At the end of semester one I had began Implementing a like post function but was unable to complete it due to time restrictions.
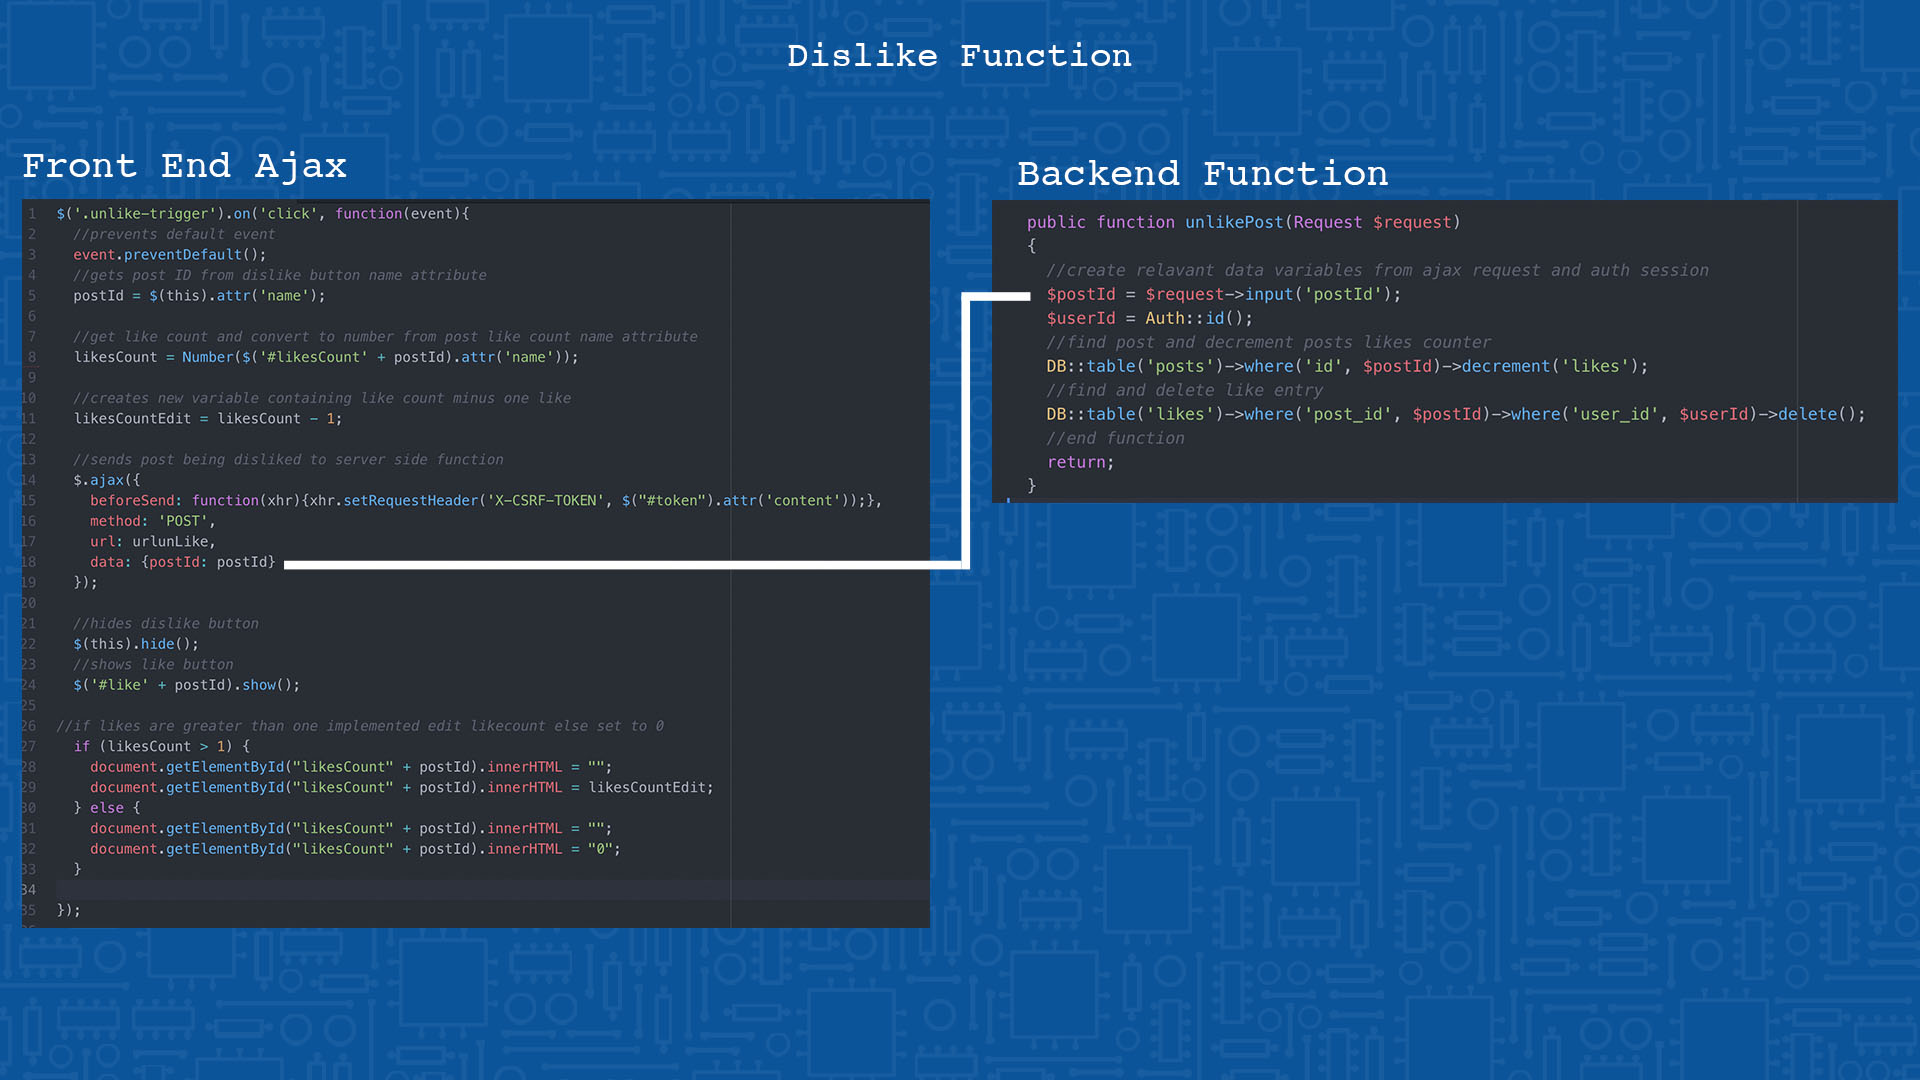
Returning to the project I began by completing this system through the implementation of an unlike function using an ajax post request similar to that of the like function, when the like button is clicked the javascript retrieves the relevant post information and sends it through to a backend unlike function located within the Posts Controller file. Within this function we search the database Posts table for the relevant post and decrement it's overall like count. Next we find the record created when the user liked the post and delete it from the database.
While working on the dislike function I added some additional Javascript frontend manipulation that helps to indicate to the user that their like has been sent through. This involved (in the case of pressing the like button for example) hiding the like button and replacing it with the unlike button and also incrementing the front ends like count. The opposite of this function was then implemented to activate when the dislike button is clicked. Below I have included the code related to this function and the comments explaining its different aspects and purpose.
Commenting
Having just completed the likes ajax function I began implementing the comments feature as this also made use of the ajax post request. The creation of this function required the set up of a new database, and model.
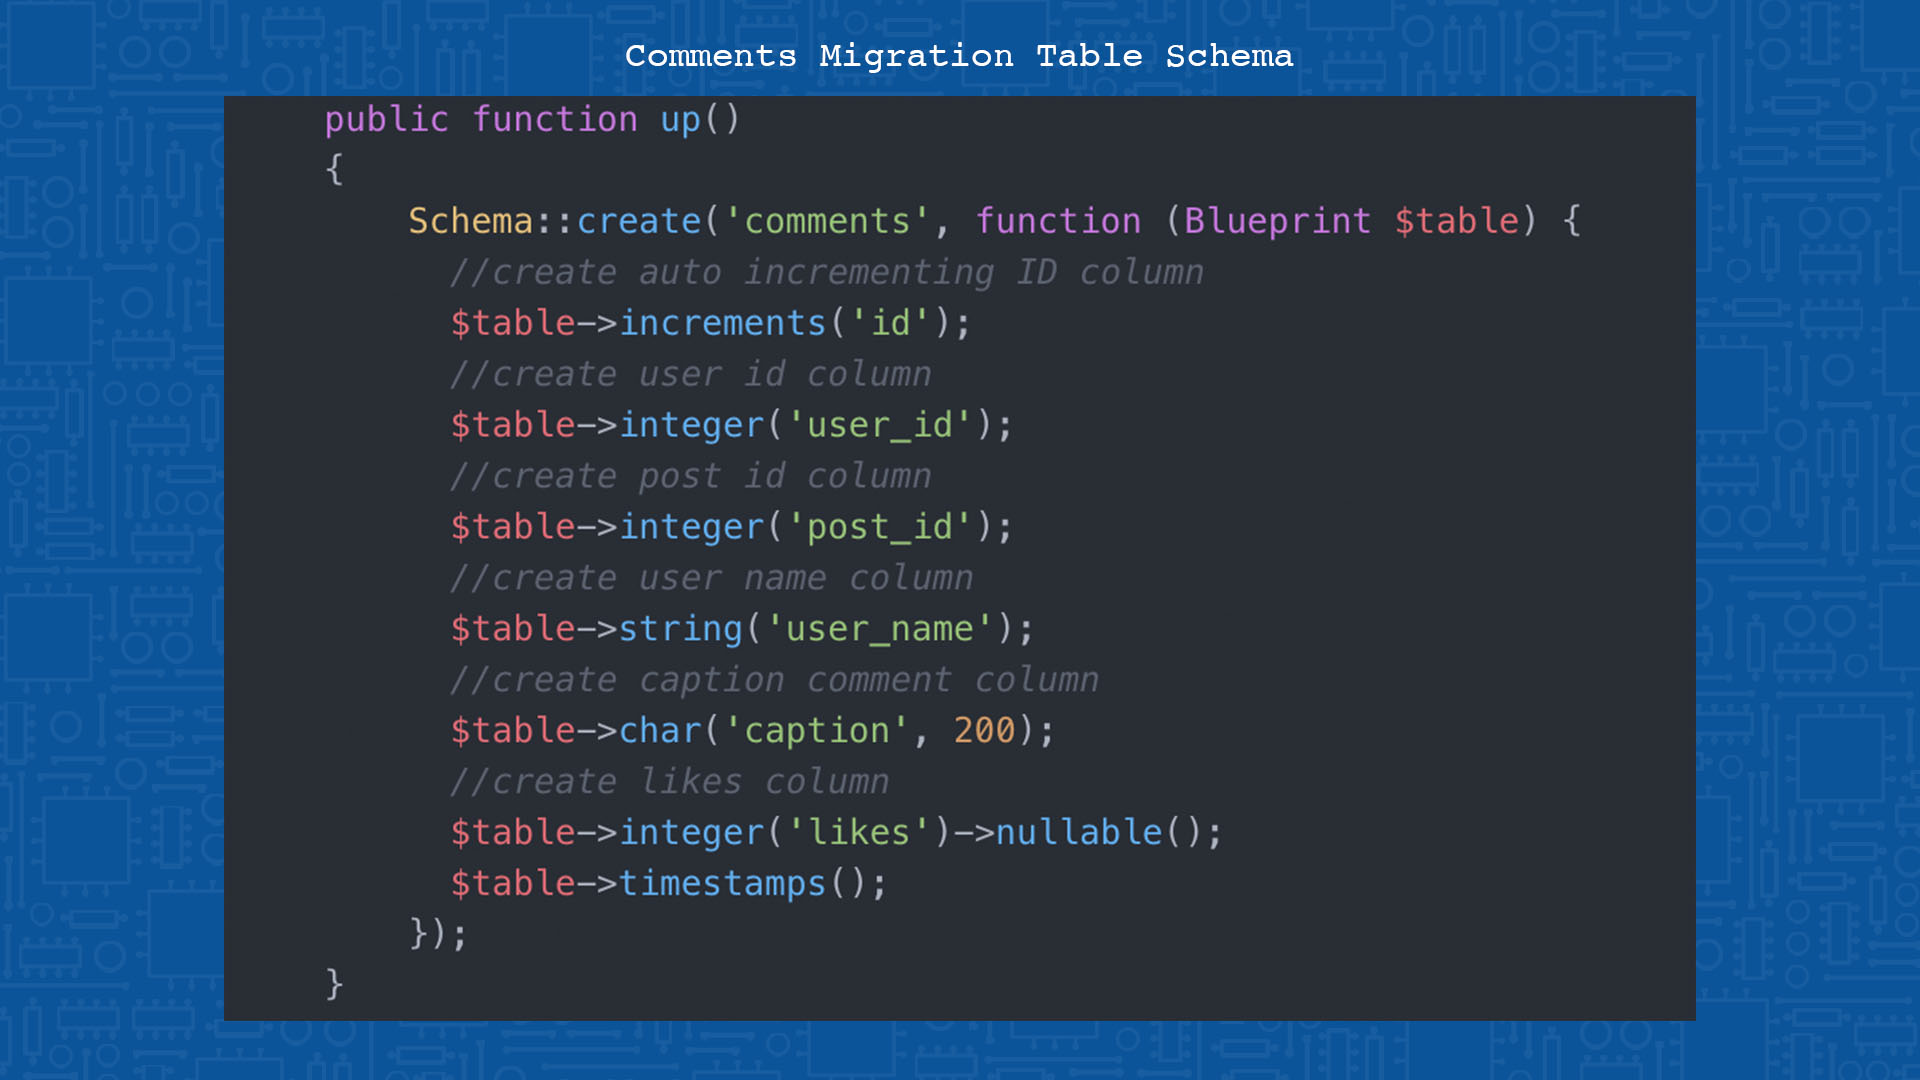
Database Migration: The file below is used to create a comments table within the database when a migration is ran. The first line creates an auto incrementing Id which can be used to identify individual comments. The next two lines creates columns used to store the Id of the user who likes the post and the id of the post that the user has liked. Finally we have the last four lines which create columns for displayable data such as the user who likes the posts name, their respective caption/comment, the timestamps of creation (Automatically required by laravel) and the comments likes count(though this feature was never implemented).
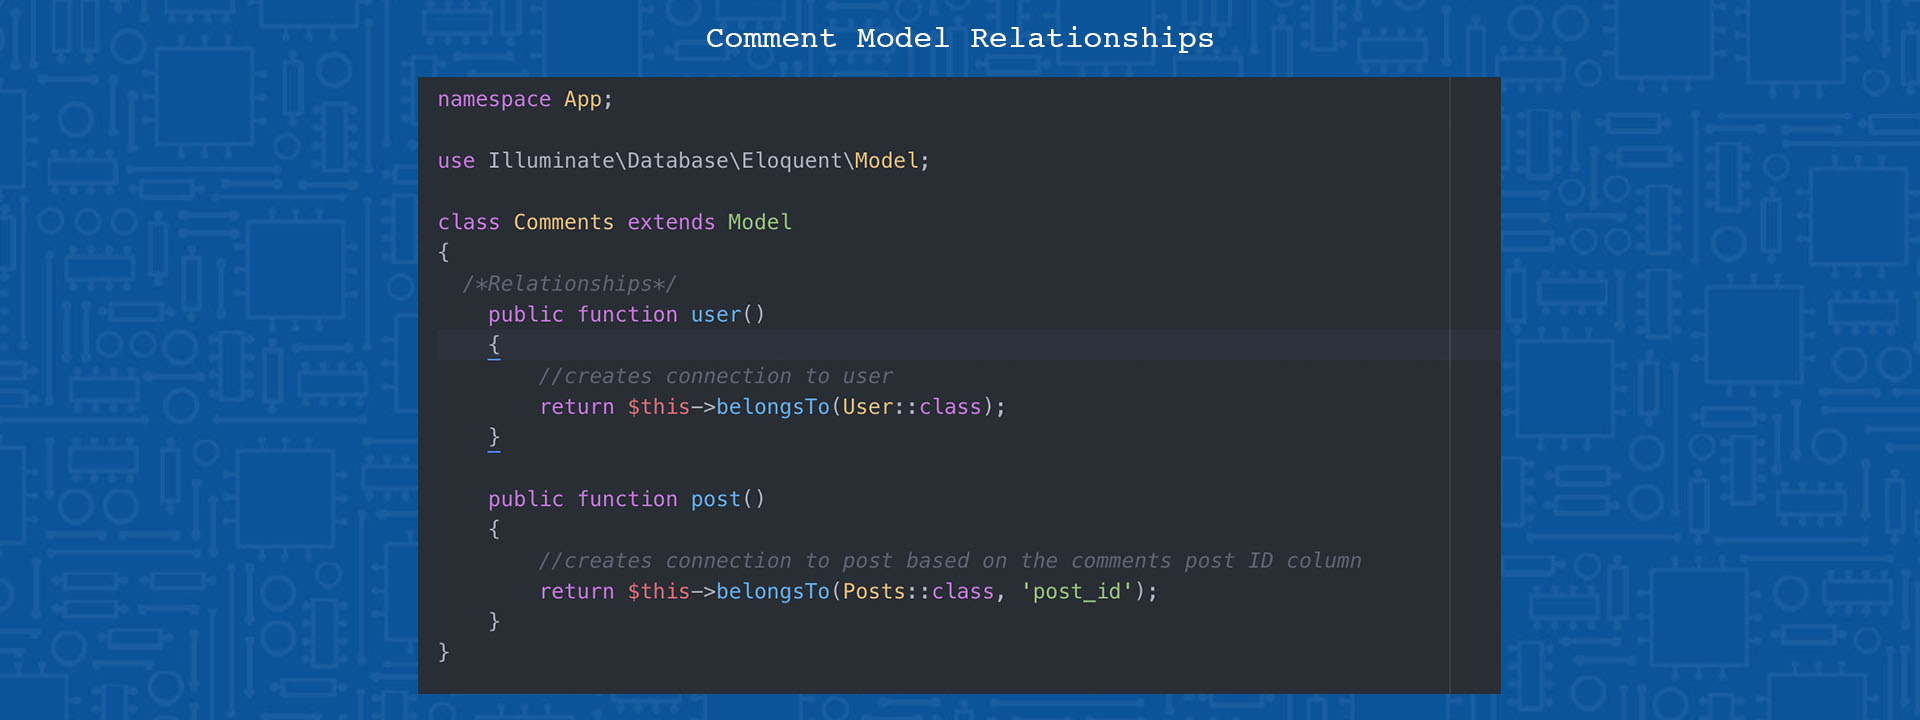
Comments Model: Within the comments model I created two relationships that link the comment to the user that created it and its respective parent post. These relationships make it much easier to get content/data that is related to one another but stored in different database tables.
The next files/functions are directly related to handling the creation and display of the comment, consisting of the comment ajax file, the create comment function, and changes made to the getting posts querys to include their related comments.
AJAX Comment File: The function within this file is triggered when the user clicks the comment button after filling in the comment input box. The function then collects the post id from the buttons name attribute and the receiver id (This is related to notifications and will be detailed later). The function then gets the value of the comment relevant input box. The collected data now being stored in Javascript variables is then added to an ajax array and sent through to the back end function.
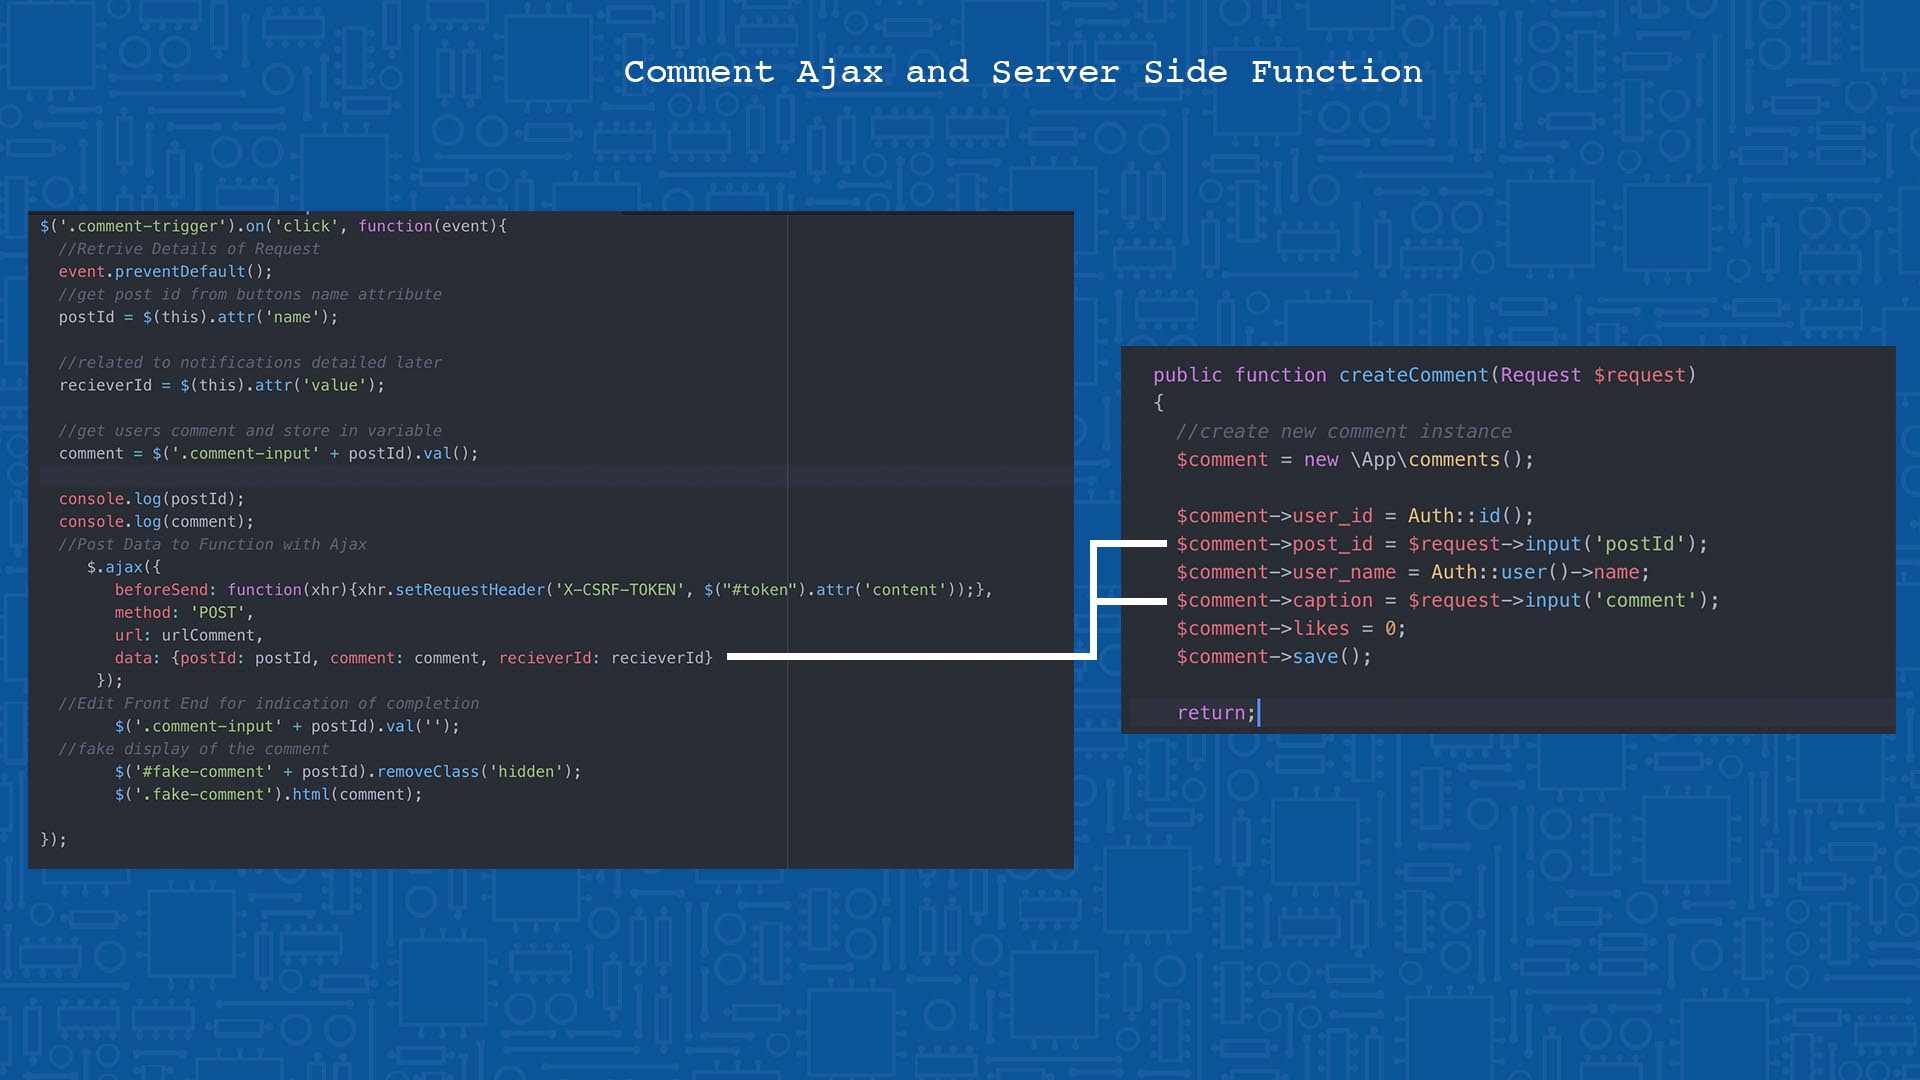
Once this ajax post is sent, I make use of more front end manipulation to indicate to the user that the comment went through. First the user input is reset to be empty, we then use a empty duplicate of the comment markup that is hidden by default, fill it with the users comment from the input and unhide it, to give the effect that it has been sent through and displayed.
Create Comment Function: Within the posts controller file is the create comment function to which the ajax data is sent via a post route set up in the web.php file. Within this function we first create a new comment instance and begin to insert the relevant data from the request and the auth session (for user data such as id and name) into the correct columns. We then save the entry in the database before using the return method to end the process.
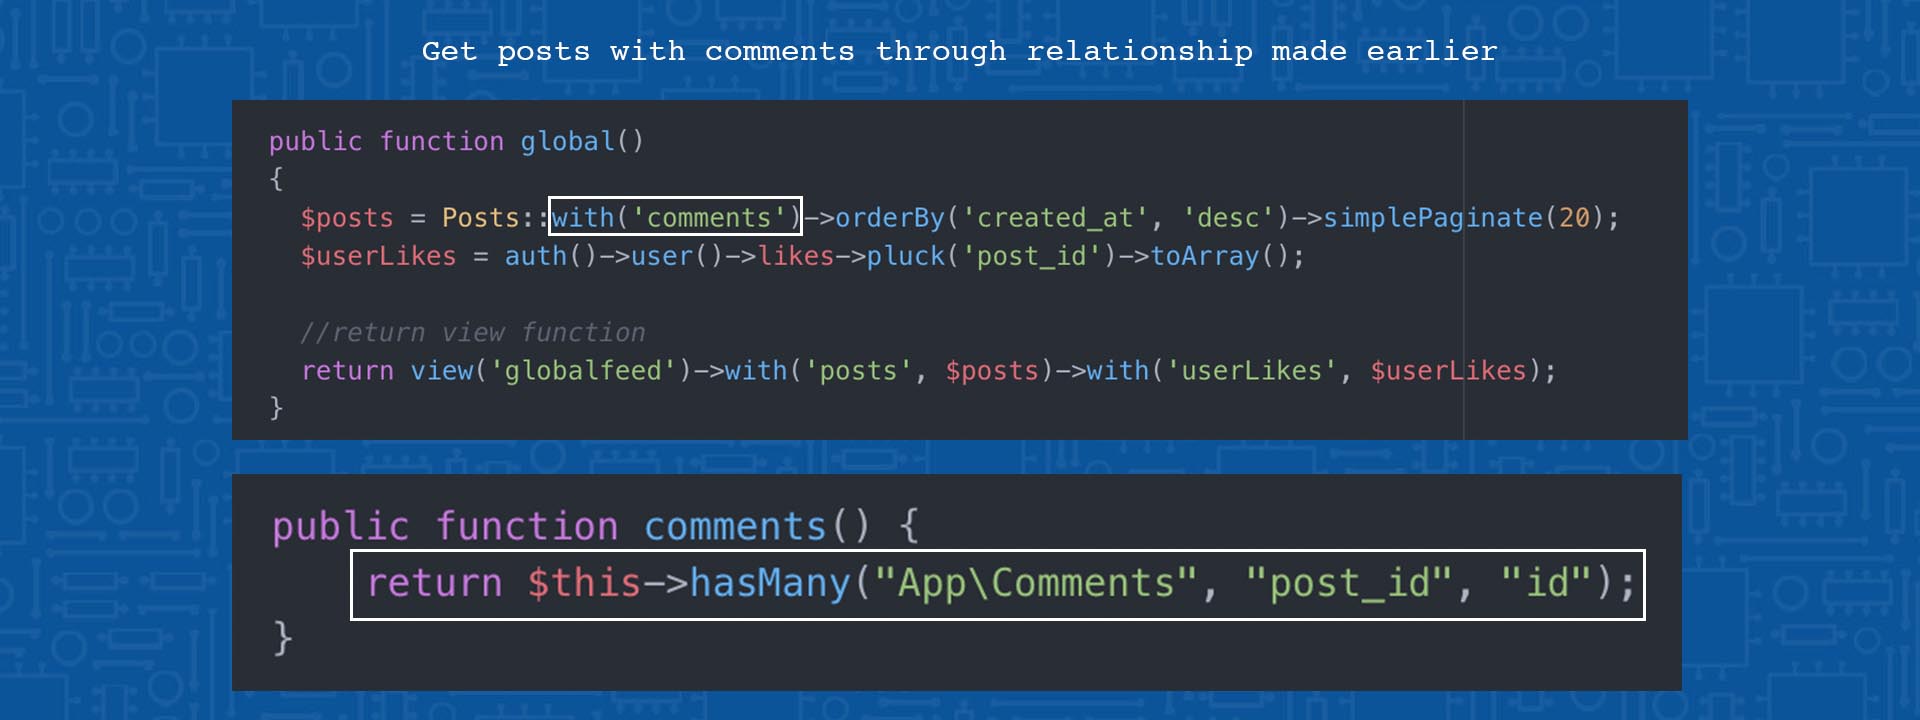
Displaying the comments for each post on the frontend involved first changing the get request within the different page loading functions. The following example is from the code related to getting and displaying the global feed. When getting the posts I added with comments method which is linked directly to the relationships set up previously. This 'with comments' code will create arrays within the posts array that get any comments where the comment’s post ID is the same as the posts ID.
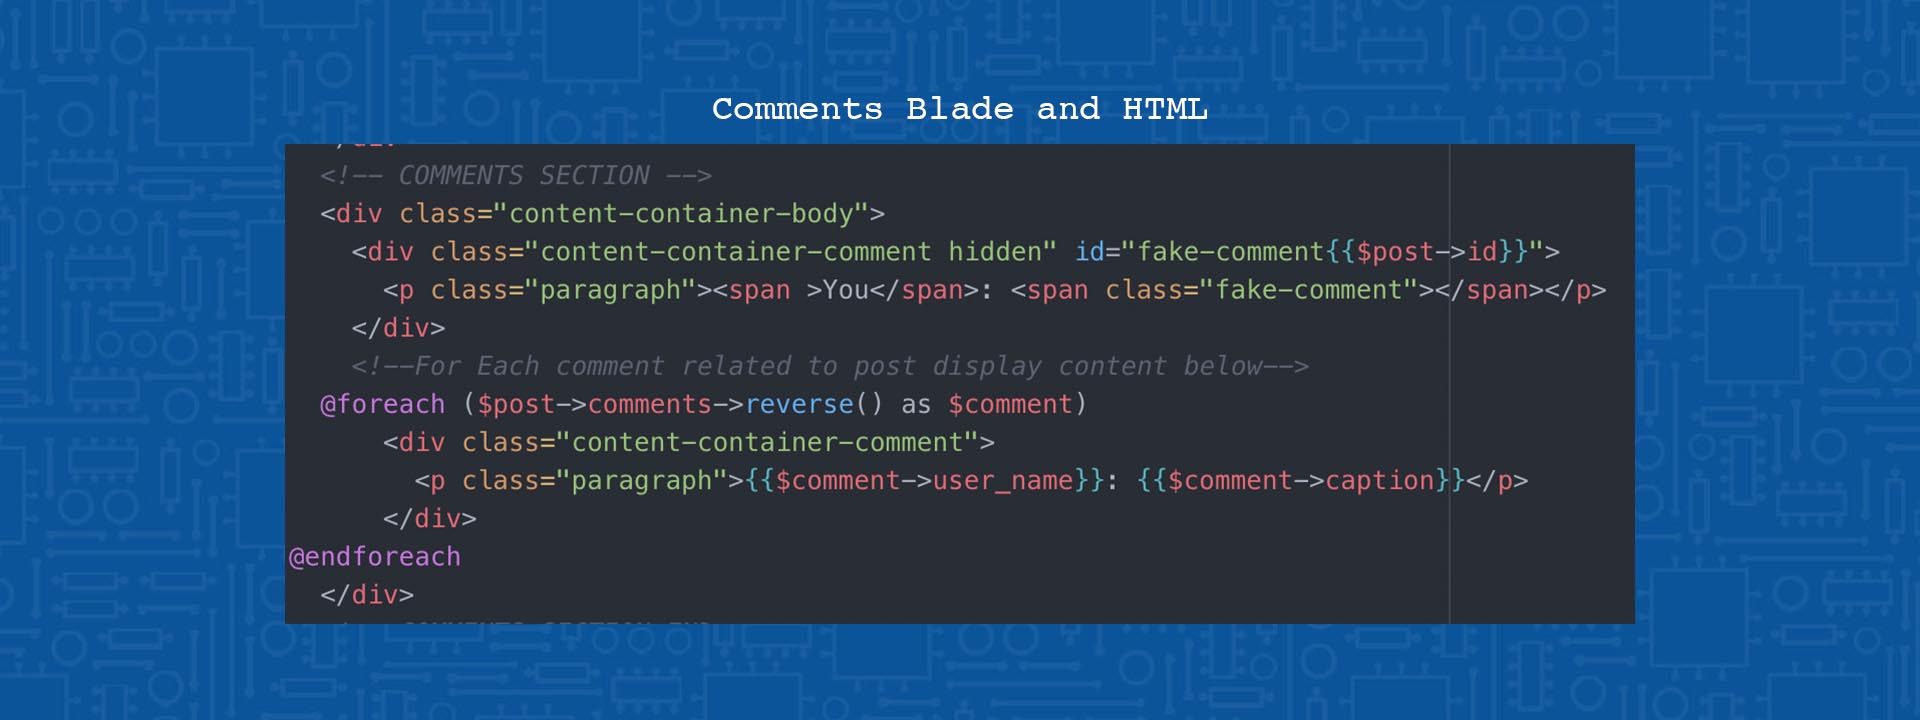
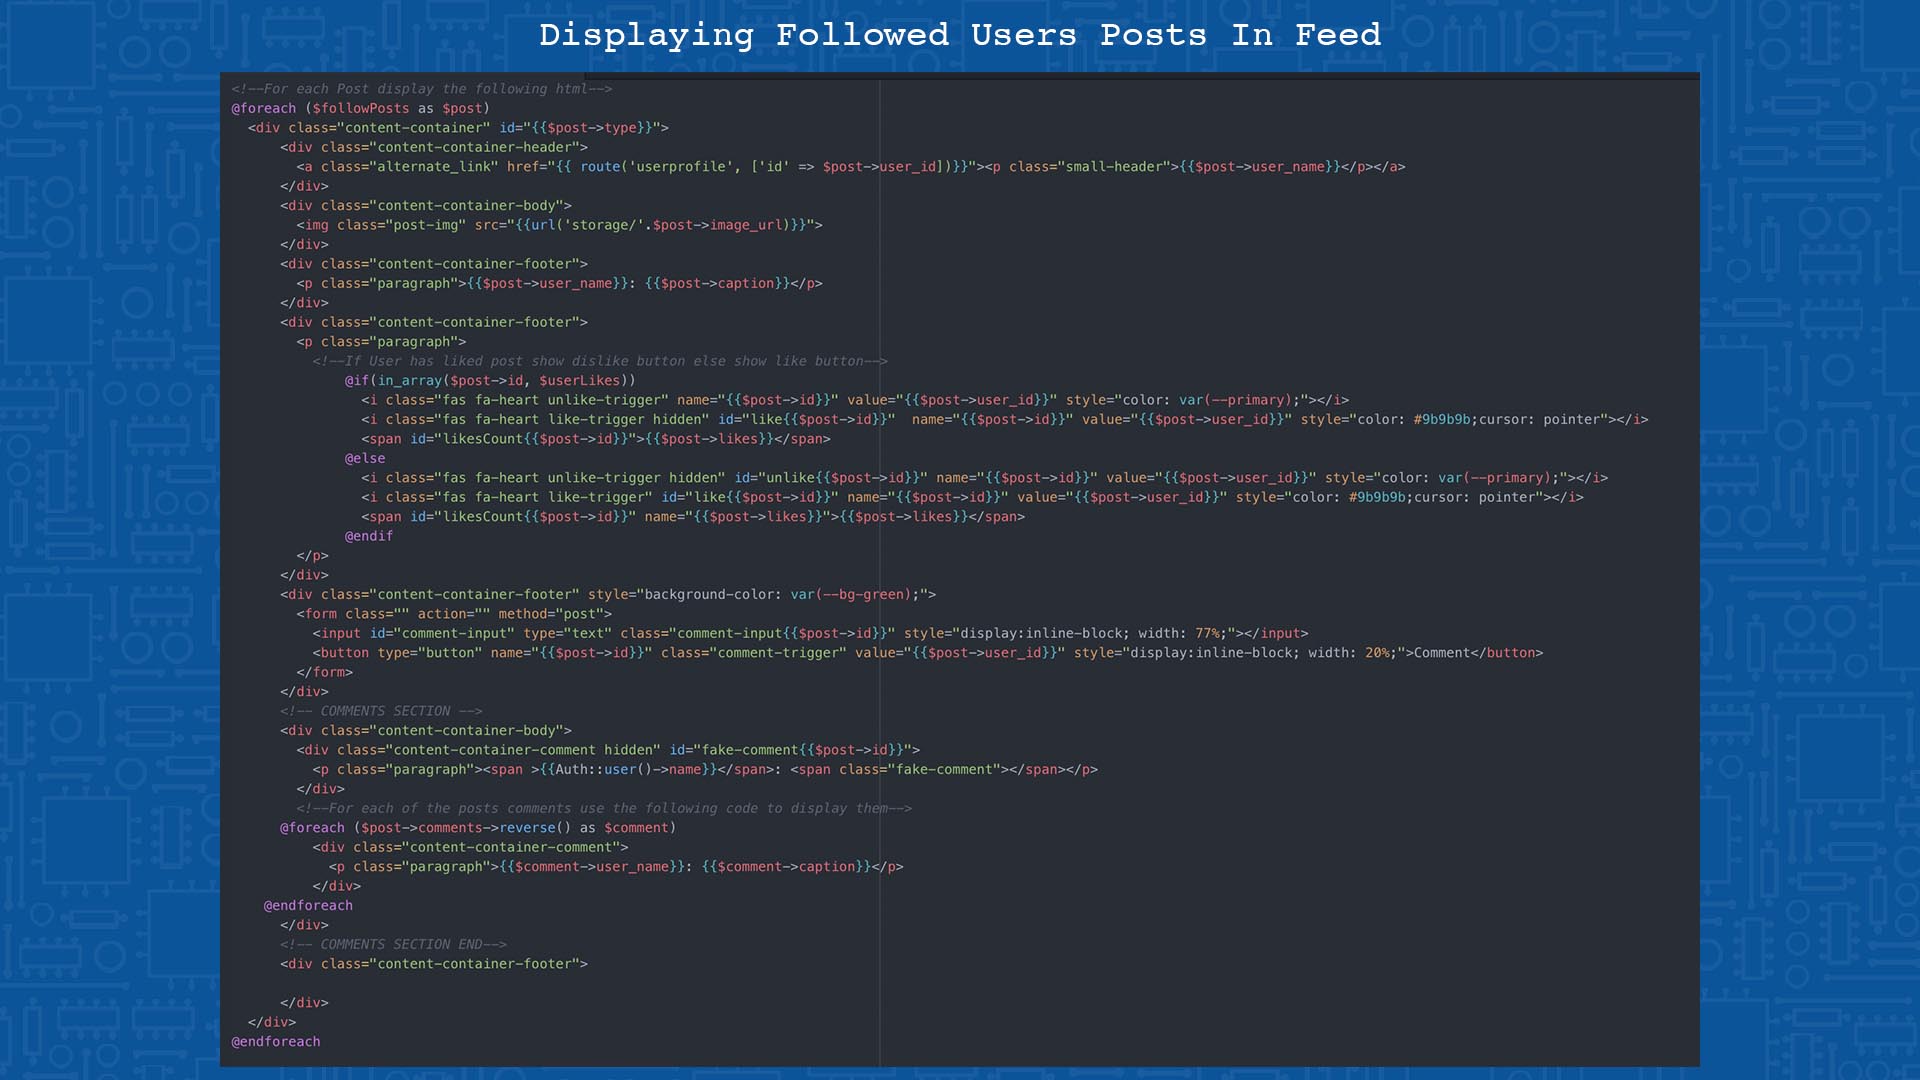
These arrays are then accessed on the frontend using laravel's blade templating. Nested within the foreach post loop is a foreach comment loop, that will loop through and display each of the comments linked to the parent post.
Validating Posts
With plans to launch the website by the end of year show, I needed to implement a few systems to reduce opportunities that could be used to break the website. The first of these was to add validation to the types of files that can be uploaded through the post form. Laravel comes with a simplified validation syntax making it incredibly easy to add limitations and produce relevant error messages.
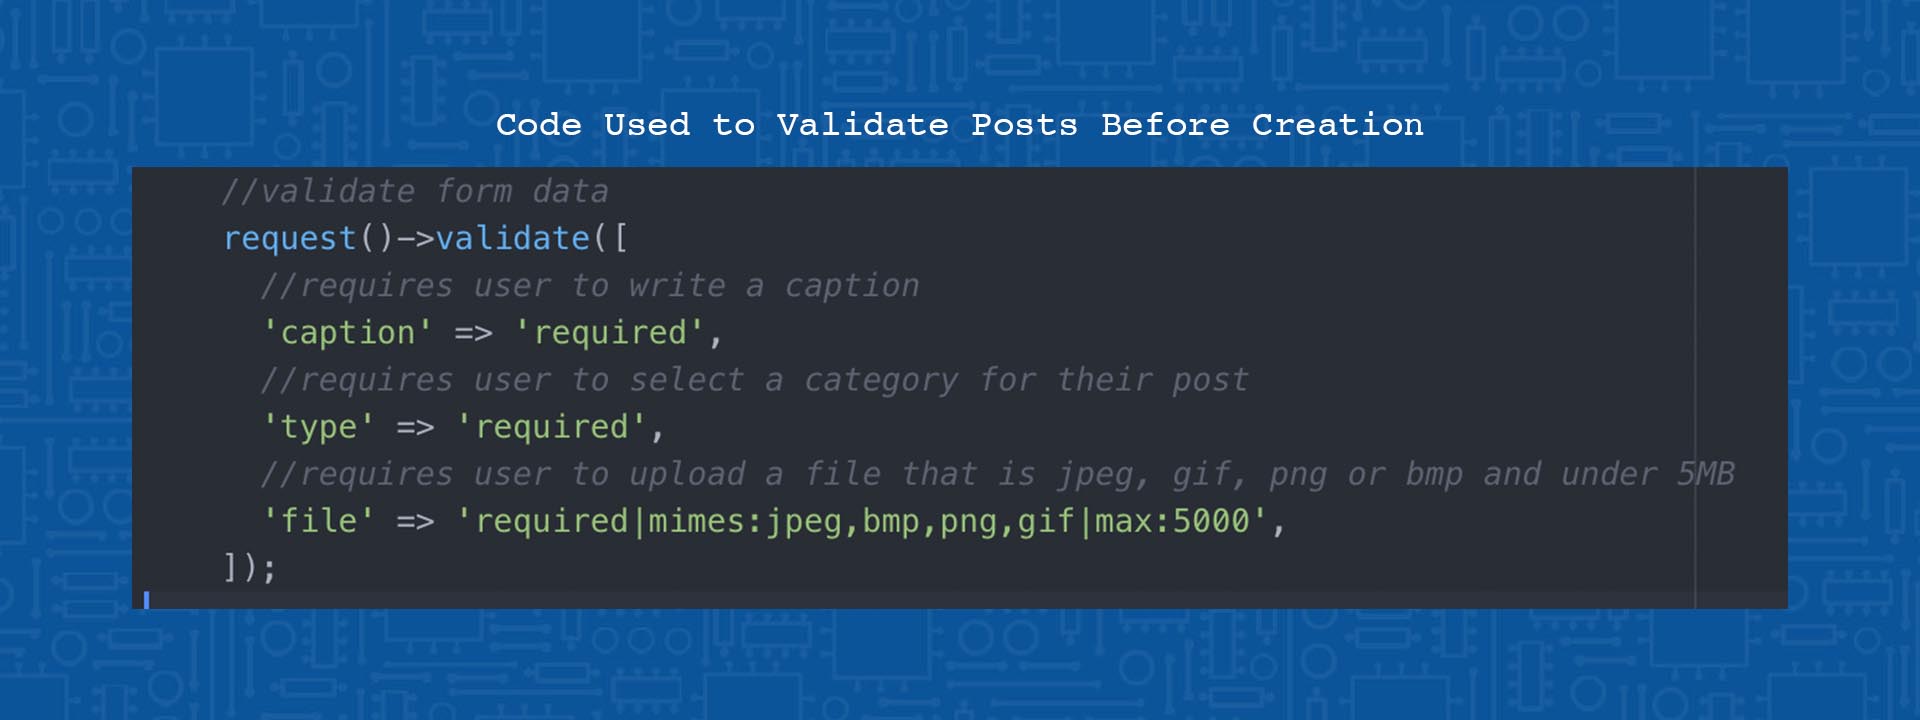
The section of code bellow is the validation of the posts upload system. The first two lines simply ensure that the caption and post type have been selected/completed. The final line is related to the file uploading and first ensures that a file has been uploaded using ‘required’, the next part limits the types of files that can be uploaded to image files such as jpeg, bmp, png, and gif. The final section is used to limit the the size of these files to 5MB which will prevent the users from uploading extremely large files that take longer to load and could essentially break the website.
Displaying Errors
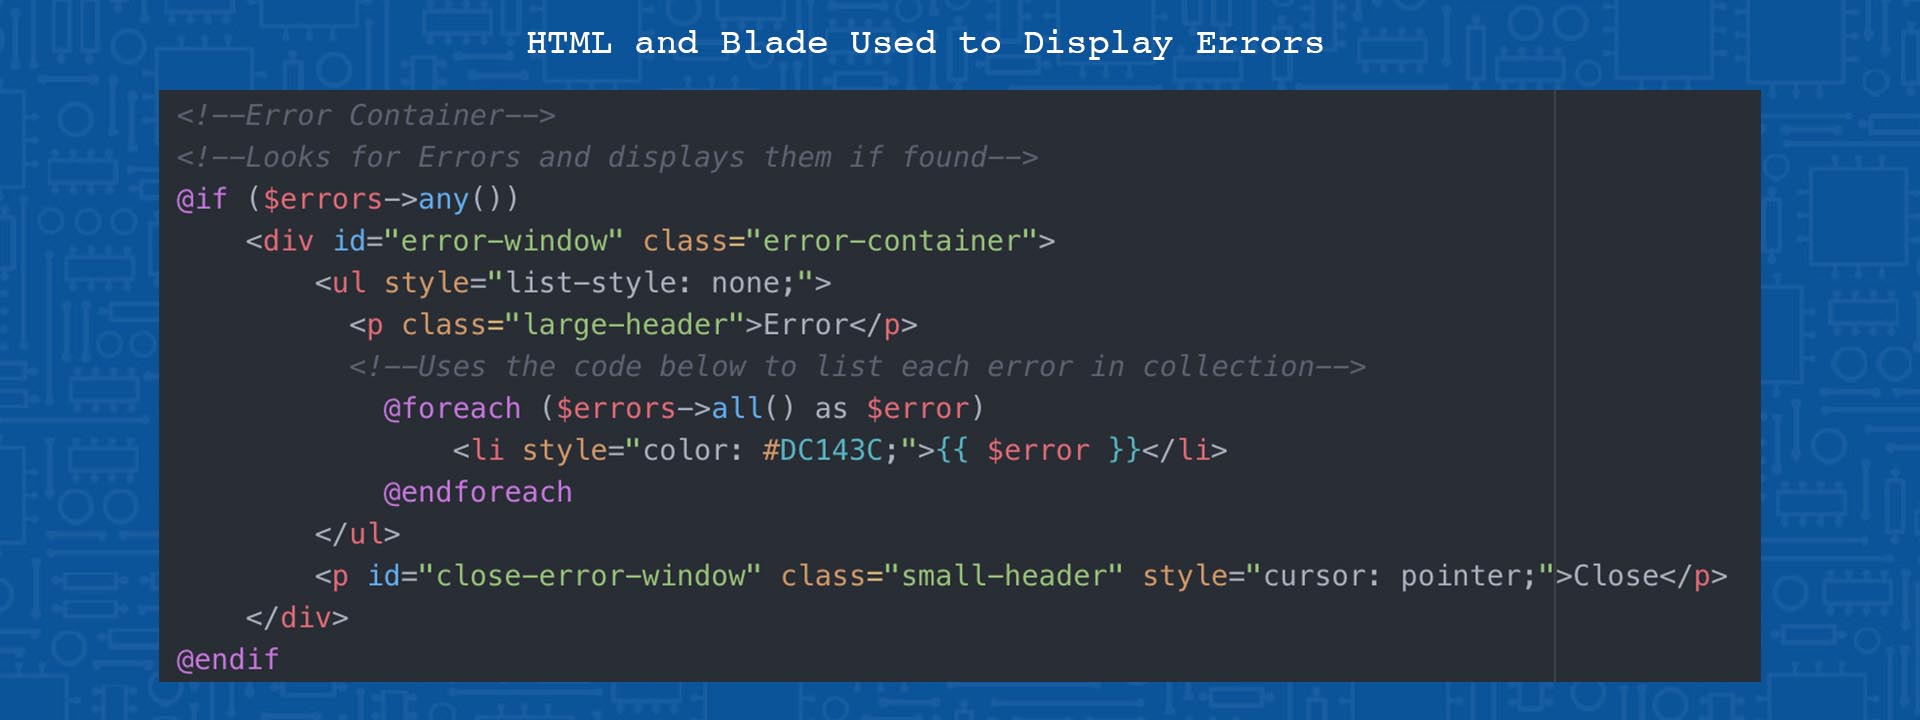
As stated earlier the laravel validation comes with automatic error generation. In the case of an error related to validation the function is automatically stopped and returns the user to the previous destination with a collection of errors. To display these, I created a section within the applications layouts that first uses a blade if statement to check for any errors that may have been passed to the view. In the case that they are found, the page will load some markup that creates a small window that floats at the bottom of the page, inside this container is a for each loop that loops through and displays the errors passed within the collection.
Followers, Following and Multiple News Feeds
The creation of the followers/following and multiple news feeds system was probably one of the larger features I decided to include within my web application. To begin creating this I first needed to set up a new database migration, new model, and new controller. The implementation also came with a series of additional features detailed in the next section.
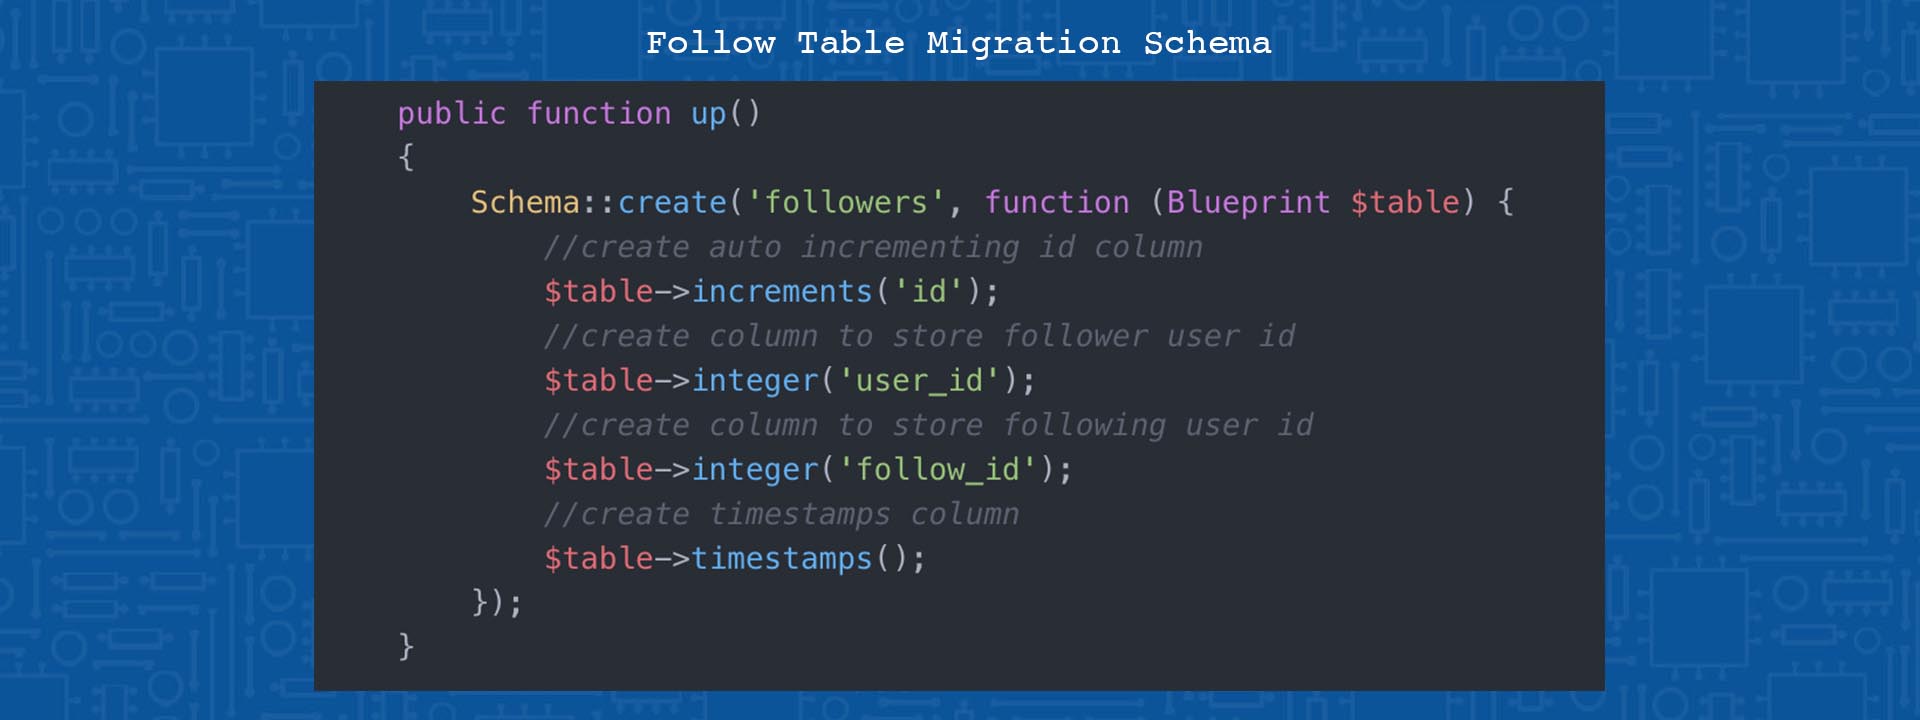
Migration File: The migration and database table structure for the followers system is relatively simple: The first line creates an auto incrementing ID column that can be used to identify and remove certain follow records in the case of an unfollow. The next two columns are for the users involved within the record. The User ID column stores the ID of the user who created the record, or the ‘follower’ for example. The follow ID column stores the ID of the user who is being followed.
Followers Model: Within the new followers and old user model I created a relationship that links the follow instances to users, and the users to the respective followers.

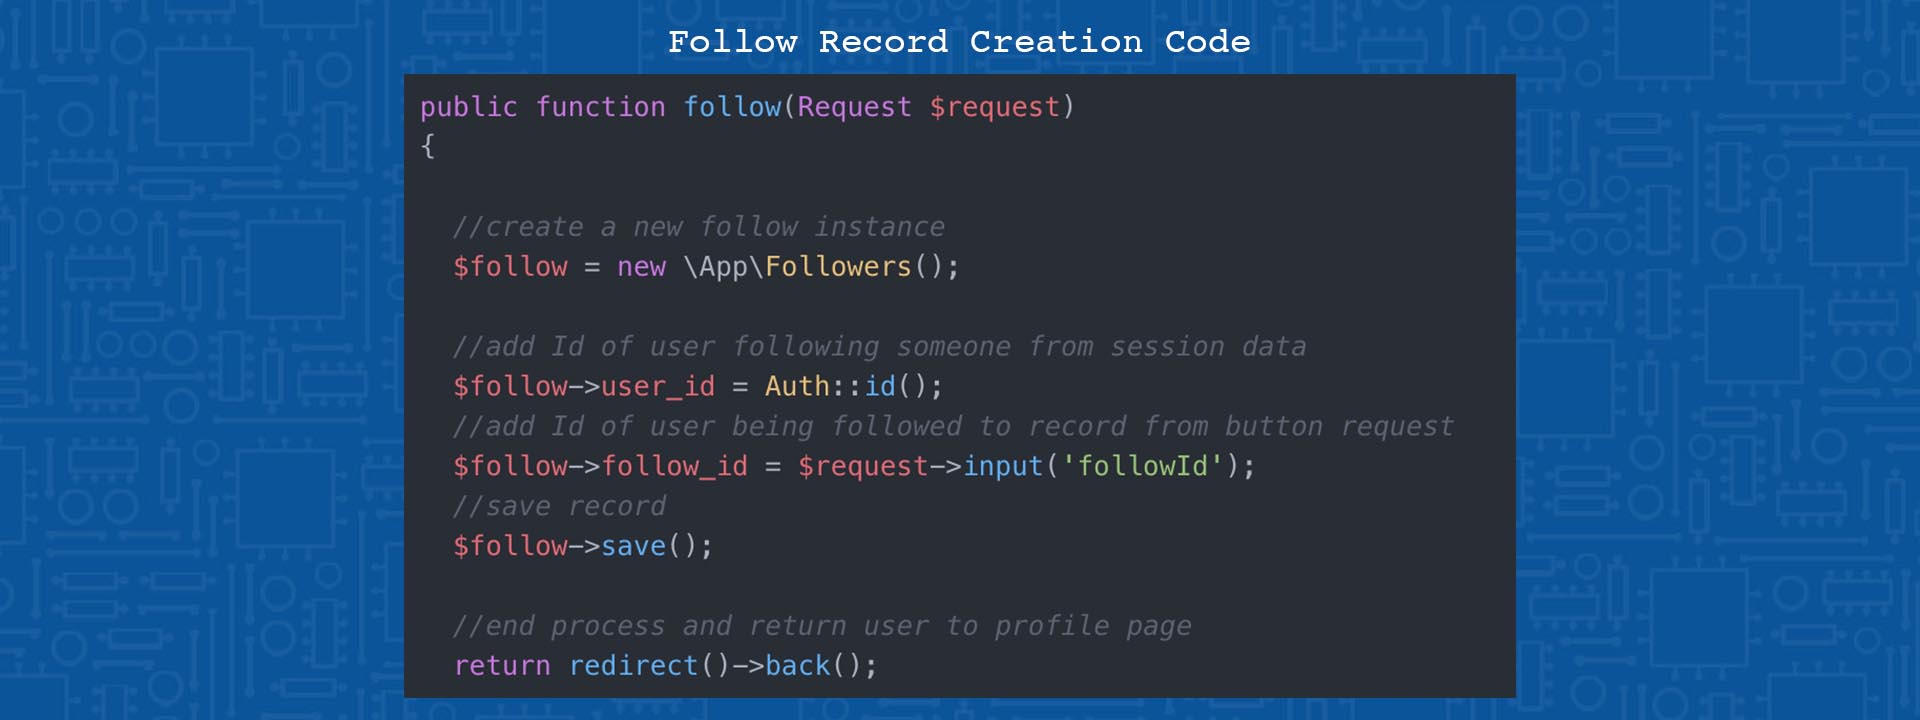
Follow Controller: The follow controller contains the two functions related to the creation (follow) and deletion (unfollow) of the data records in the following system. When the user activates the follow function, the code first creates a new follow instance, in this case only two bits of data need to be inserted into the record. The first is the user ID which is retrieved from the auth session, the second is the ID of the account they want to follow. Which is retrieved through a post method from that users profile page. Once this data is added the recorded is saved, automatically filling the ID and timestamps.
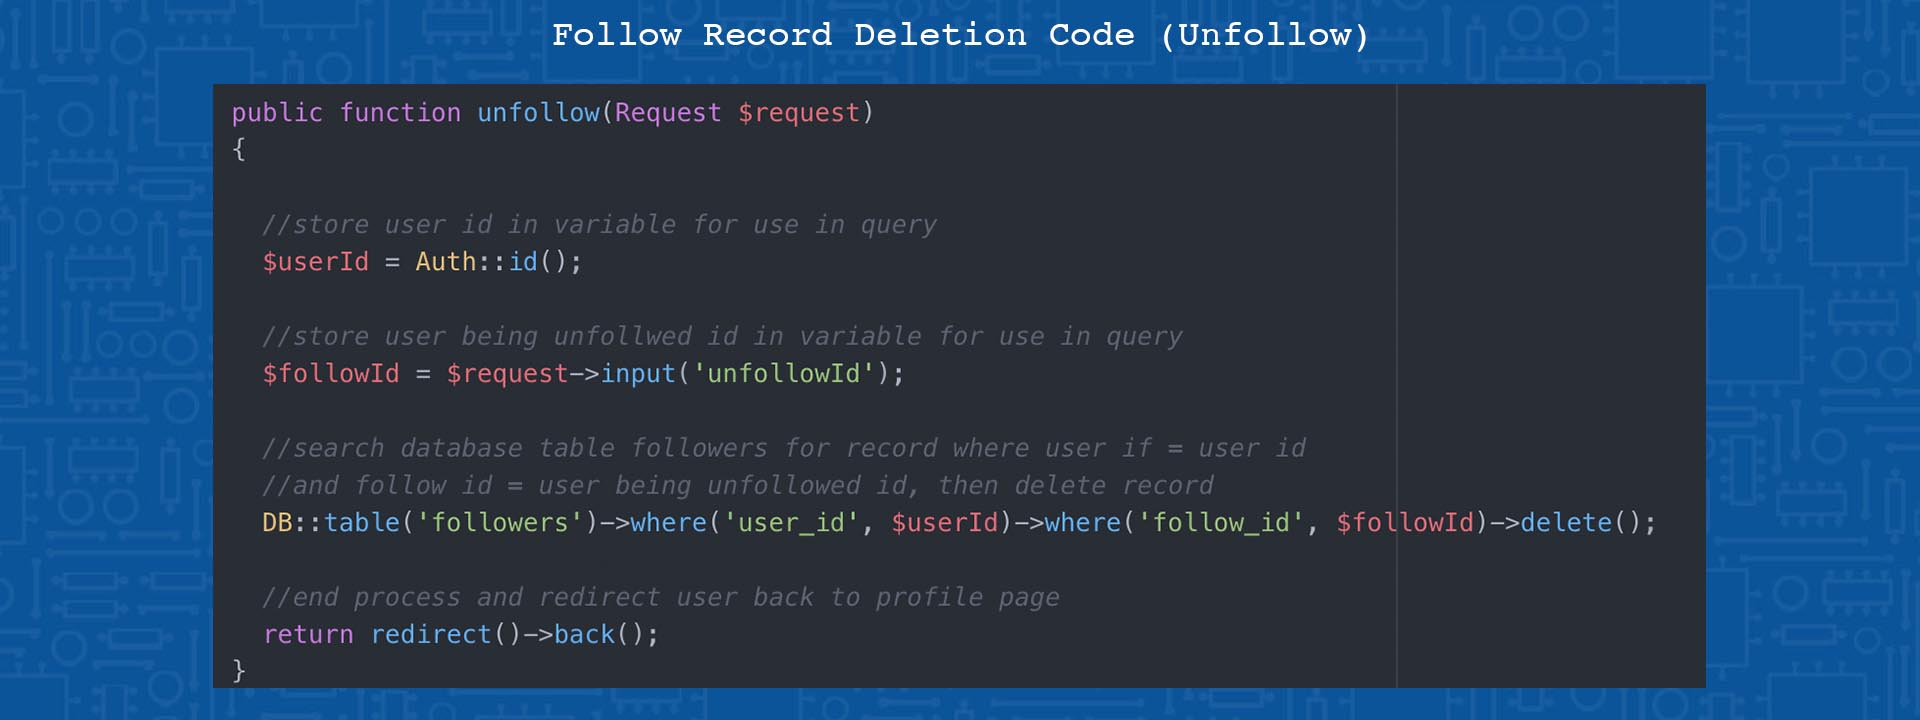
The unfollow function works using the same data (auth user ID and follow ID), to find the record related to that follow instance within the database and remove it.
With a follow system in place I then needed to create the news feeds that make use of this system. Like sites such as instagram, I wanted to include a following feed that shows the posts by people the user has chosen to follow and a global feed that would show all posts on the site allowing the users to discover others and share to a wider audience.
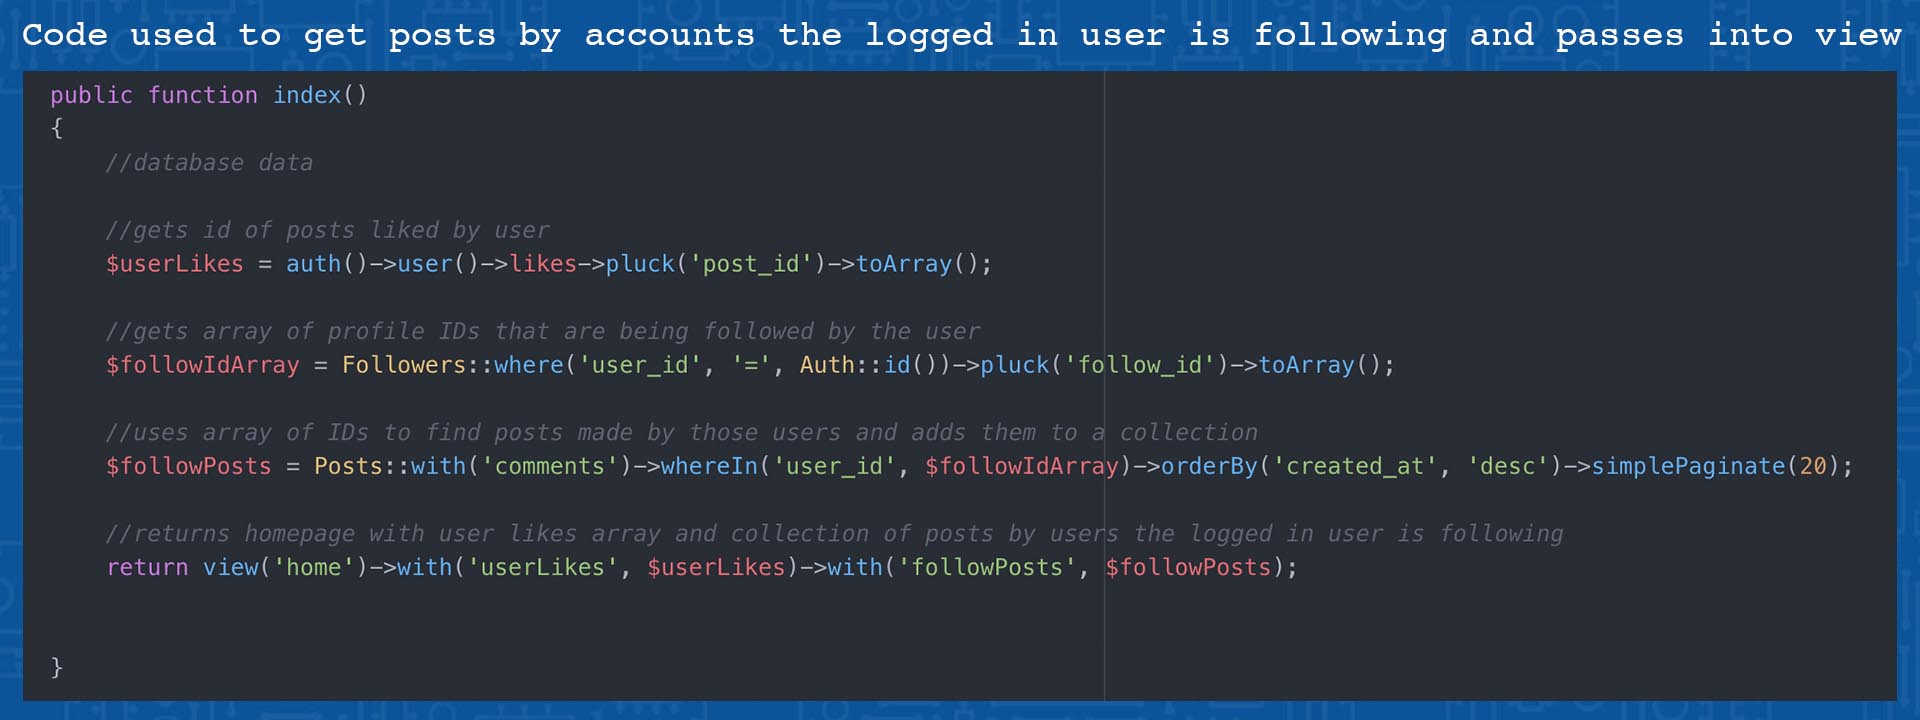
Focusing on the following system I had to first search the followers table and and gather all the follow IDs, where the user ID matched the auth session ID and contain them within an array. This array of IDs is then used to get all the posts where the creator ID matches an ID in the array. The result of this query is a collection of the posts created by the users that the logged in user is following. This is then loaded into the view in the same way as the other feeds with a foreach loop running through and displaying each post in the collection with it respective comments.
User Search, Profile Personalization, and Profile Pages
Having now created The follow system I needed a way for users to identify, discover, and interact with the other users.
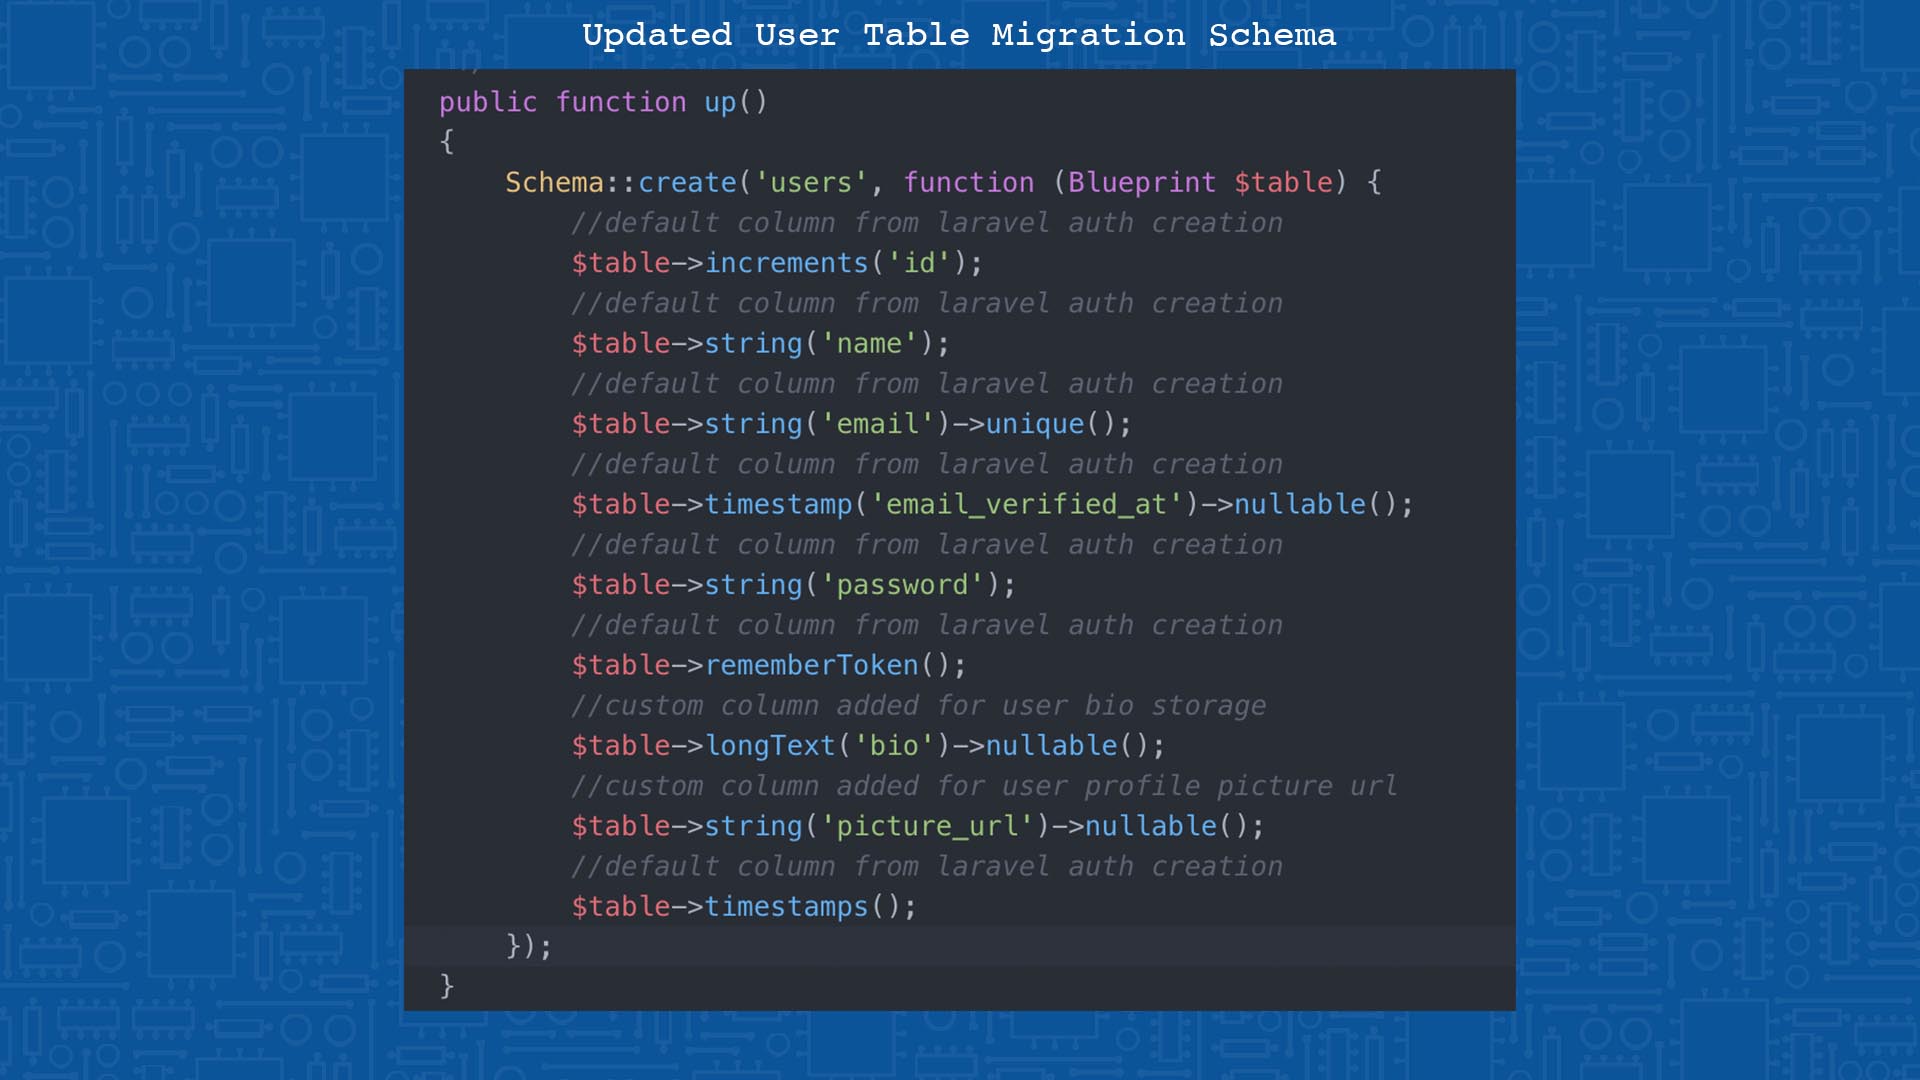
To do this I first added a feature that would allow users to personalize their profiles making them unique and discoverable. This took the form of a profile picture and biography option. To create this I first adapted the user migration to include table columns for the biography and profile picture url as shown below.
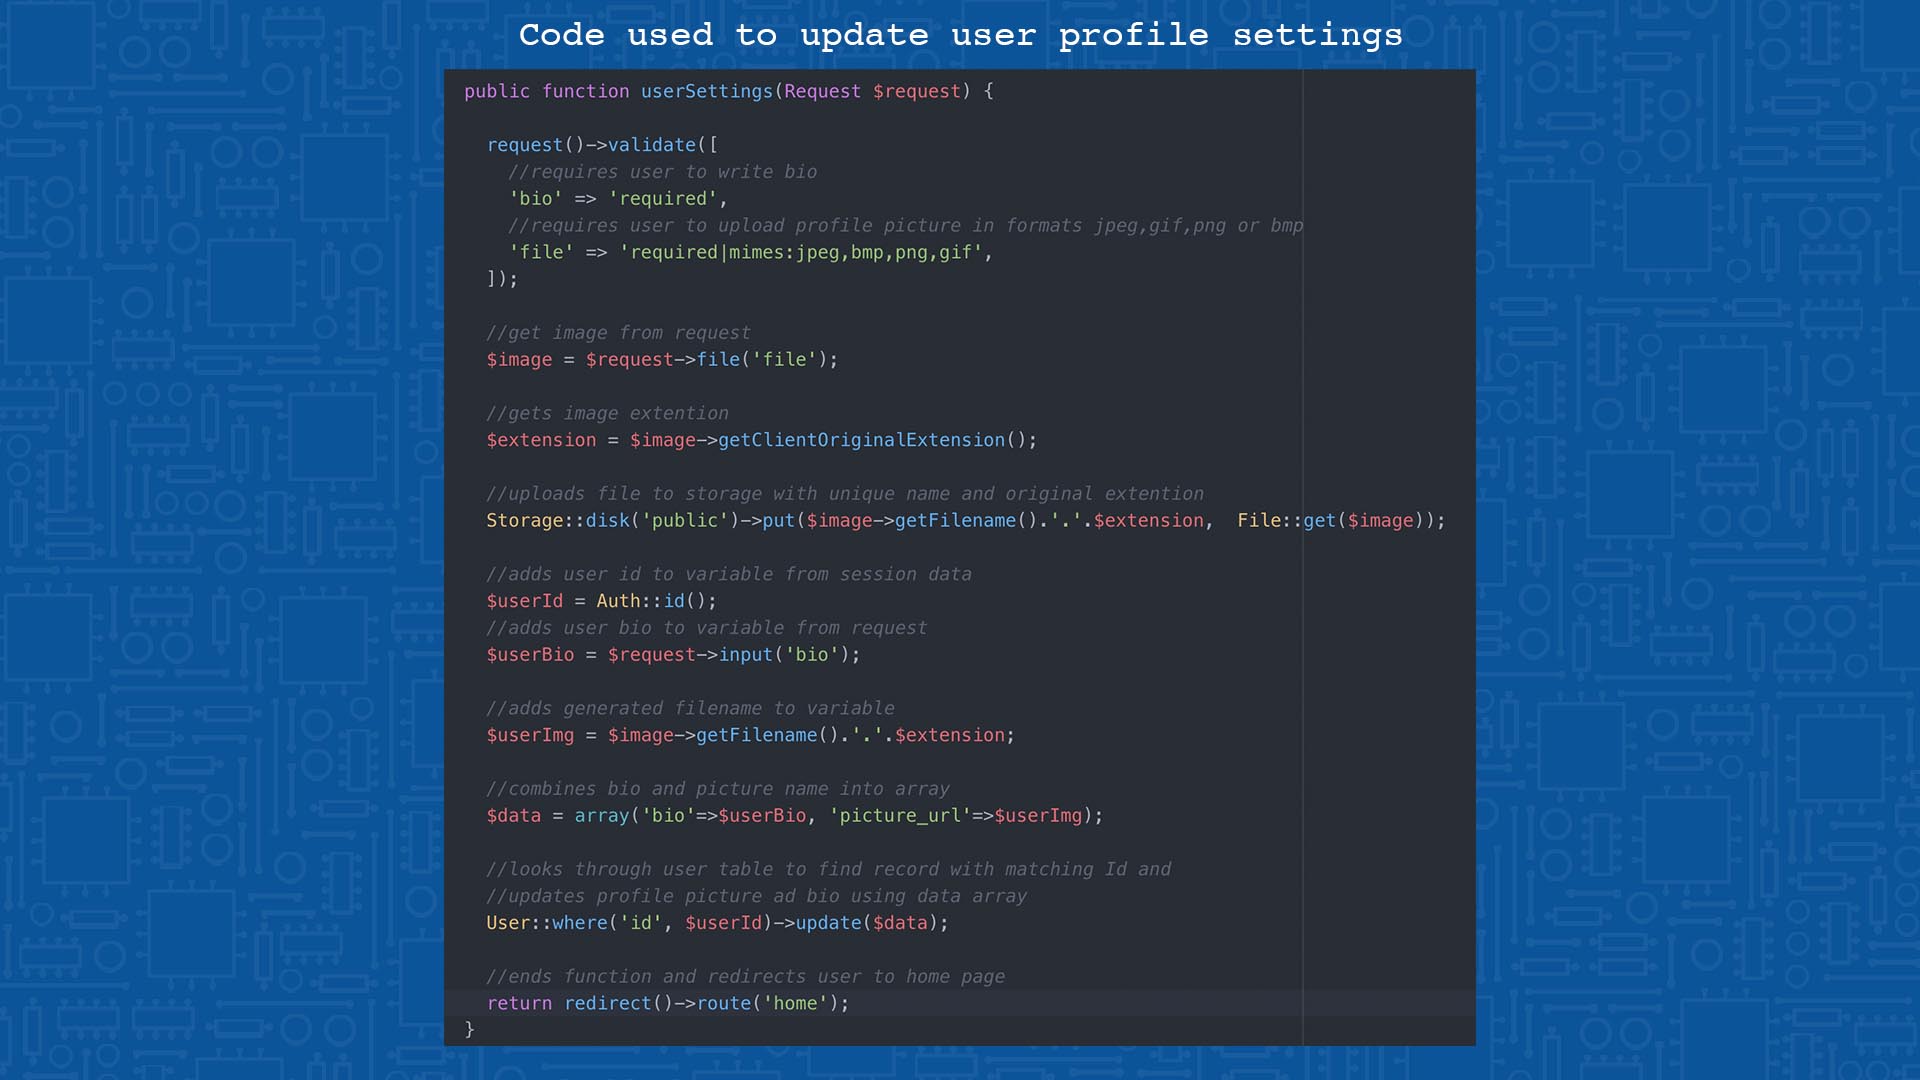
I next added the function that allows users to upload a profile picture and set their own bio. The code below works in a similar way to the creation of a data record only rather than creating a new record it searches for an existing one, where the ID matches the auth session ID. The data from the request (file name and bio) is then stored in an array that is used to update the relevant columns within that record.
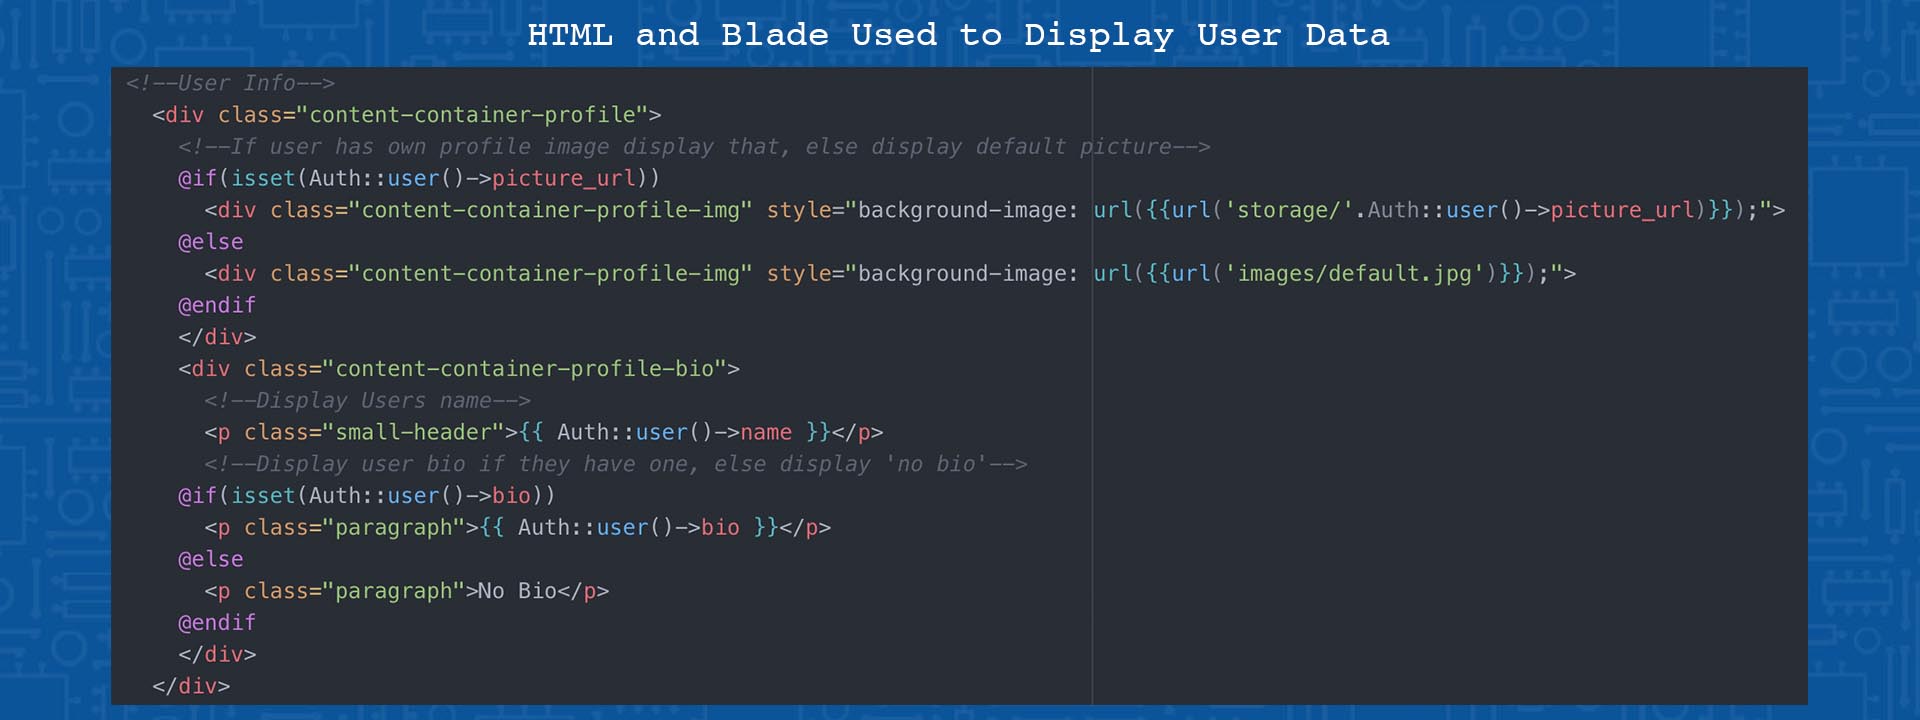
To display this data on the front end I used a series of if statements that check whether the required data is available. If the picture and bio have not been set by the user blade will replace the section with a default markup that includes a profile picture icon and text reading ‘no bio’. The blade and html code for this is shown below.
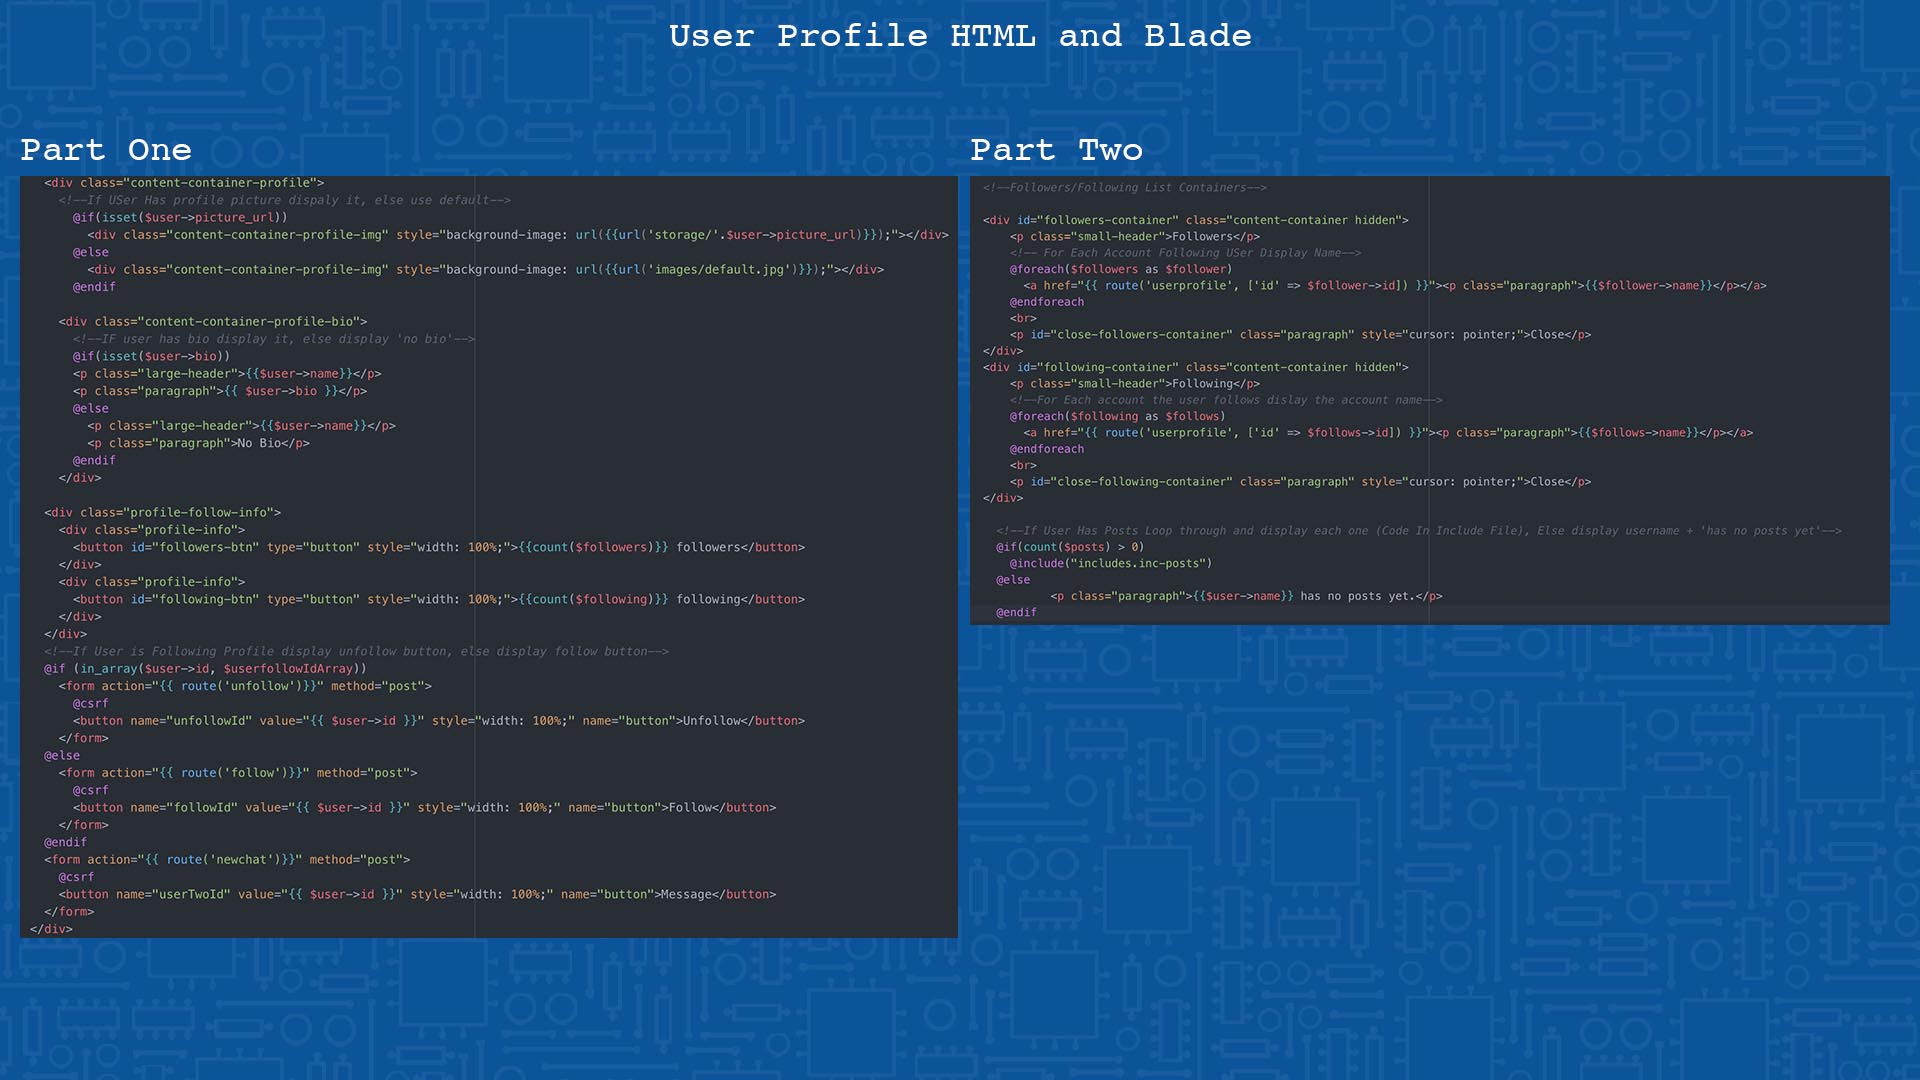
With the ability to now create and display personalized profiles I began creating profile pages, that would allow the users to view posts created by specific users along with giving access to the follow functions, and the ability to view which users follow that account and who they follow.
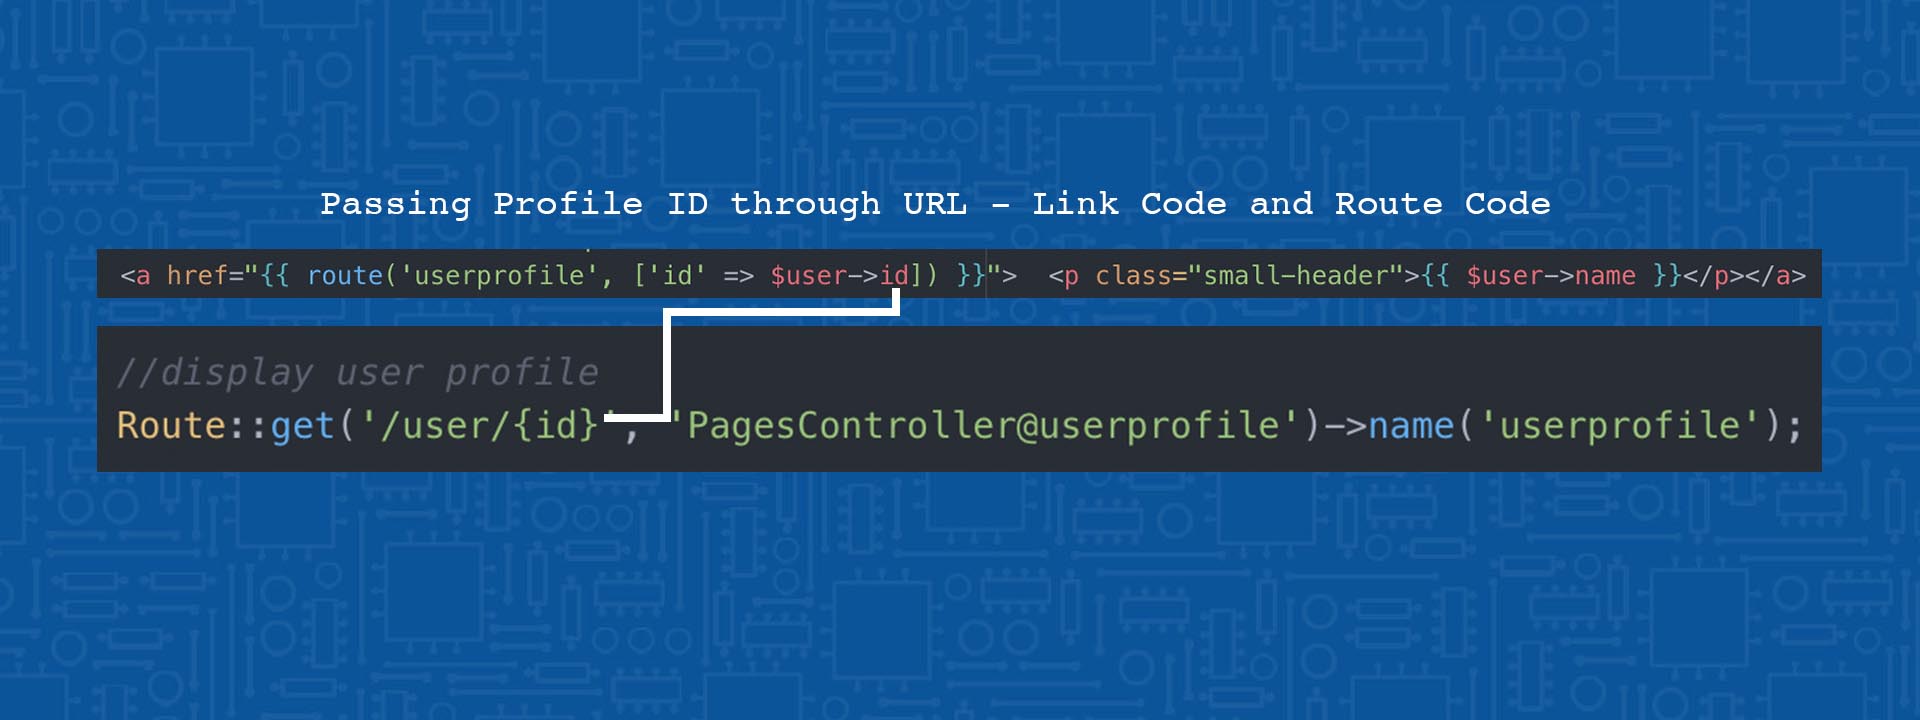
To do this I created a new view template and a route that would link to that view. In order to reuse the same template for multiple users, I made use of posting data through the url. When the user clicks a link to a specific profile that users ID is passed into the URL where it is then retrieved in the function that loads the page.
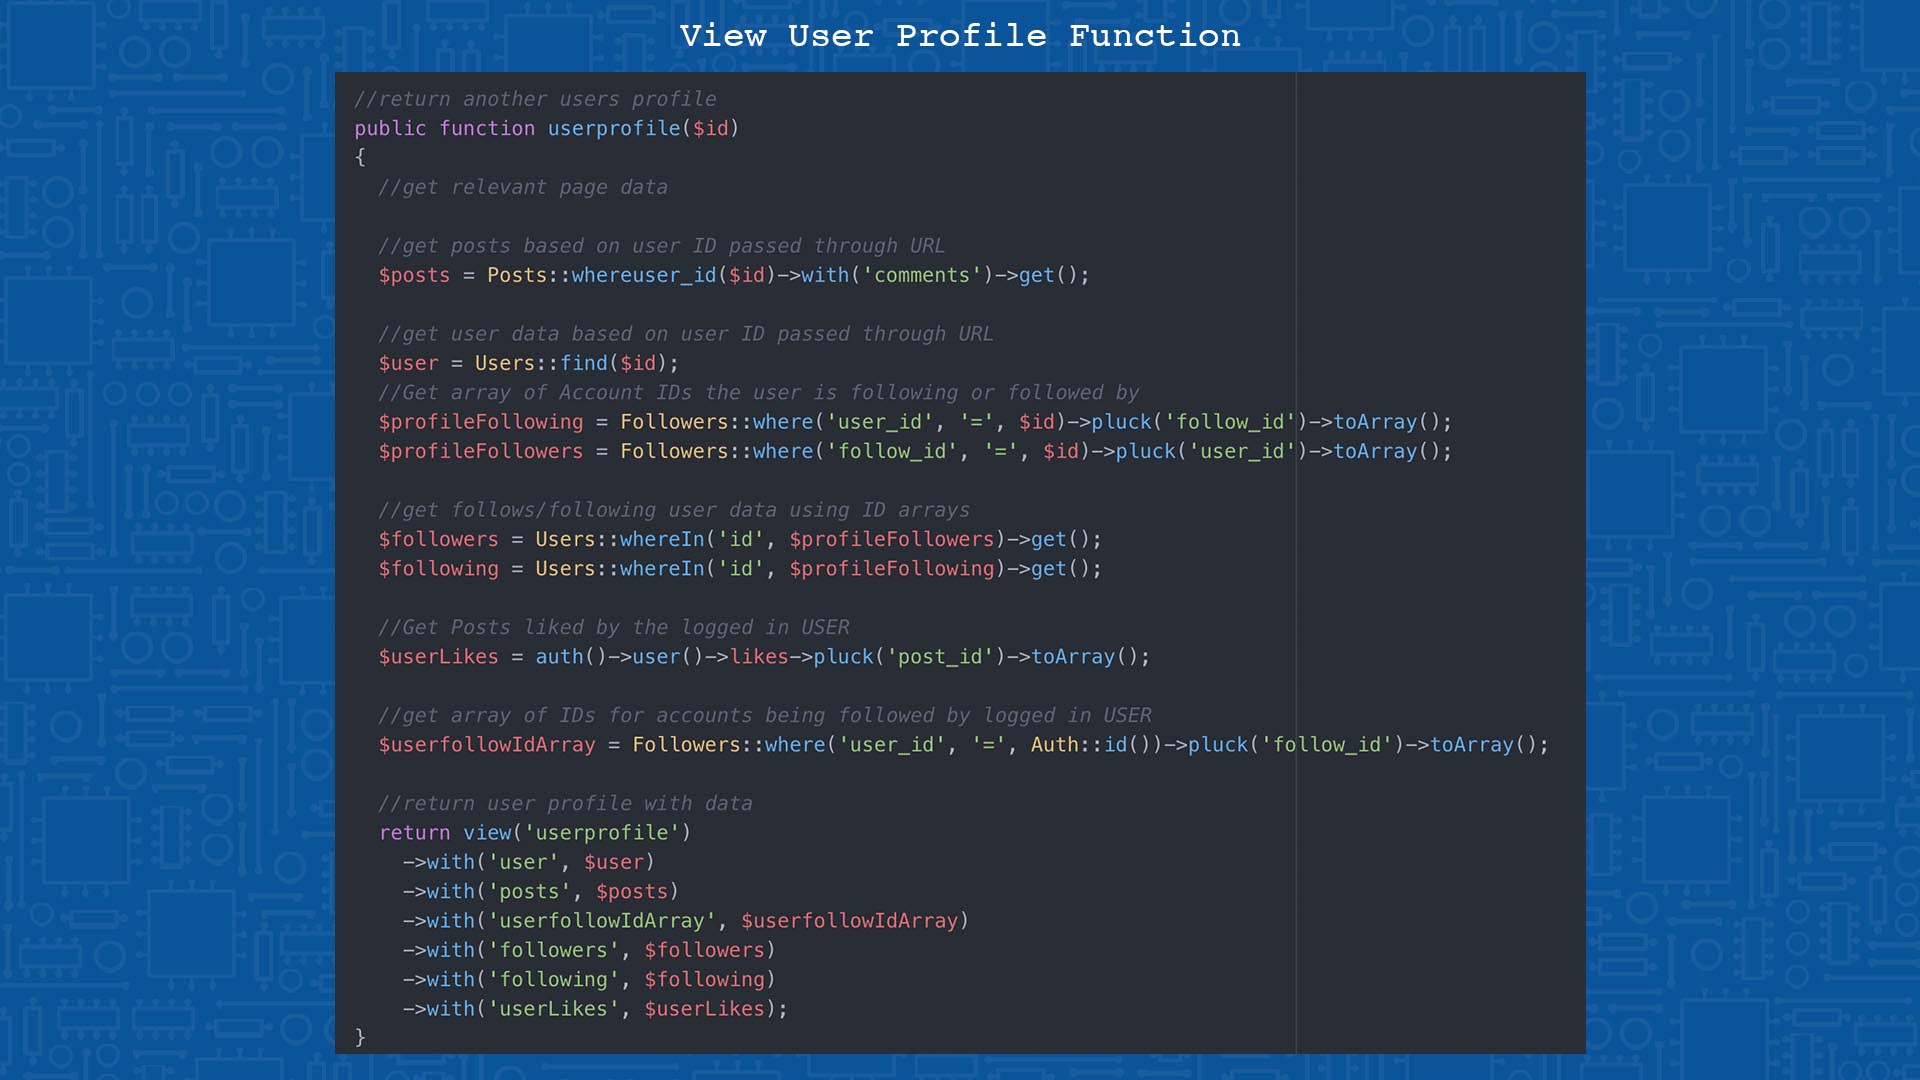
The function that loads the page, takes the ID passed through the URL and uses to retrieve the relevant data needed to fill the template. As you can see in the code below I use the ID to first retrieve all the posts created by that user, then the users data name, bio, and picture for example. I then retrieve the IDs of the accounts that the user has following them and the accounts they follow. Before finally passing all this data through to the view, I get some data related to the auth user this includes whether the user is already following the account they wish to view (Which determines if the follow or unfollow button is displayed on the profile). I also get the array of posts liked by the user, which much like the feed pages is used to show which posts have and haven’t been liked by the user and show the relevant buttons.
Finally to complete the following system I created a search function that would allow users to search for specific people on the site via their usernames. This feature would allow users to find people they know, while the global feed was a way to discover and connect with users from across the world.
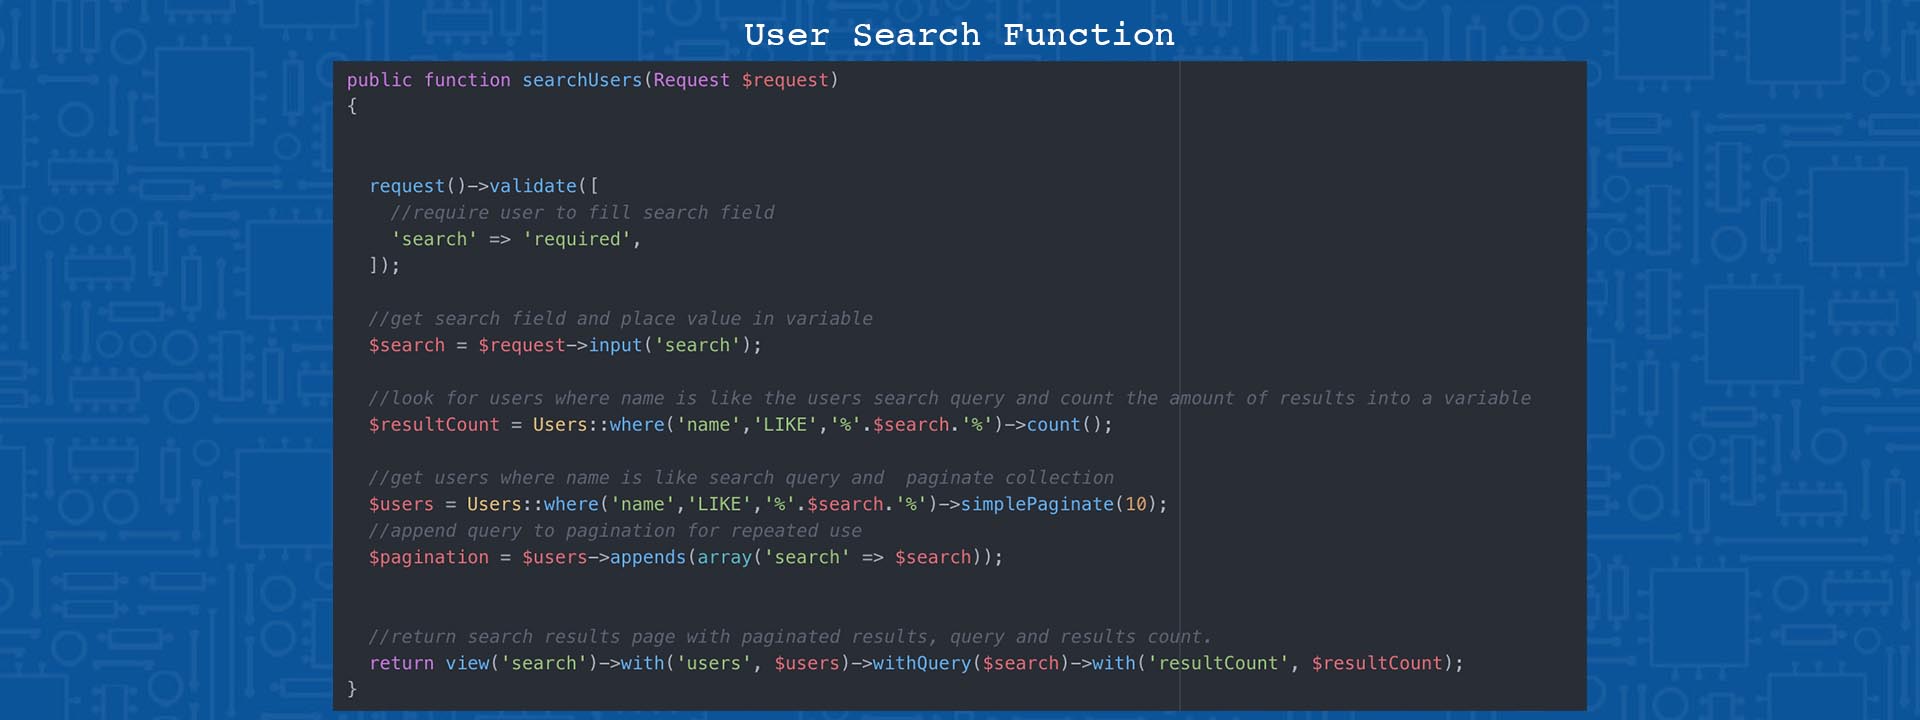
Using the search field on the navigation bar, I linked it to the function shown below. The first section of code simply validates that there is something in the search field as an empty query would return all the users on the site. Next the users query is put into the search variable, this variable is then compared with the usernames in the user table to return any accounts where the username is similar to the users input query. These results are then paginated to show ten users per page, which prevents the site from having to load all the results at once. In order to continue displaying the relevant users on each pagination instance the users query is appended to the pagination, this prevents the pagination from forgetting the query and defaulting to all users as you navigate through the pages of results.
Backpack and Admin Briefs System
One of the smaller but unique features within Creanu is the project briefs. Which offers a way for student designers to gain experience working with detailed briefs. To create this system I made use of the Backpack package for laravel. Which provides the ability to easily create a backend CMS/admin systems similar to frameworks like wordpress.
Using terminal I began by adding Backpack to my project with the commands shown below.

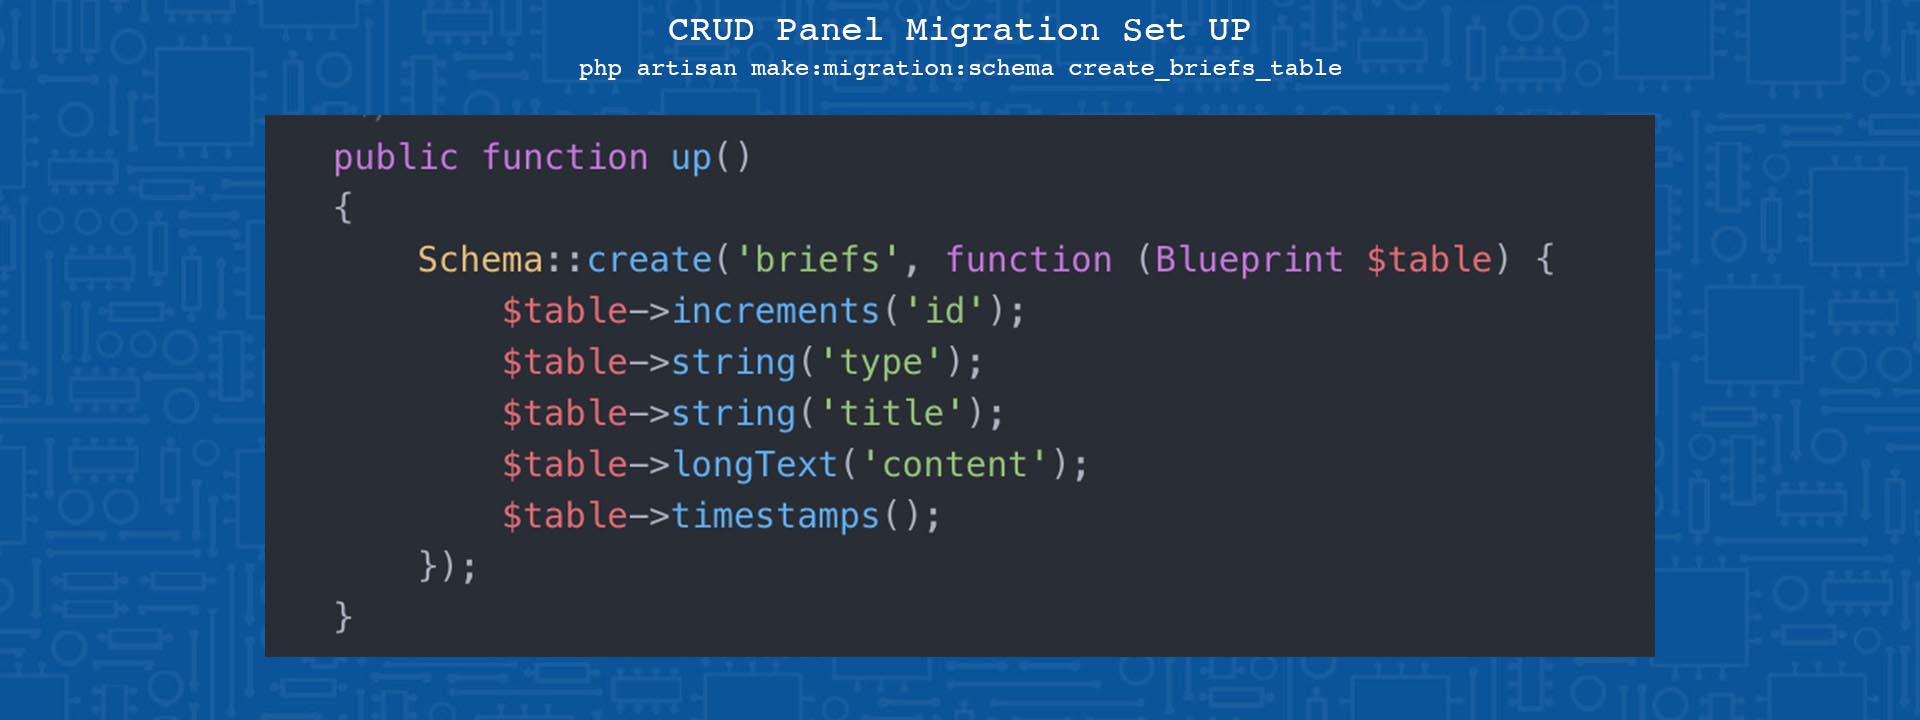
The backpack system is made up of something called CRUD panels, these can be linked to content on the front of the site. In the case of my project I created one CRUD panel that would allow me to add and remove project briefs. The set up of this feature was made extremely easy through backpacks set up commands. Which allow you to create new crud panels, listed below are the commands used to create the system and what they do.


Updated Project Generator
During the Re-Design of the site I moved the project generator function from the projects page into the sidebars, making at accessible on all pages. As part of this change I needed to adapt the code so that as the user navigated through the pages any generated projects would remain the same and continue to be displayed.
To do this I made use of Javascript Sessions which allow you to store data in the browser. A session is a form of cookie that stores data on the client side, with the difference being that a session is cleared when a user closes the page rather than it being stored indefinitely (Or Until Browser Cache is cleared) like in a cookie.
The first chunk of code within this file is a series of if statements, triggered when the document loads. They check the session for any previously generated projects, displaying them if found. This allows the user to switch pages without losing a project prompt they may have generated on a previous page.

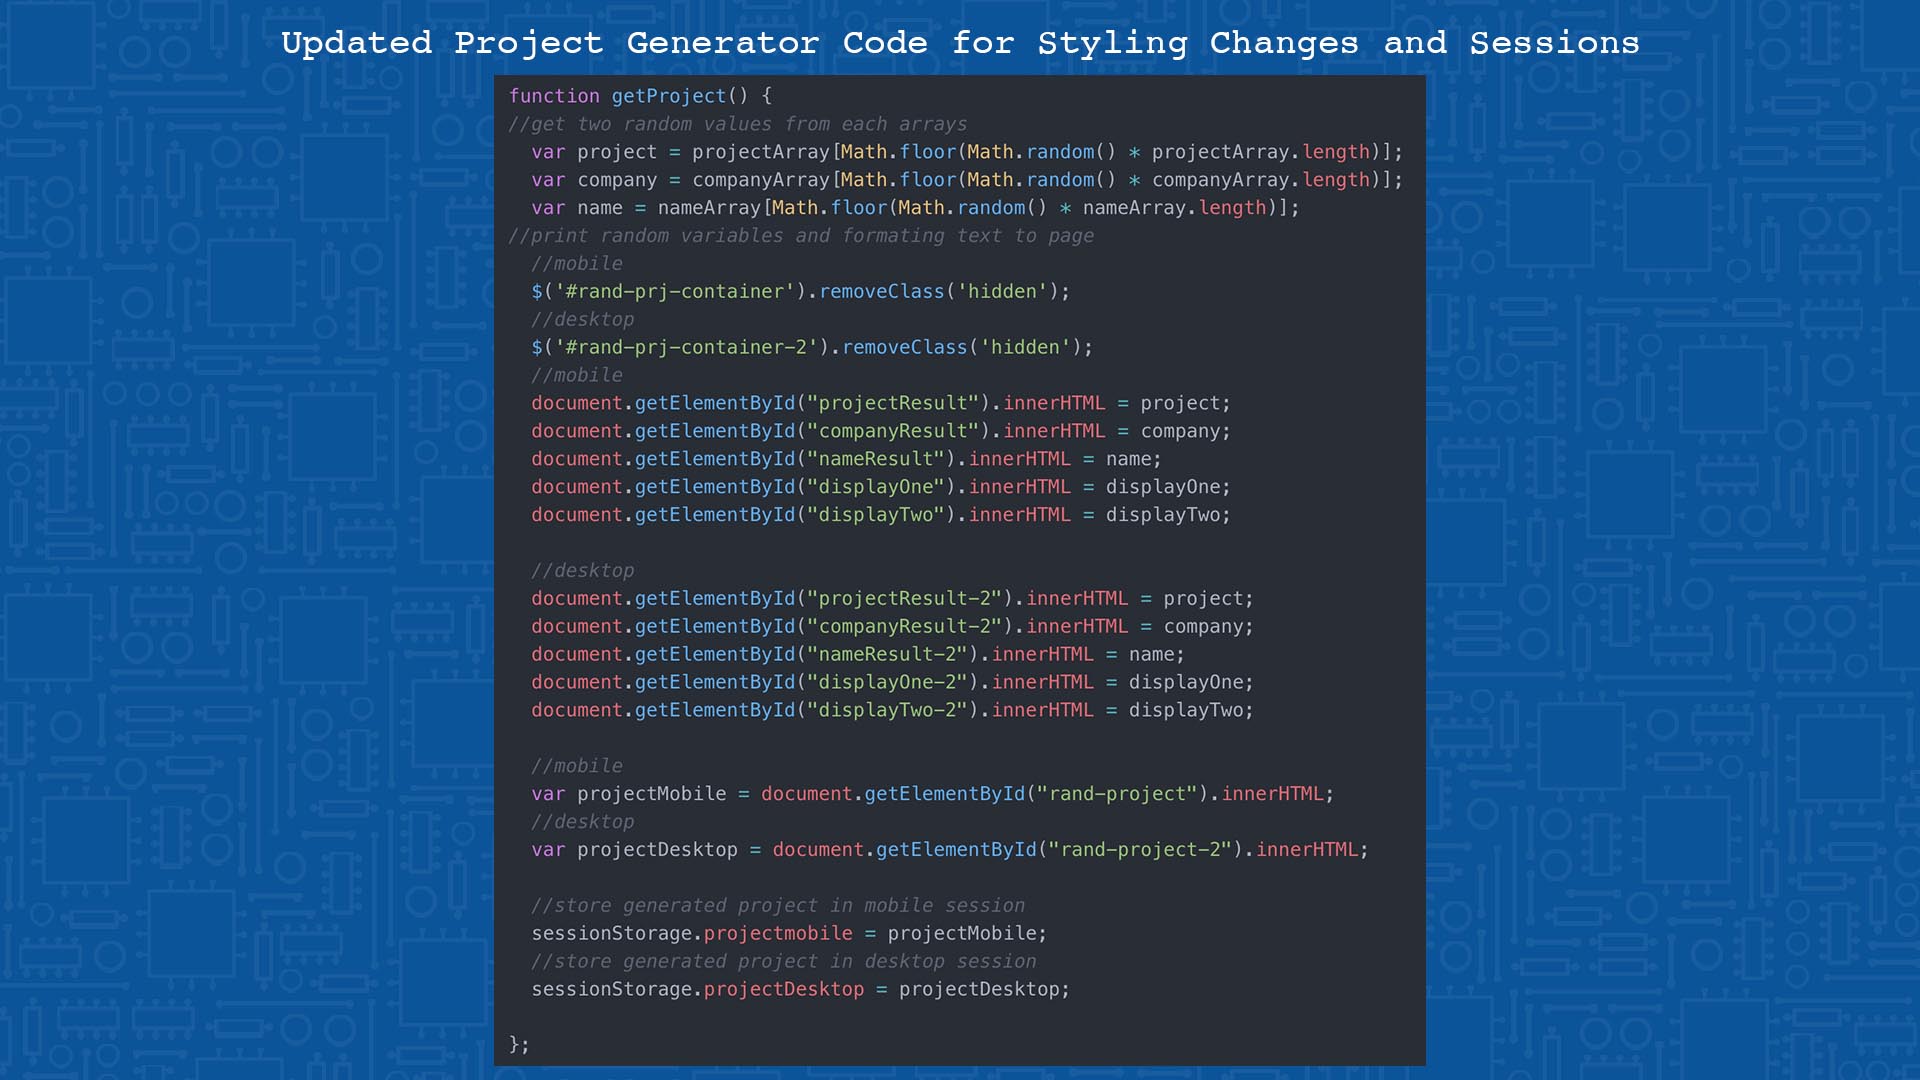
The next function is used to generate the project, the majority of this was code was written in semester one however, with the implementation of the new design I needed to separate the function slightly to account for activation on the mobile and desktop devices. As the layout of the mobile version ended up with a duplication of the mark up used to display and call the function, I had to store the generated project in two sessions one for mobile and one for desktop. This duplication method allowed me to save the same project for both mobile and desktop versions. The display of the project uses a combination of Javascripts innerhtml functions and jQuerys hide/show function.
Updated Project Generator
Within the newsfeed and other lists of content, I needed to create a system that would break the data into chunks as this would improve the website's loading speed and efficiency. I had wanted to incorporate some form of lazy loading or infinite feeds as seen on most popular social media websites however, due to time restrictions I decided to make use of the Laravel pagination system. This is simple function that can be added to the end of an eloquent get query and will divide the results of the get request on to multiple pages.
Within laravel there are a few different types of pagination. I opted for using the ‘simplePagination’ which provides a next and previous button rather than specific page buttons in between them. I felt this would be more appropriate for a social media site, where the content is expected to change on a regular basis. It also allows for a much cleaner UI. Below I have detailed some of the different places within my web app.
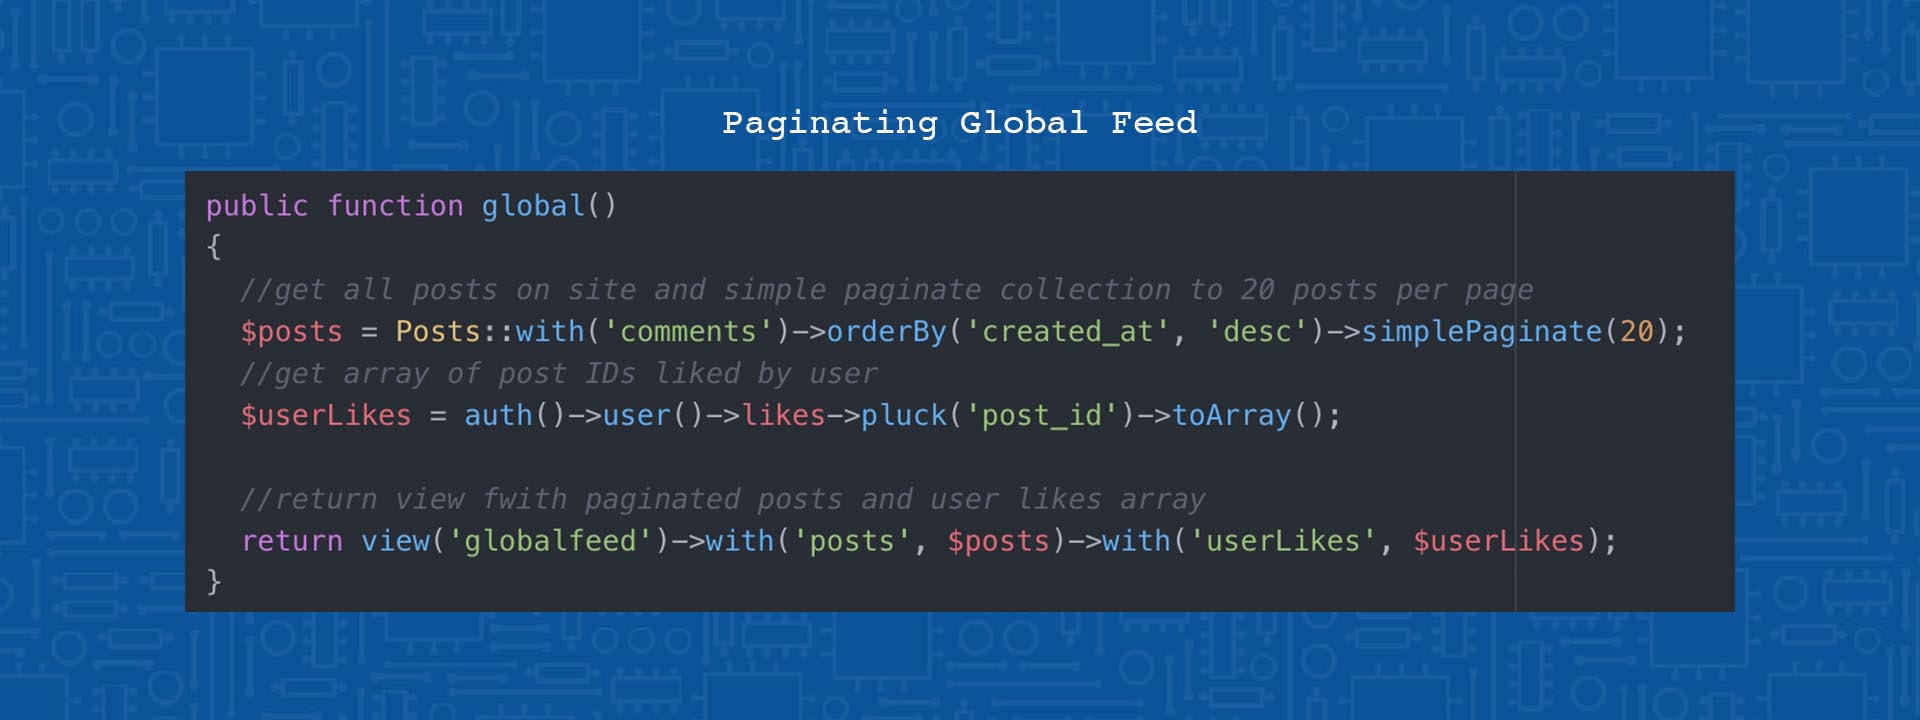
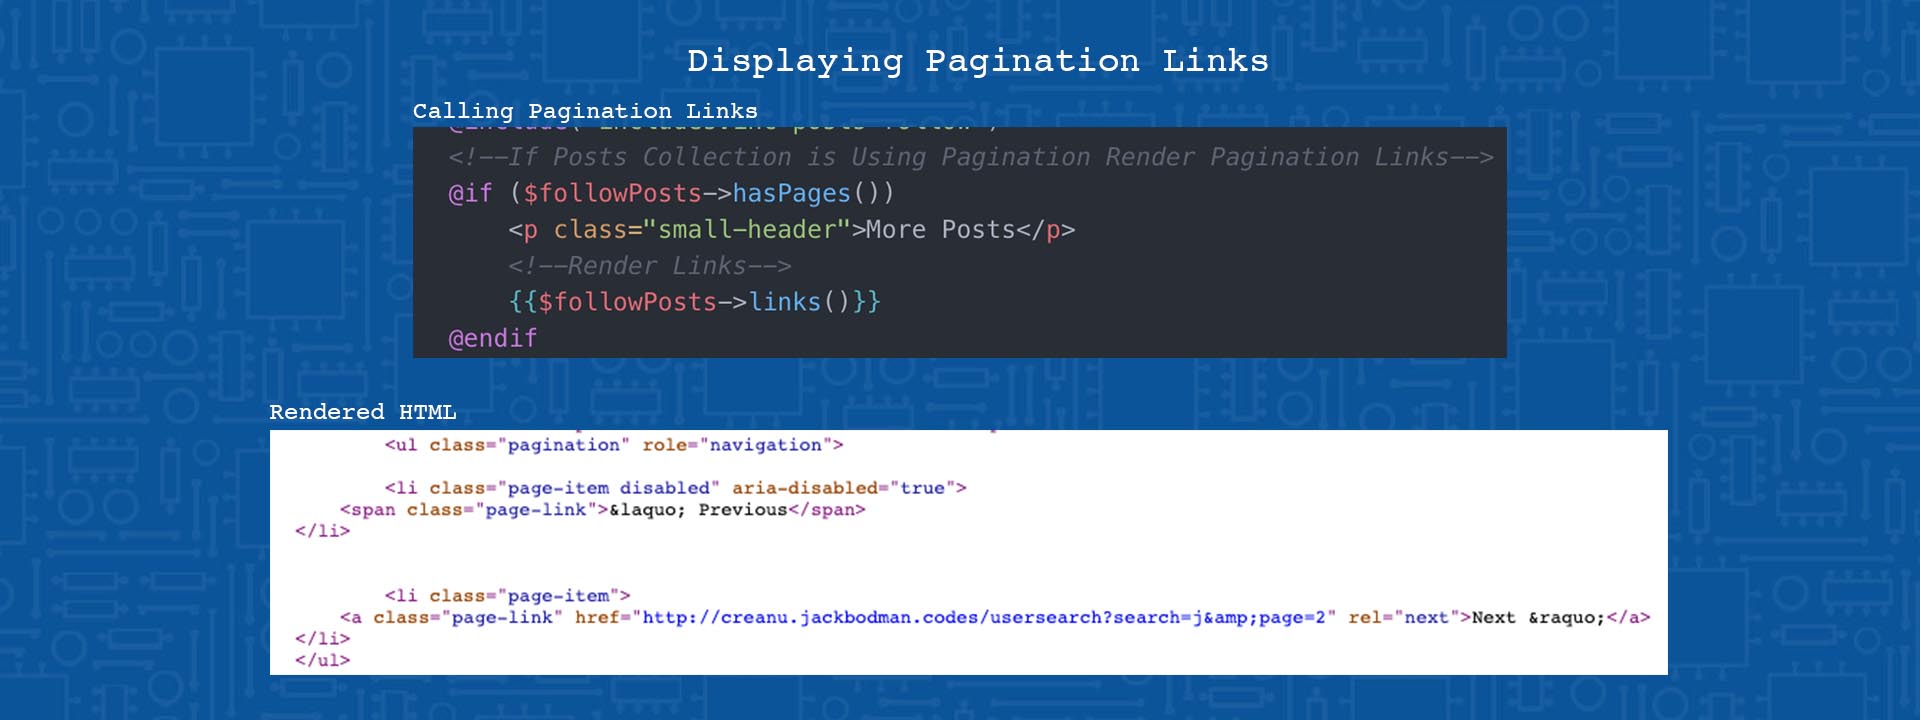
The above code is one of simplest examples of pagination being used on my site. The global feed gets the all posts on the site, but the pagination splits it into 20 posts per page. To display these results in the view, I use a blade foreach loop that will run through and display all 20 posts in the pages collection then underneath but outside of this loop I call the pagination links which automatically renders the html markup for the pages navigation buttons, an example of these links being called on the global feed is shown below.
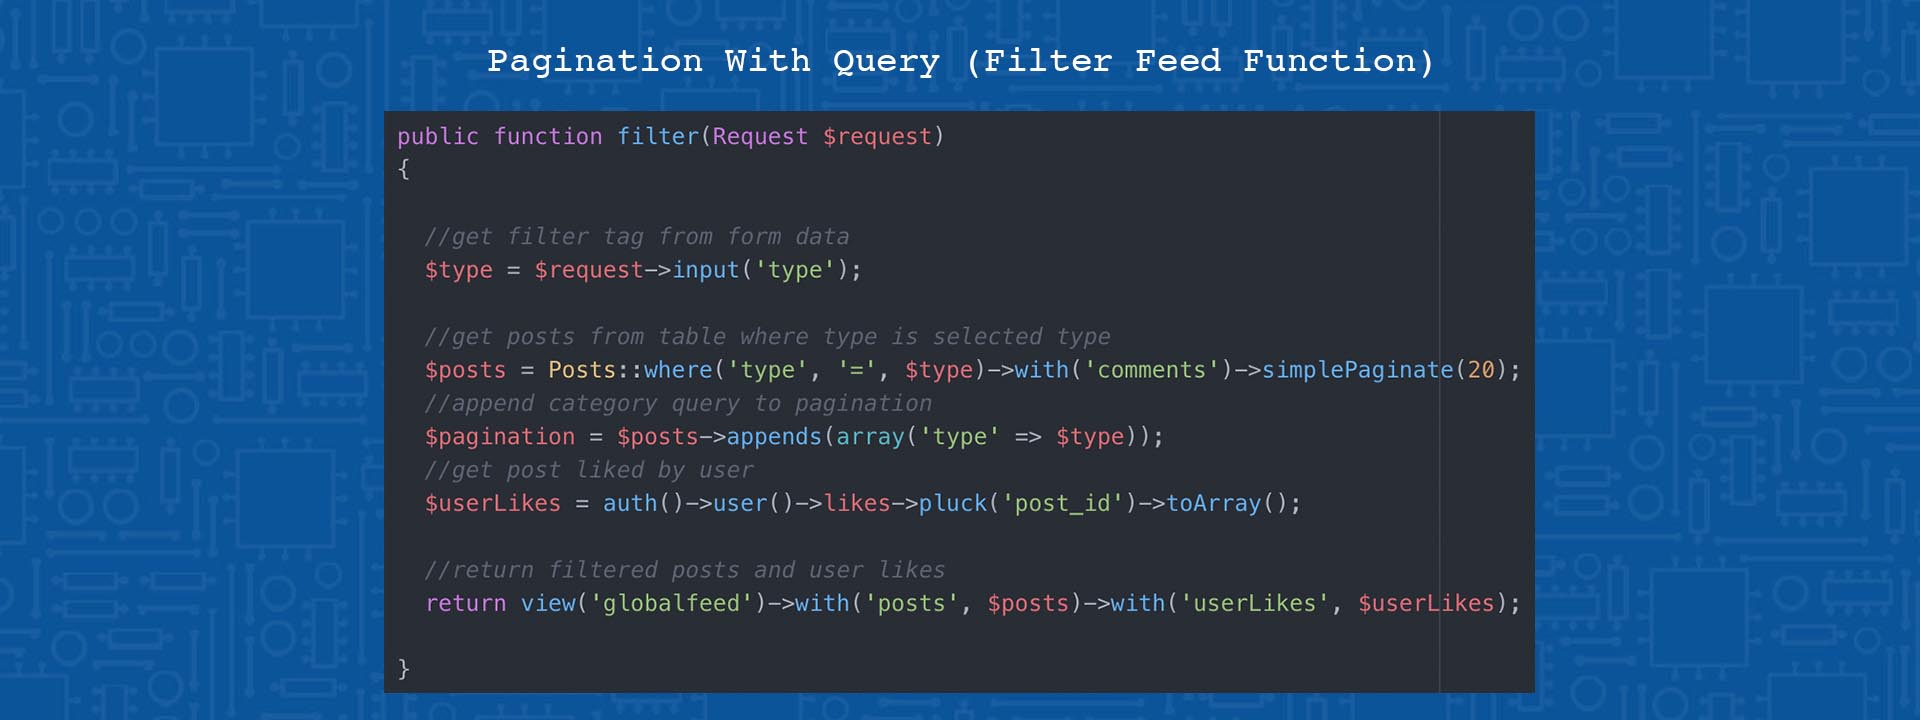
The code shown below is the pagination of the filtered global feed results, in this example the posts selected are based on the design project category selected by the user. The pagination used here is similar to the search results pagination detailed earlier, in which the query (or in this case user selected category) is appended to the pagination, so that when navigating between pages only posts with the selected category(type) are shown.
Chats and Instant Messaging
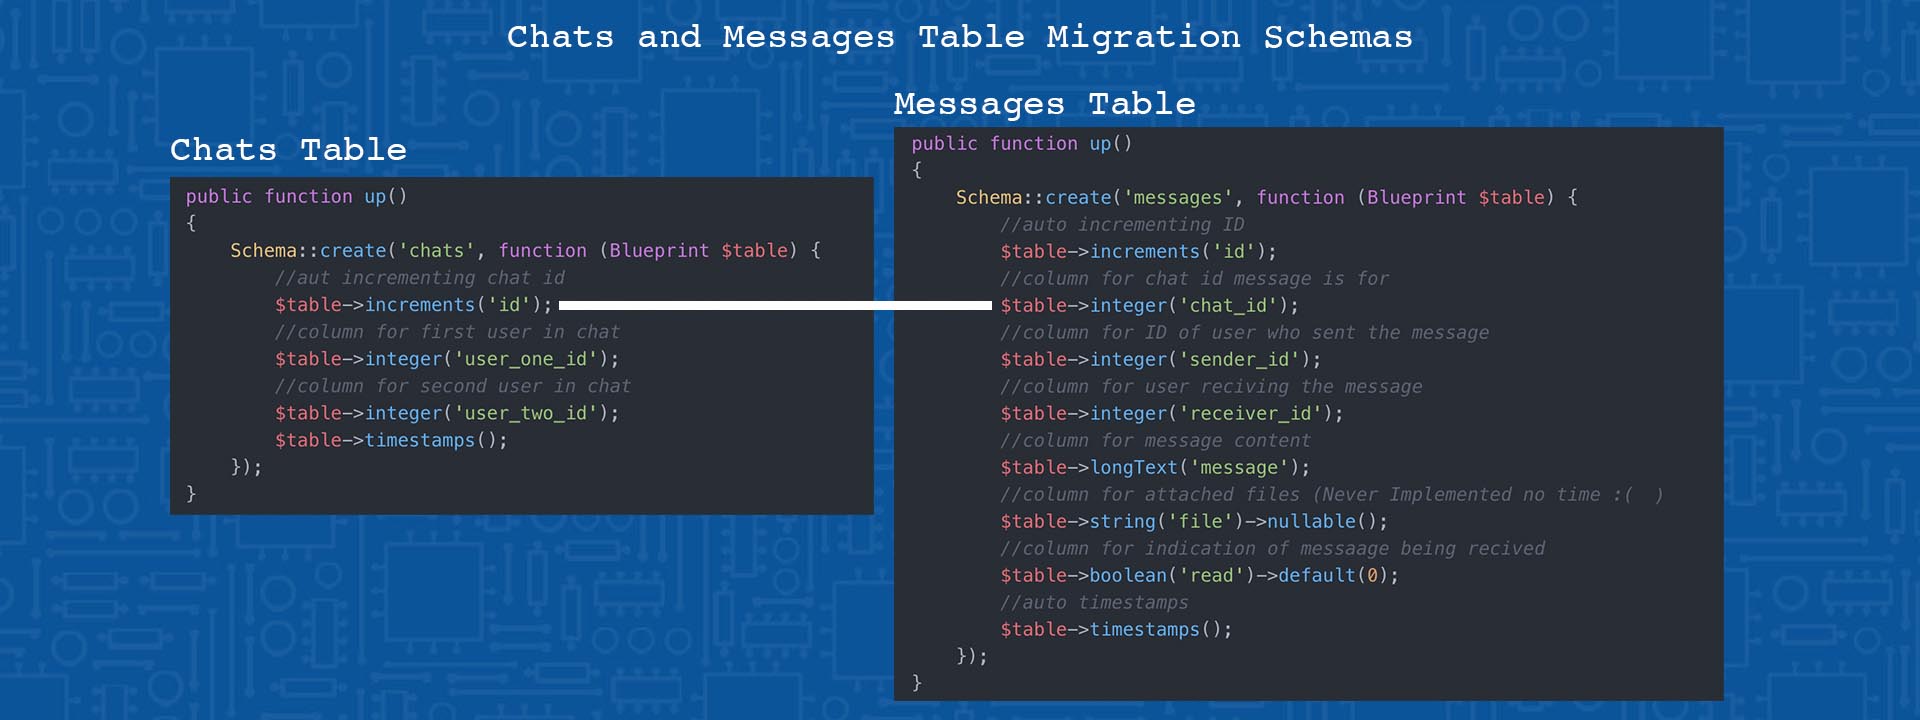
The chats and instant messaging feature I built this semester was by far my favourite system to build. This feature allowed me to get more experience with Javascript AJAX functionality, and raw Javascript. This system uses two new migrations and database tables, one is used to contain the chats and keeps a chat ID which is used to identify the messages related to that chat and the IDs of the two people part of the chat. The migration files for these two tables are shown below.
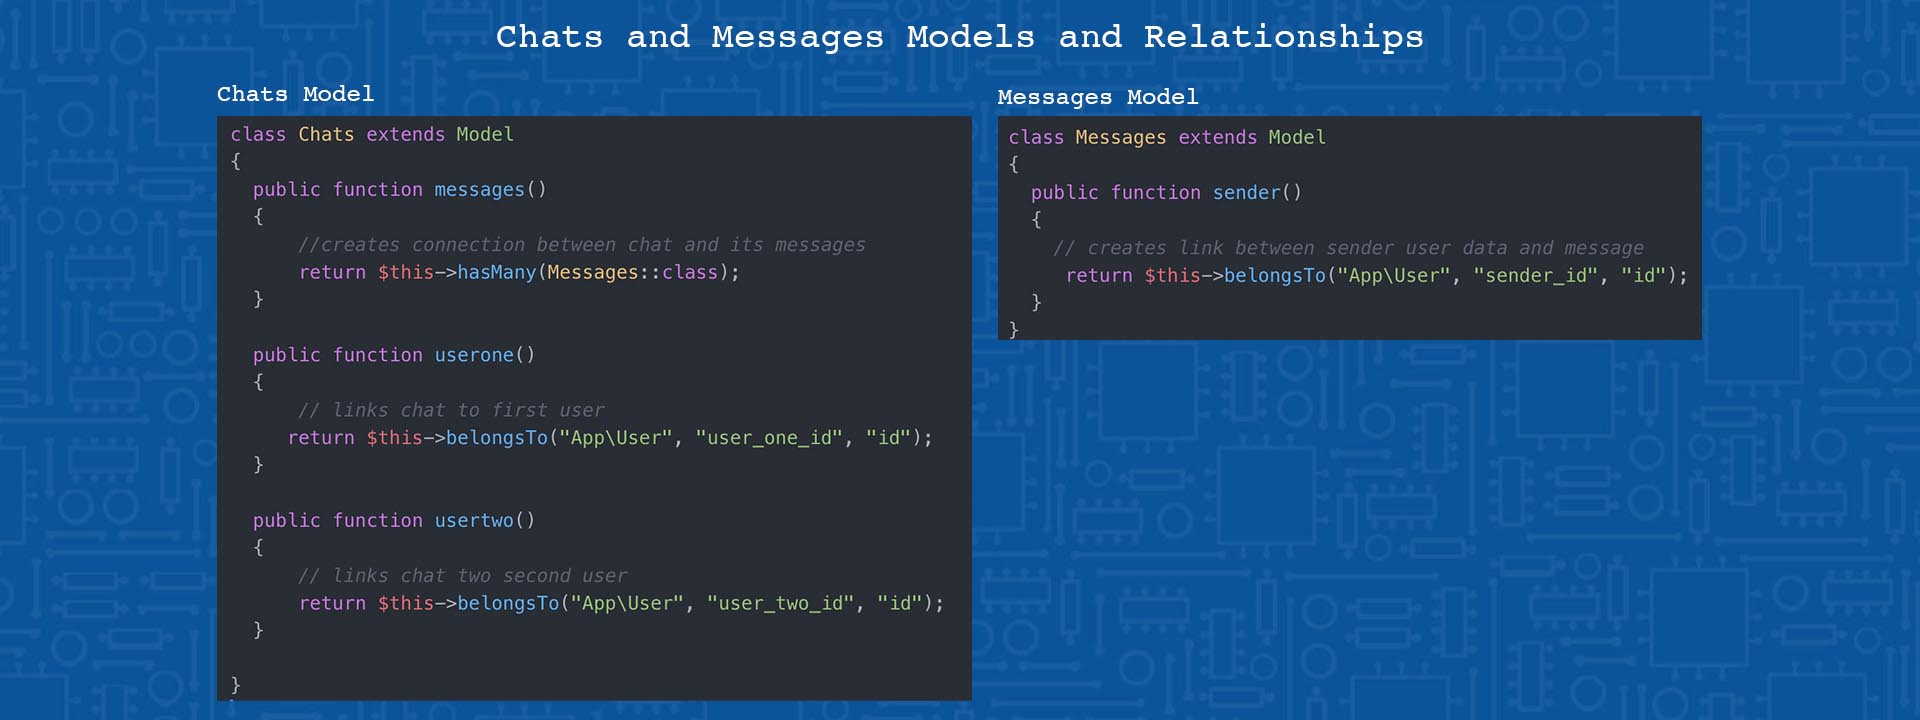
The system also required the creation of two new models with their own relationships, the models and relationships detailed below, create a data relation between the chat and its members, the members and the messages and the chat and the messages. These relationships make it easier to get the relevant content, for example the username of the message sender.
The two remaining files (Excluding the views which are mainly basic HTML, css, and Blade Templating) are the messaging ajax javascript, and the Chats controller. The controller handles the backend functionality such as storing, retrieving, and processing the data passed into the view. While the Ajax file acts as a link between the server and the users frontend. Allowing data to be passed to and from the server and client side without having to refresh the page.
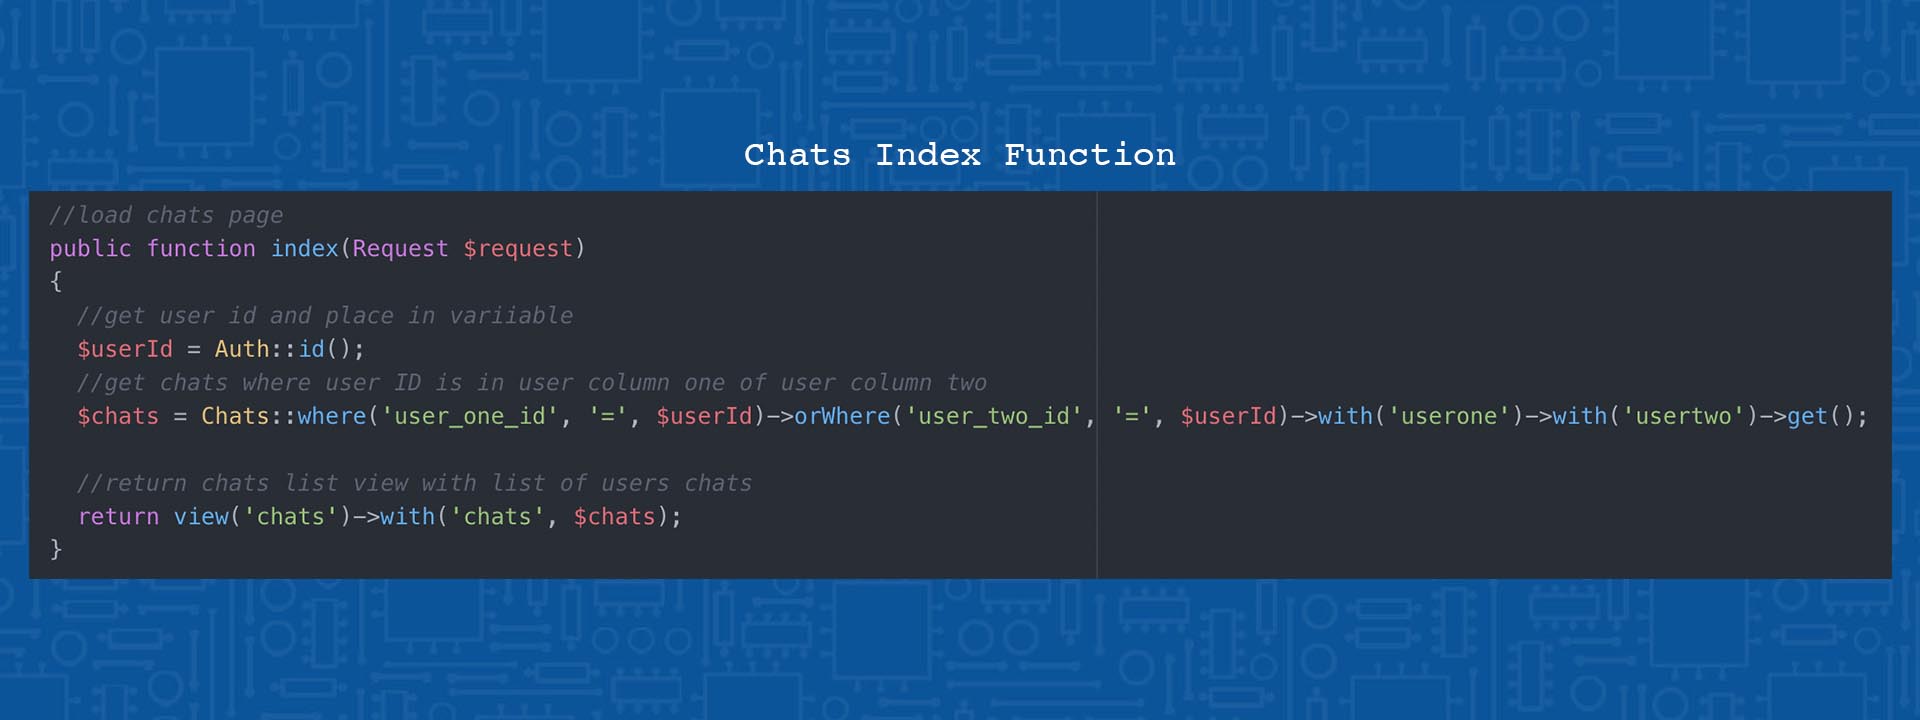
Chats Controller - Index Function: The first function within the chats controller is used to display the list of Chats a user has with other accounts. The first line of code fetches the User ID from the session. The ID is then used within a query to get all the chat records where the user ID appears either in the ‘user_id_one’ column or the ‘user_id_two’ column. The chat records gathered from this query are then sent through to the view.
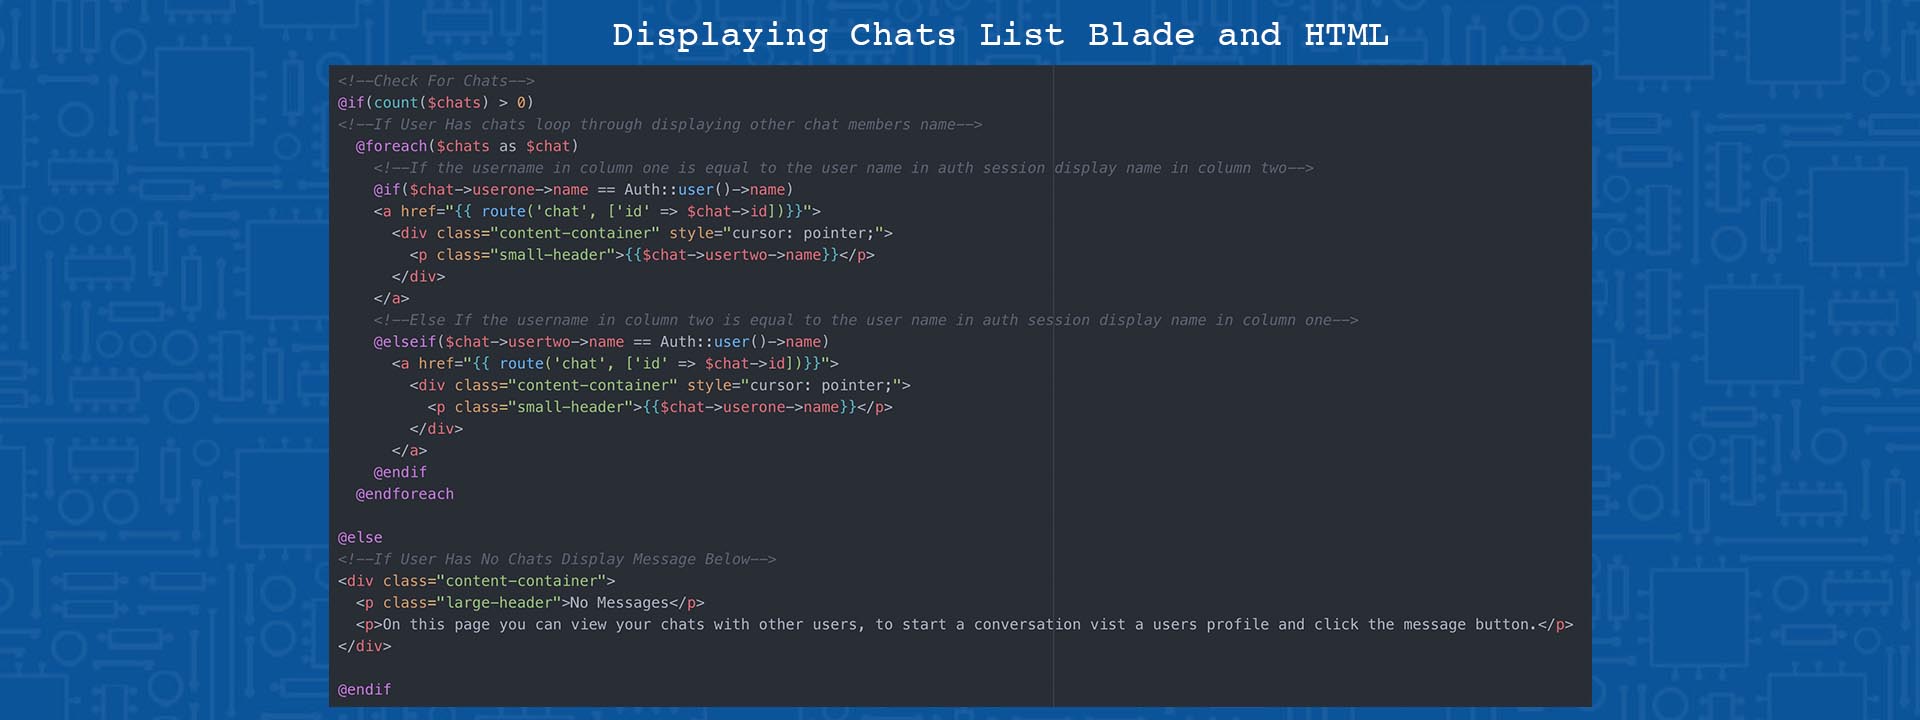
When displaying the list of chats in the view, I needed to make sure that the names displayed where the names of the other person in the chat. As the user IDs are stored based on who created the Chat (I.E. if the user created the chat there ID is stored in column one with the other user being put in column two) this meant that looping through one of the columns would sometimes show the users own name rather than the user they were talking with. To fix this I used a blade if statement, where if the user ID in the column one matched the auth session ID it would get the name of the user ID stored in column two, as shown in the code below.
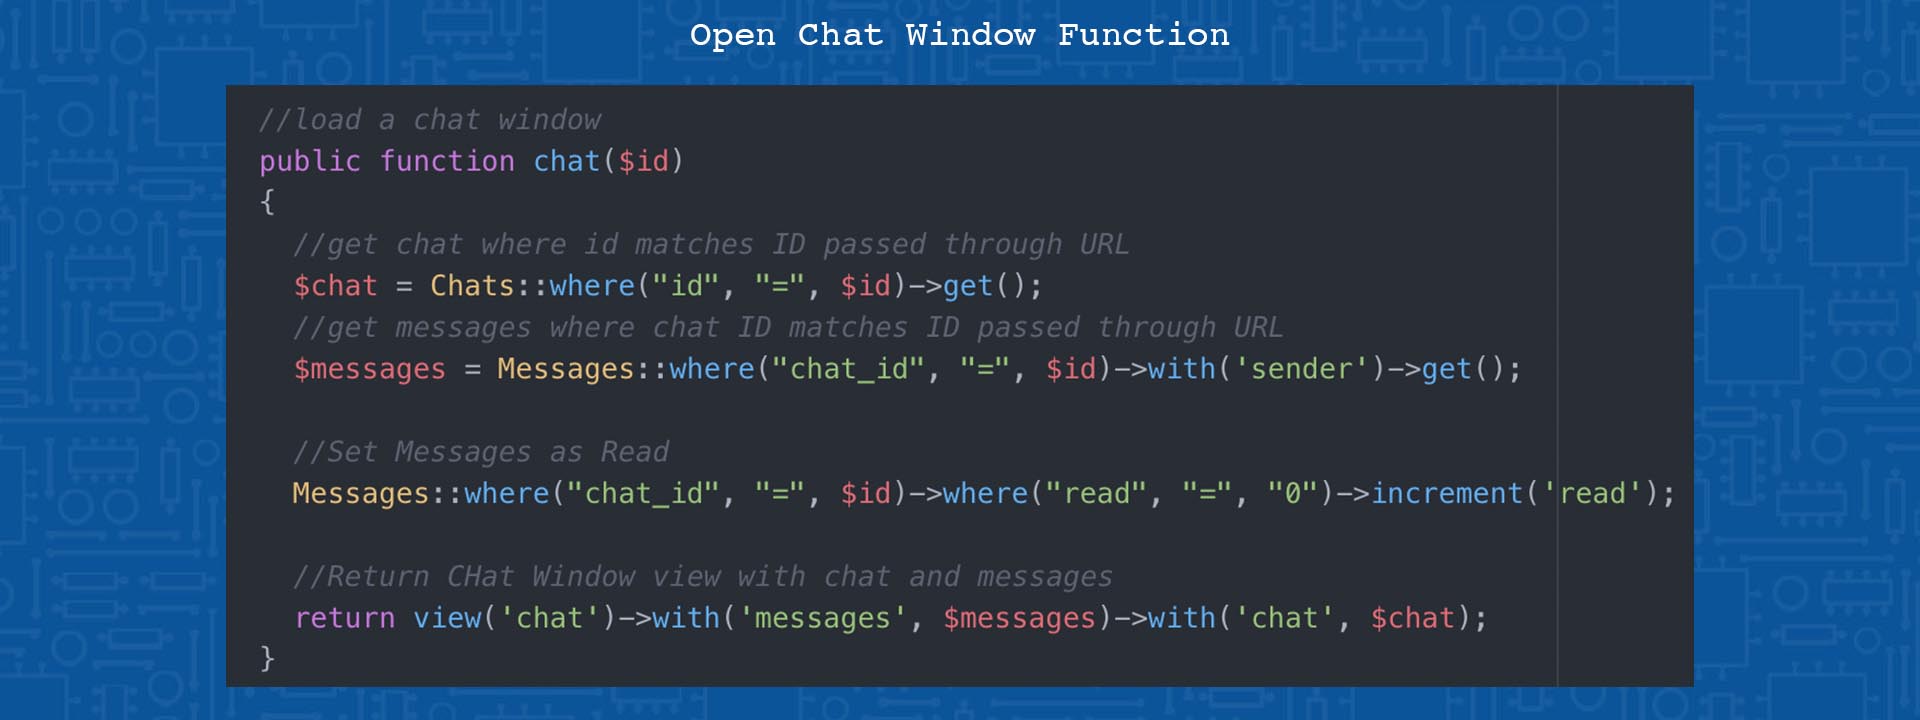
Chats Controller - Chat Function: The next function in the controller is used to load a chat window, this is done in a similar way to the profile page in that the Chat ID is passed through the URL (This method led to a bug that would allow users to view other users chat windows which I detail the fix for in the Bugs and Testing section later). Within the function we use the chat ID passed through the URL to first get the chat information, and then the messages related to that chat. Using the relationships set up in the models I get the chats with the sender, this is another sub array that contains the user data of the person who sent/created the message.
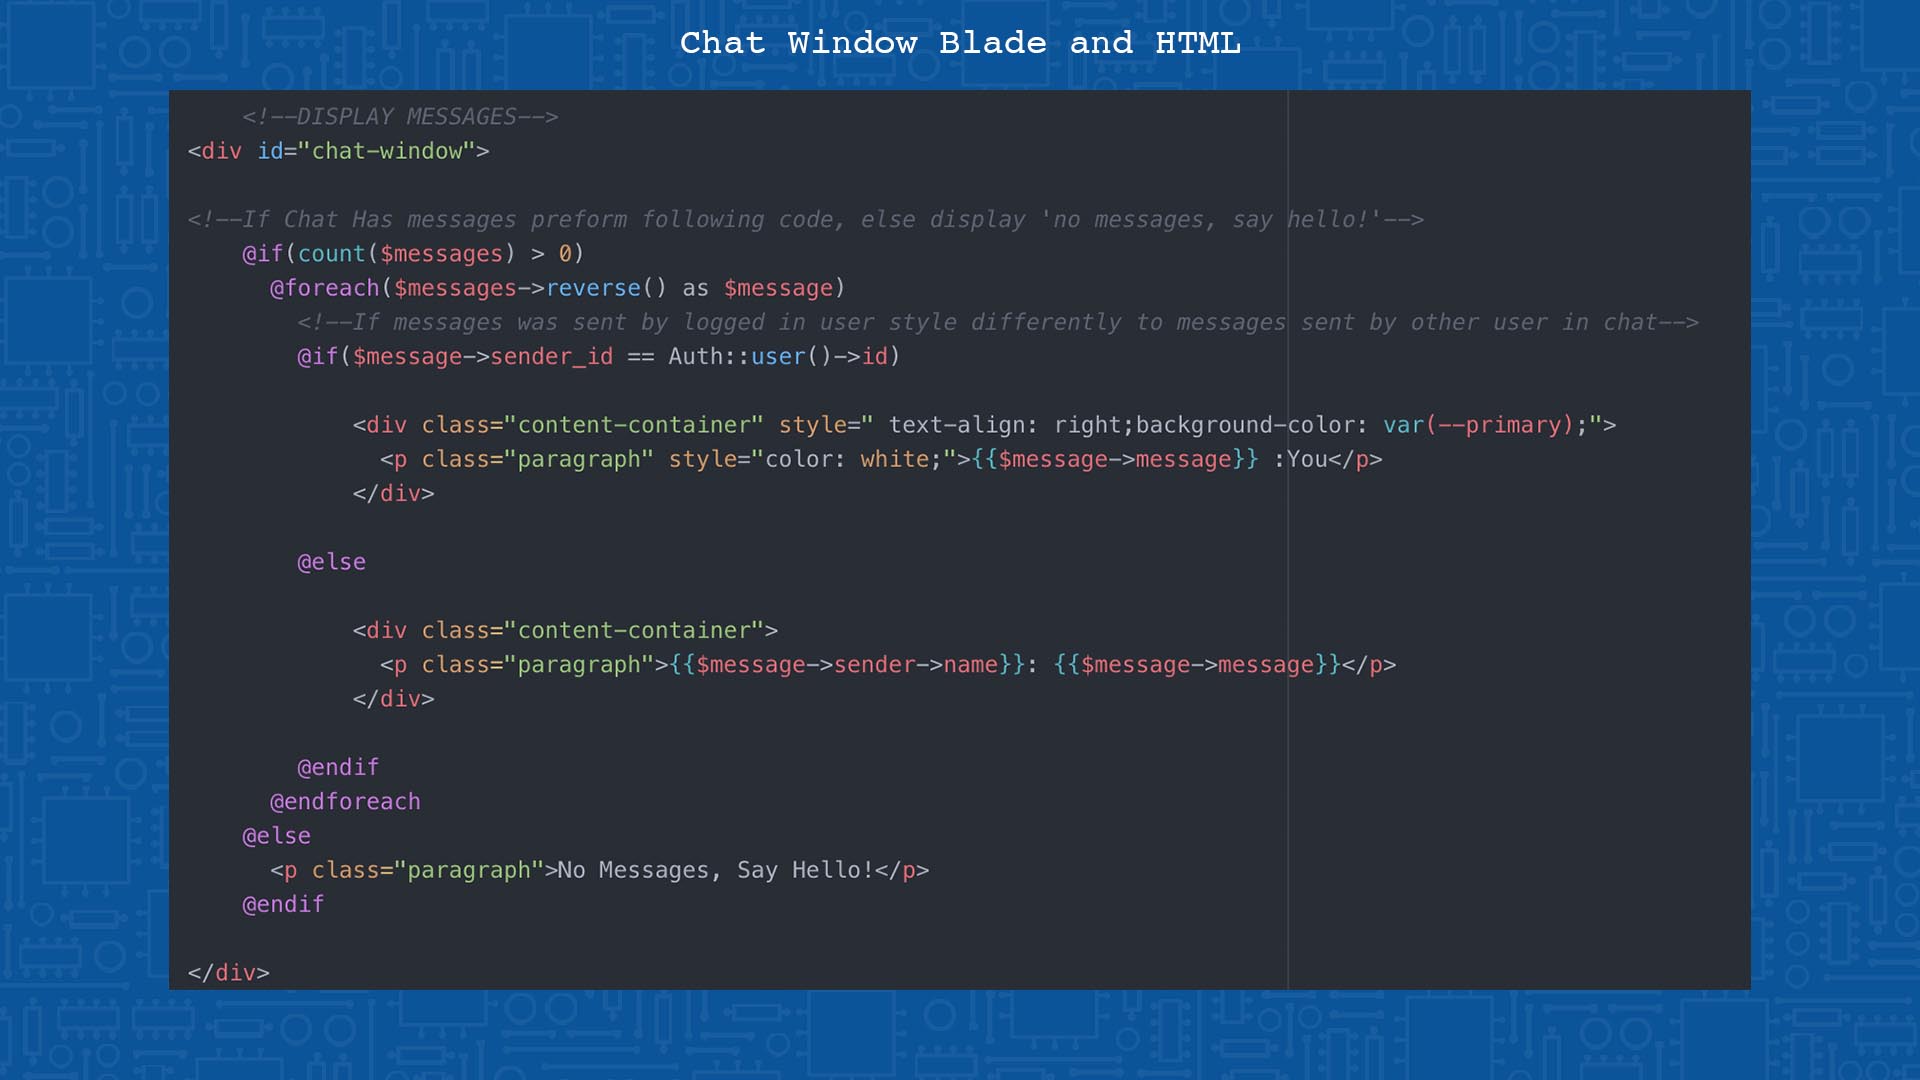
To display the messages in the view I used a similar if statement to that used in the chats list window, in which the If statement will check to see if the message has been sent by the logged in user and styles them differently based on this, allowing the user to differentiate their messages from the person they are speaking with.
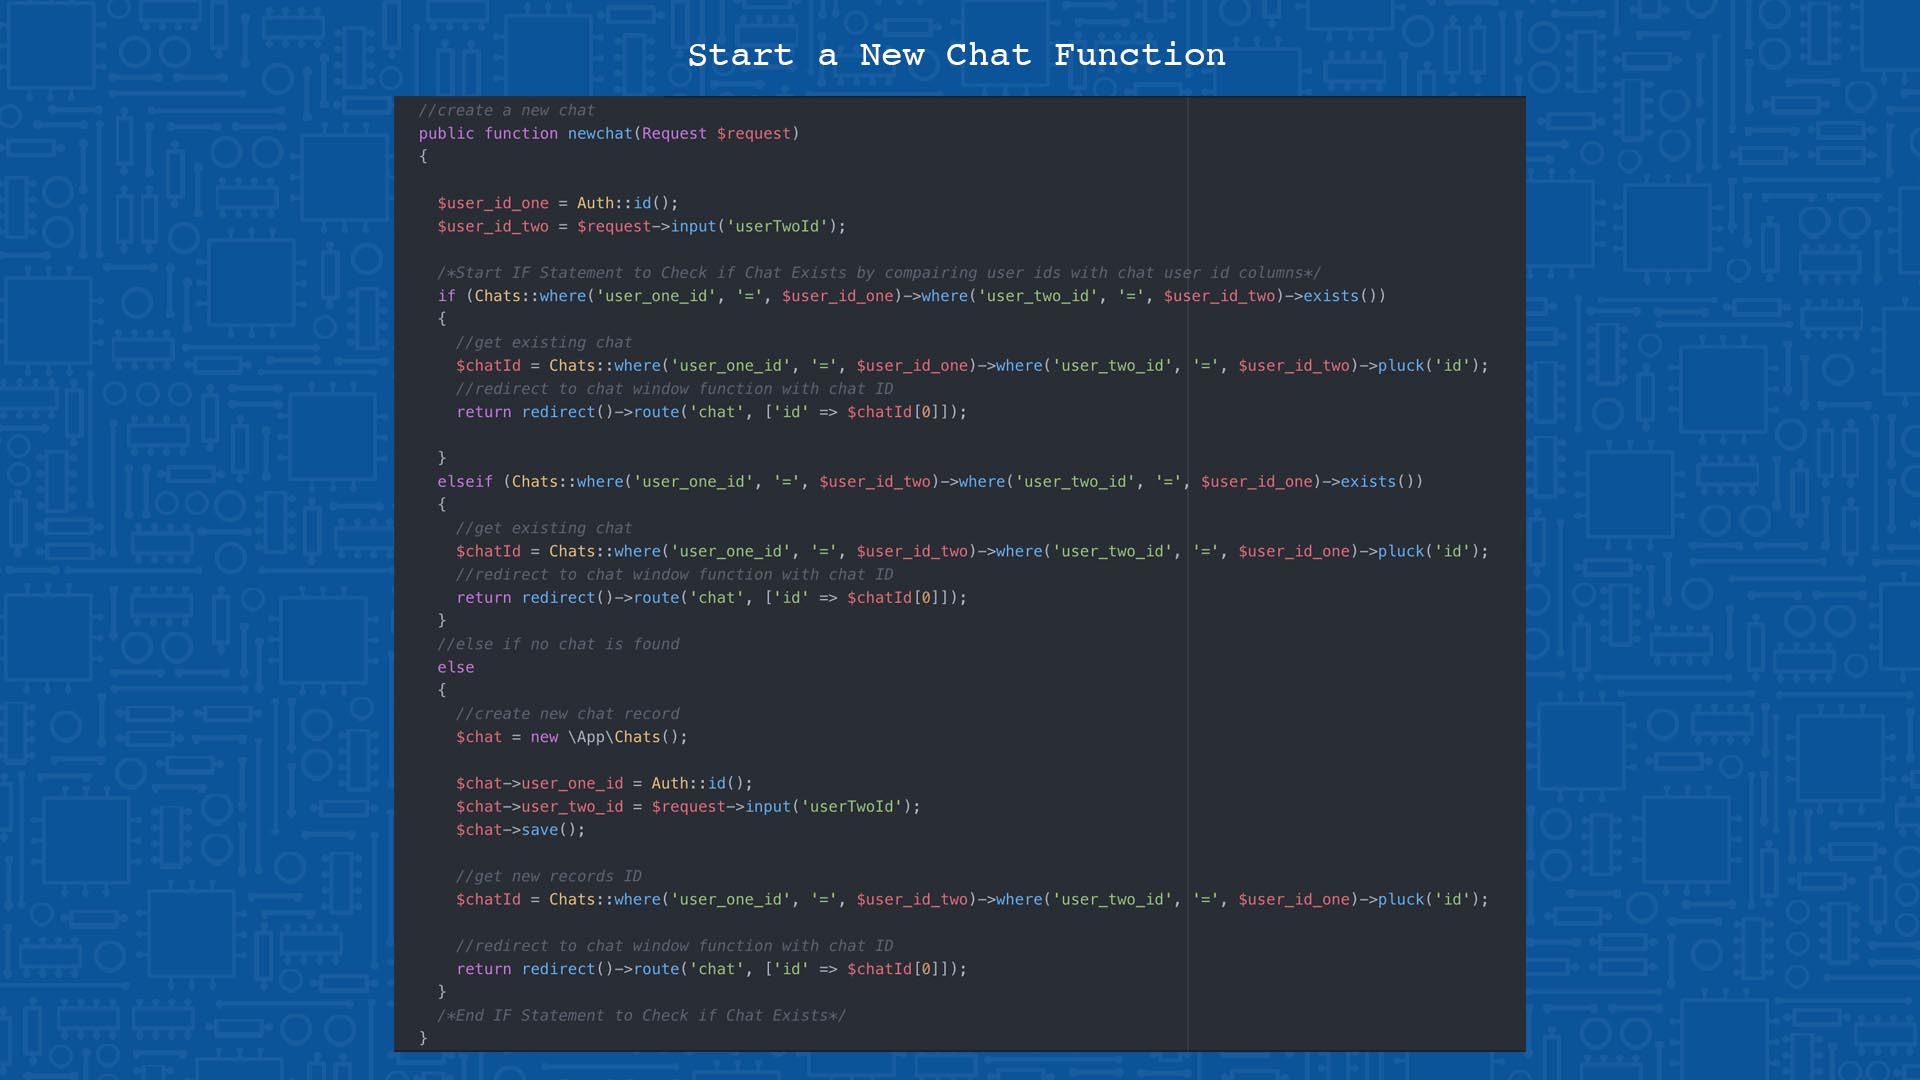
Chats Controller - New Chat Function: The final function that is independent of any Javascript Ajax is the function used to create a new chat. This was probably one of the more complex creation functions written within the web app as a combination of two users can only create a chat once. Because of this before any creation code was written, I first had to create an if statement that would check the database chats table for any instances where the two users involved in the chat appeared in the same record. If this is found the same query used to check for the record is used to get the ID which is then passed into a return function redirecting the user to the previous load chat function. Not only does this if statement prevent users from creating multiple chats with the same people, but it also works as a redirect to an already created chat, if the user chooses to access the messages through the user profile message button rather than the chats list.
If the if statement does not find a chat it while perform the else function, creating the chat in the same way most user data is created, then it retrieves the Id of the newly created chat and redirects to the open chat window function, essentially setting up the chat and allowing the user to begin sending messages instantly.
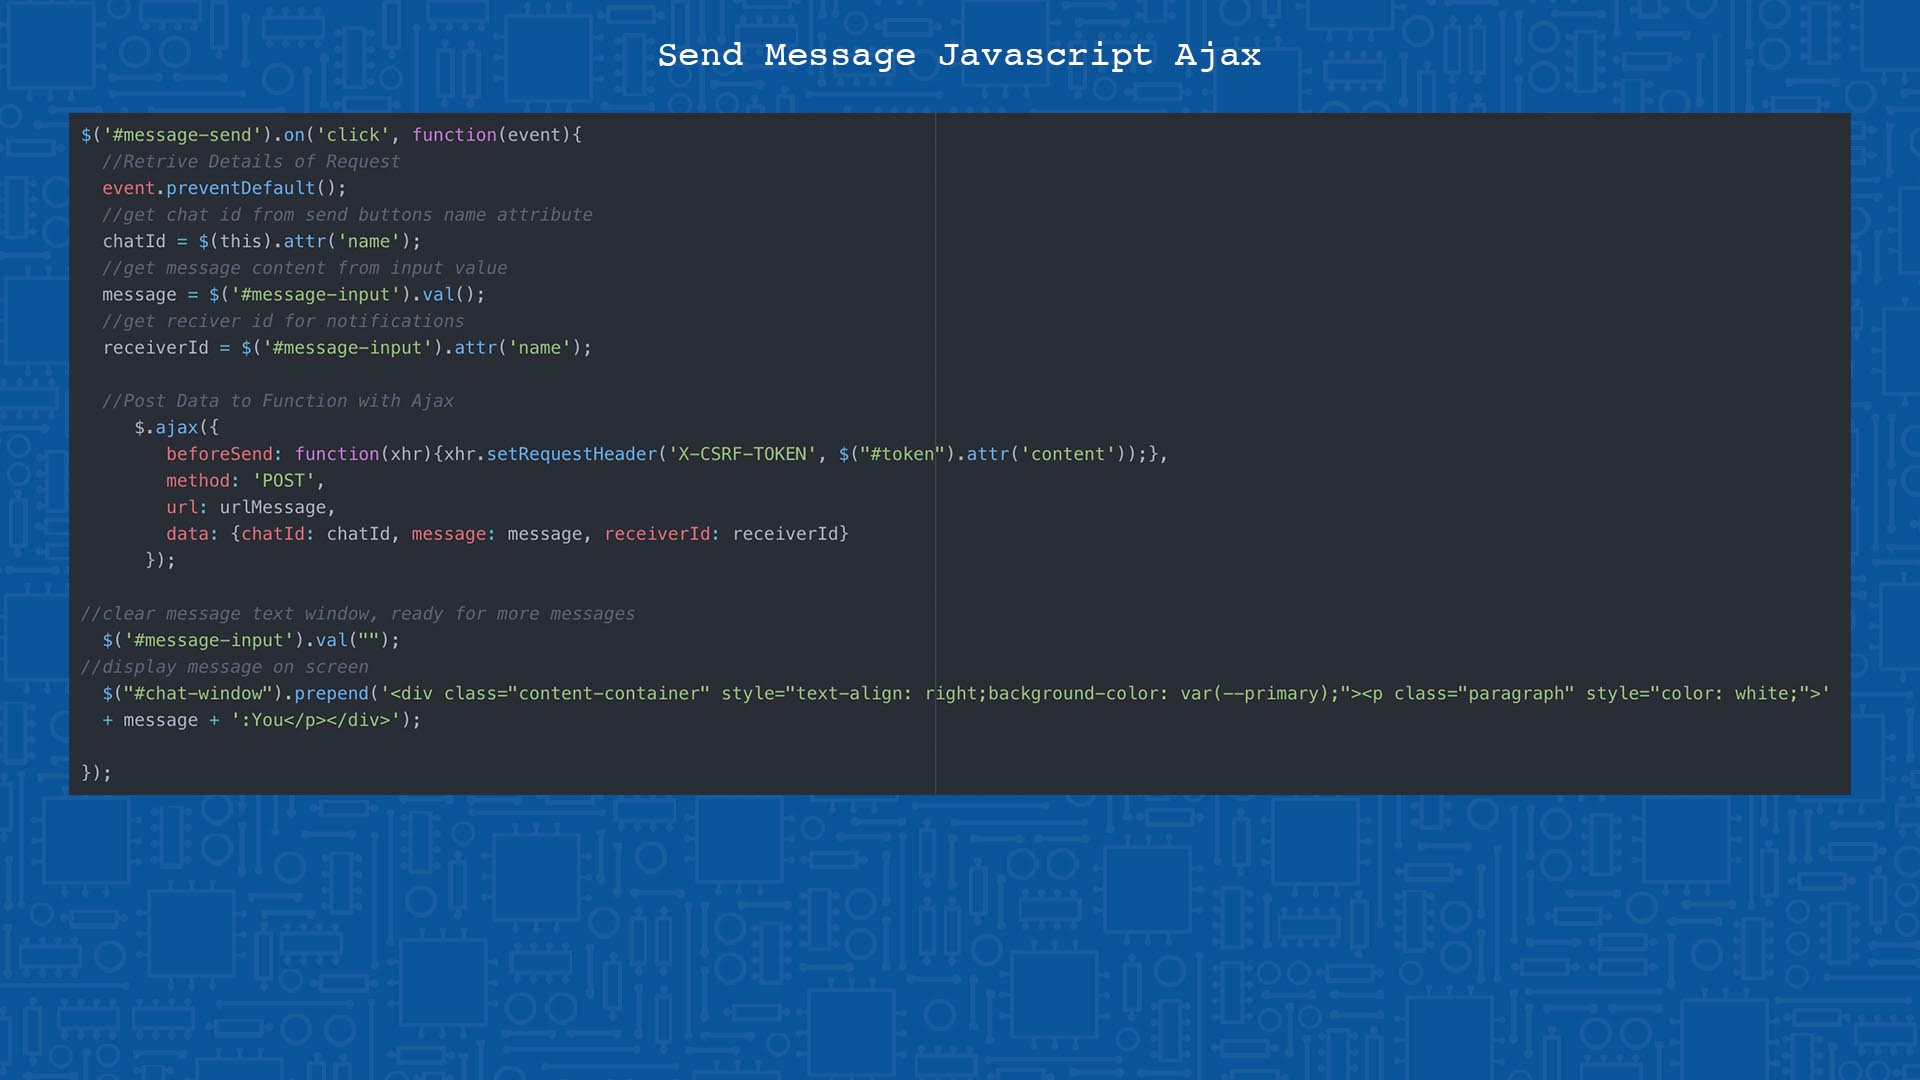
Chats Controller and Message Ajax - Sending Messages: The function of sending a message is the first within the feature to make use of Ajax, Working in a relatively similar way to the comments and like ajax functions detailed before. The button in the form used to compose and send a message triggers the ajax function collecting the relevant data from the form and sessions, the data is then inserted into an ajax request and sent to the ‘sendMessage’ function. Once the message has been sent, I make use of the Javascript Prepend function to insert that users message into the view on their side.
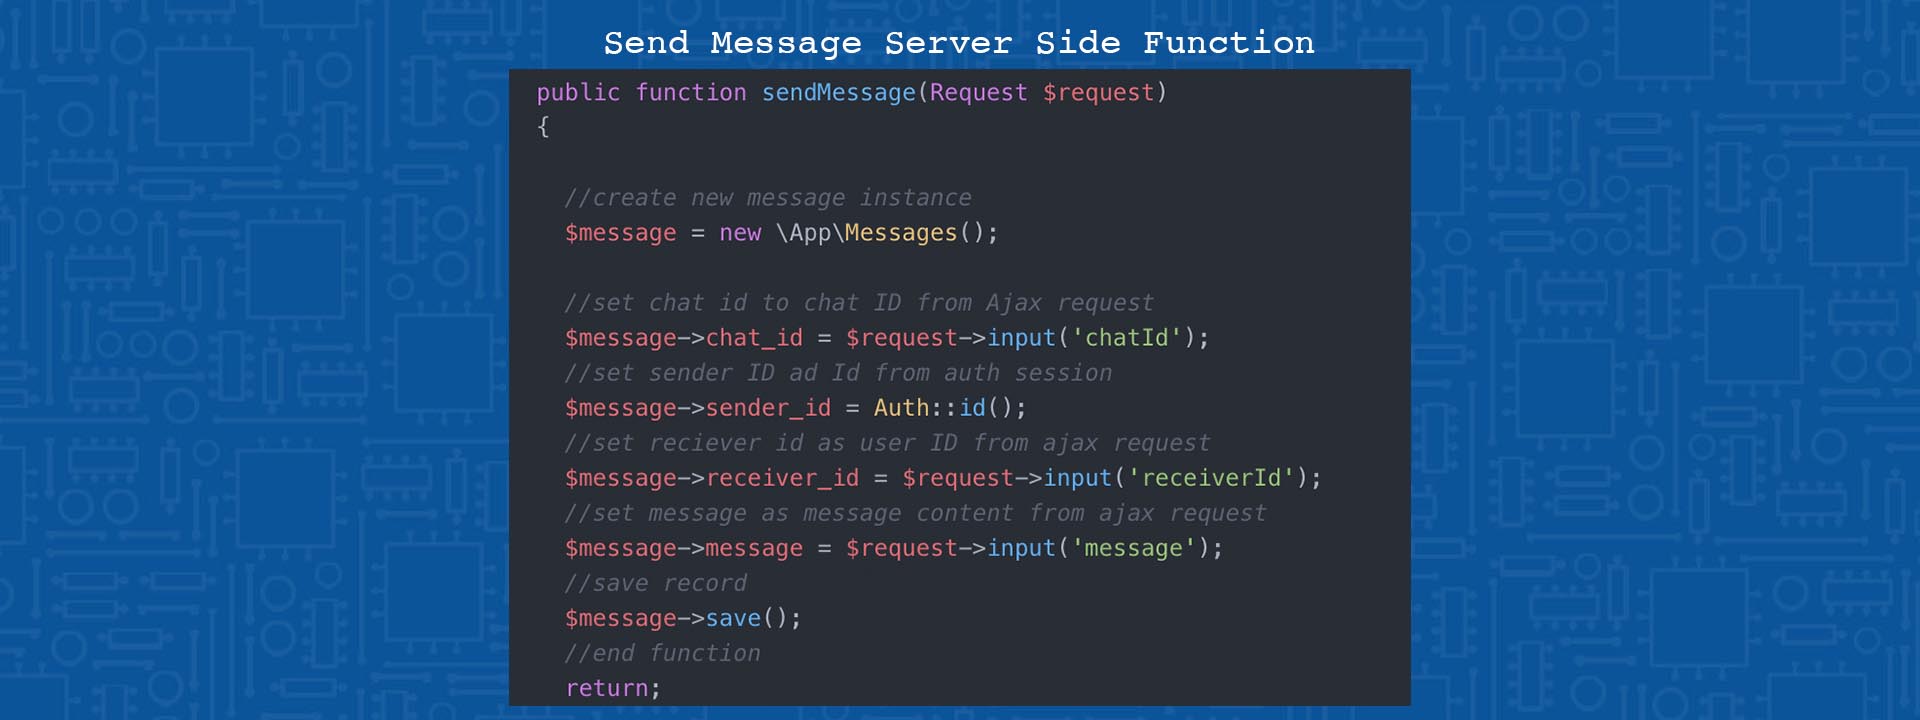
The code below is used to retrieve the data from the ajax request detailed earlier and insert it into the database.
Chats Controller and Message Ajax - Getting Messages Live: The final sections of code within this function were by far my favourite to write and was an extremely rewarding experience. The last two functions in the chats controller and message ajax, are used to check for new messages and load them into the view without the user having to refresh the page, meaning two users can talk to each other in close to real time through the chat windows.
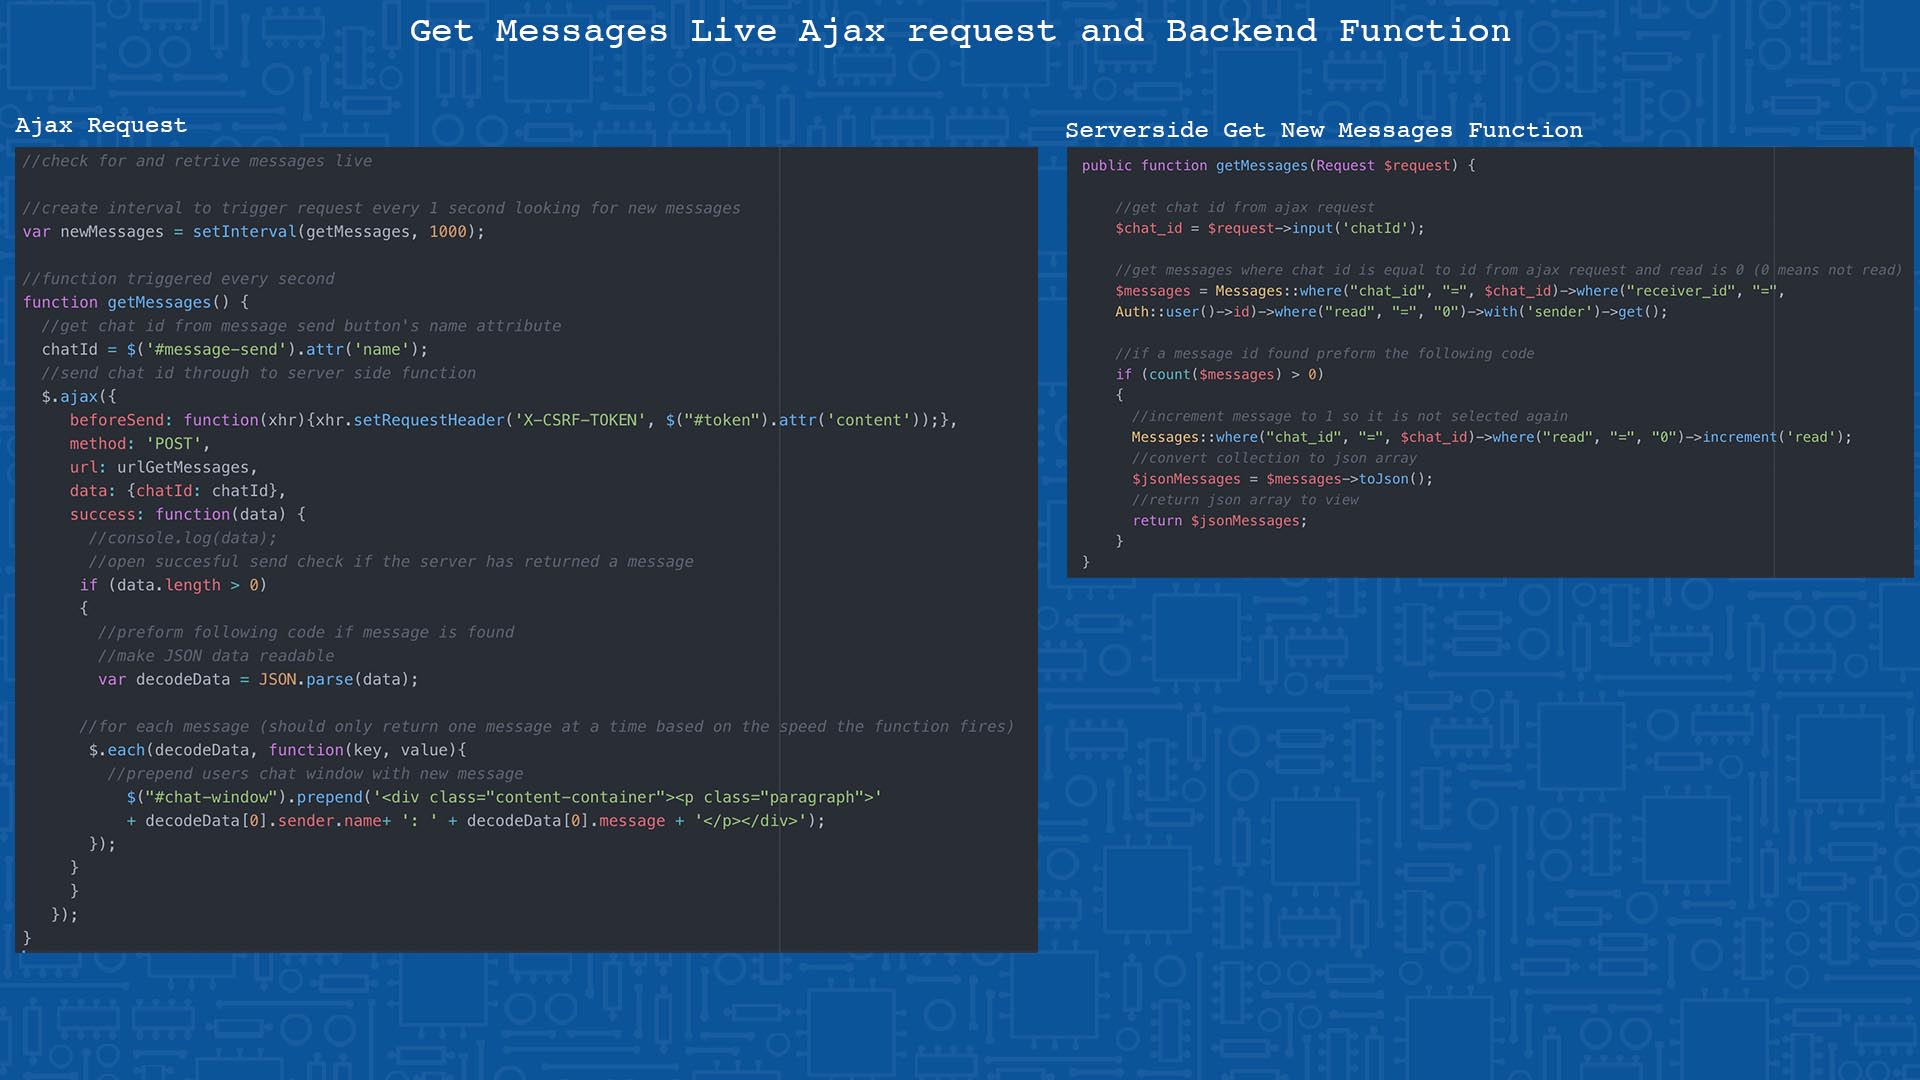
The first piece of code within this process is the Javascript shown below. I first create a variable that contains a small setInterval function which is used to trigger the get messages function located below it once every second. The function below was my first time using ajax to retrieve data from the server rather than send it so it took awhile for me to get to grips with it. The function works by posting the chat Id through to the server side get function (also shown below) that looks for a message that has not yet been read (has a 0 in the boolean read column signaling that it has not been read) by the user.
In the case that a new message is found it increments the counter read value to 1 so that it is not selected on the next request instance before converting it into a Json array (making the data array readable with javascript) and sending it back through to the Original Javascript. Upon receiving the new message the Ajax success function is triggered. The success function then decodes the json data into a new variable where I then make use of the jQuery each function to prepend the received data into the users chat window.
Notifications
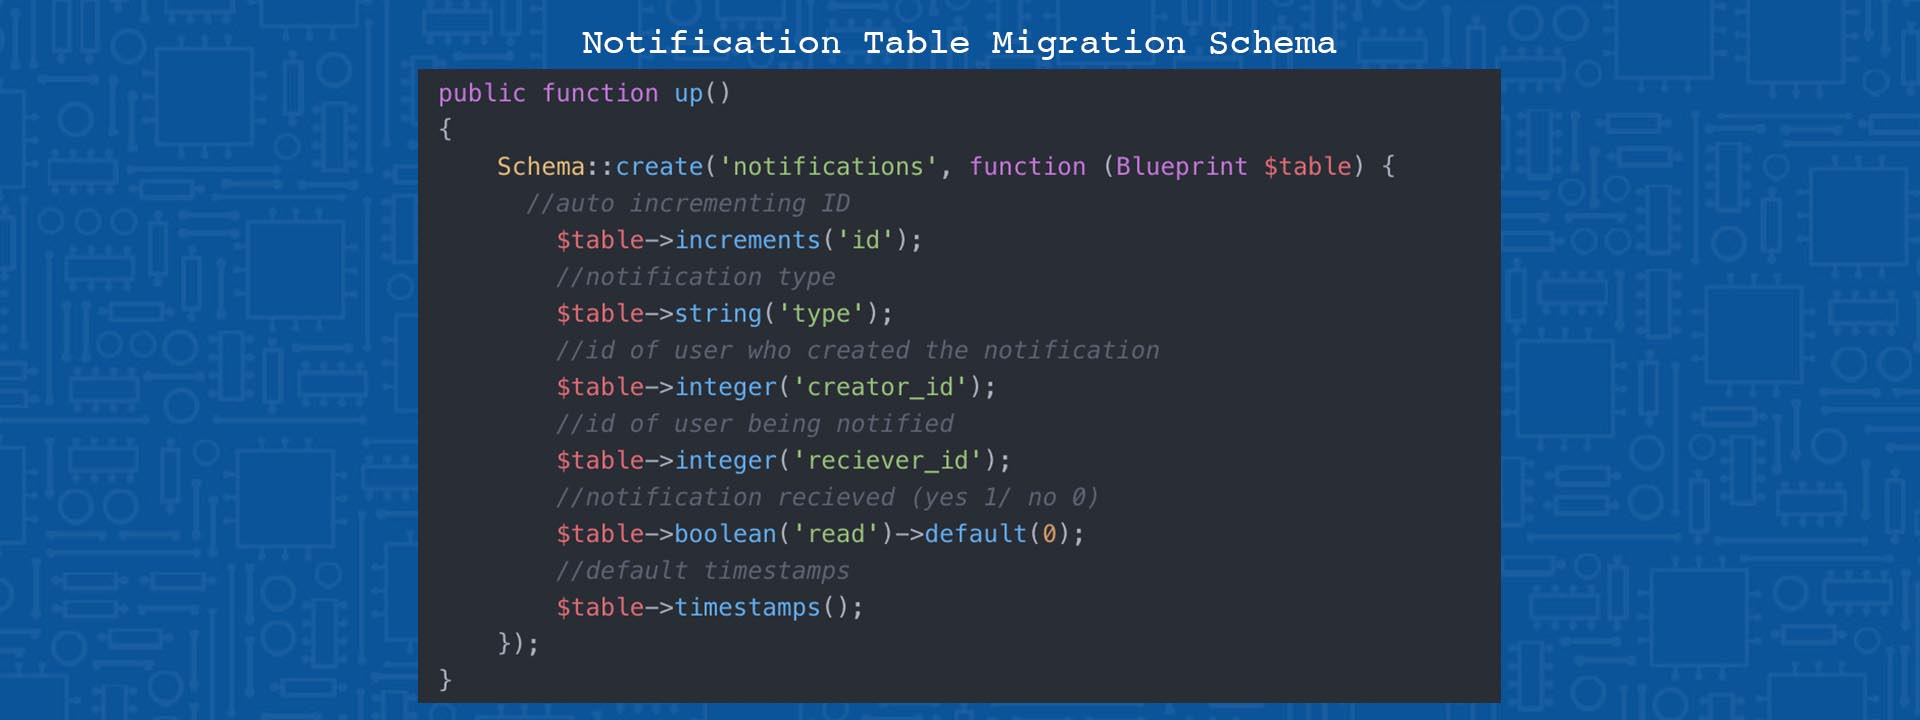
The last big feature I added to the site was notification system, which would tell users when someone had liked their post, commented on their post, or sent them a message. This was a relatively simple feature to add requiring the addition of a new migration and model, and the adaptation of the code in which comments, likes and messages are created. The database table migration shown below simply stores the creator id which is the user who triggered the notification, The receiver id which is the user being notified and the type, which indicates what type of notification it is.
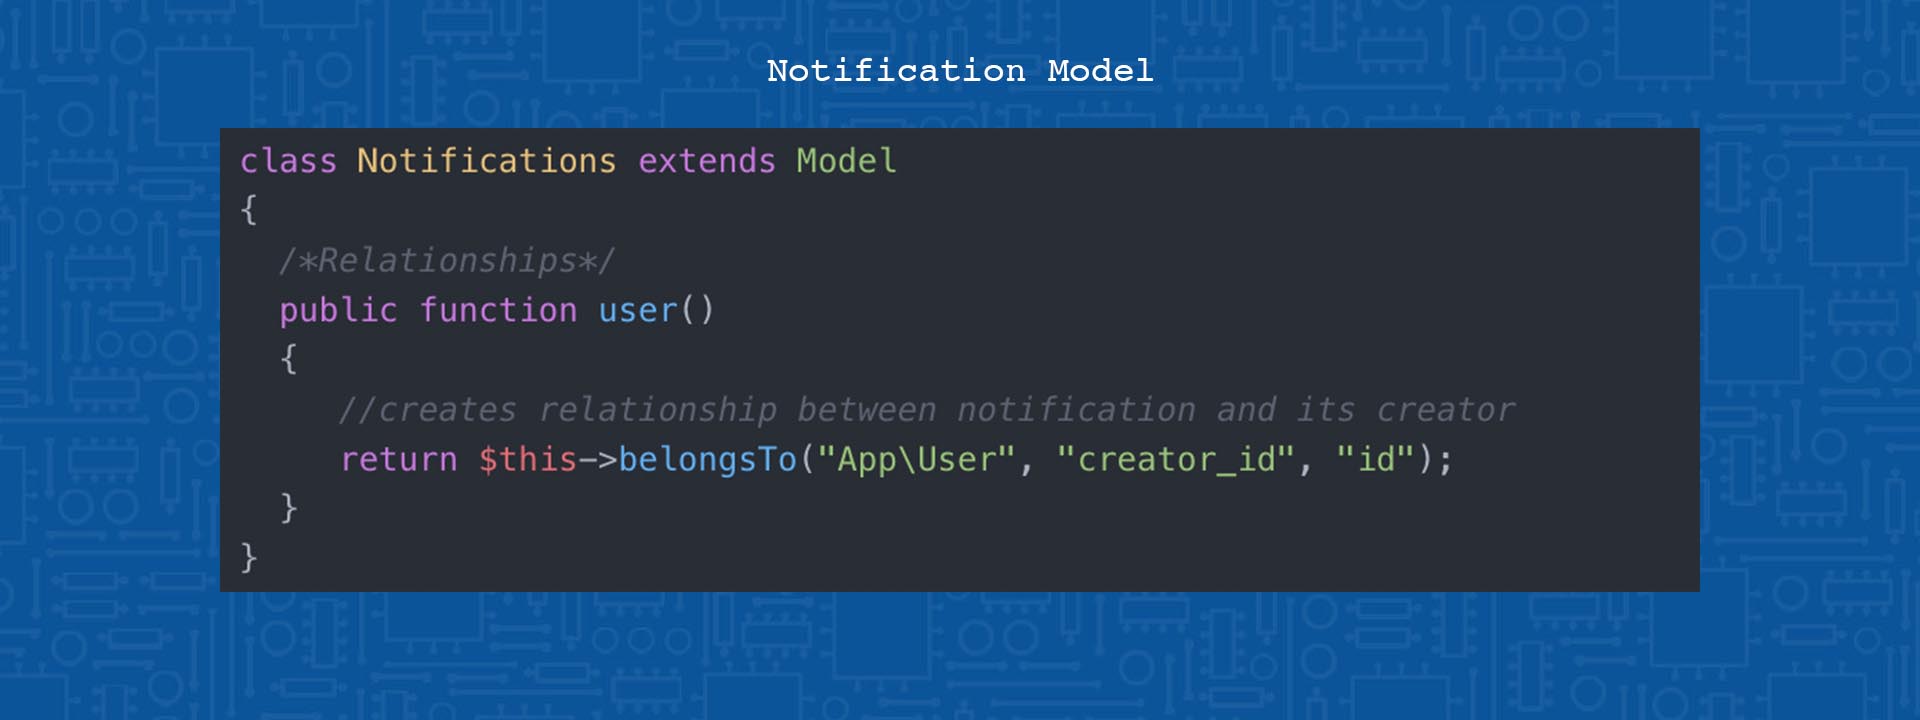
Within the model I have created relationships between the notifications and the users that created them.
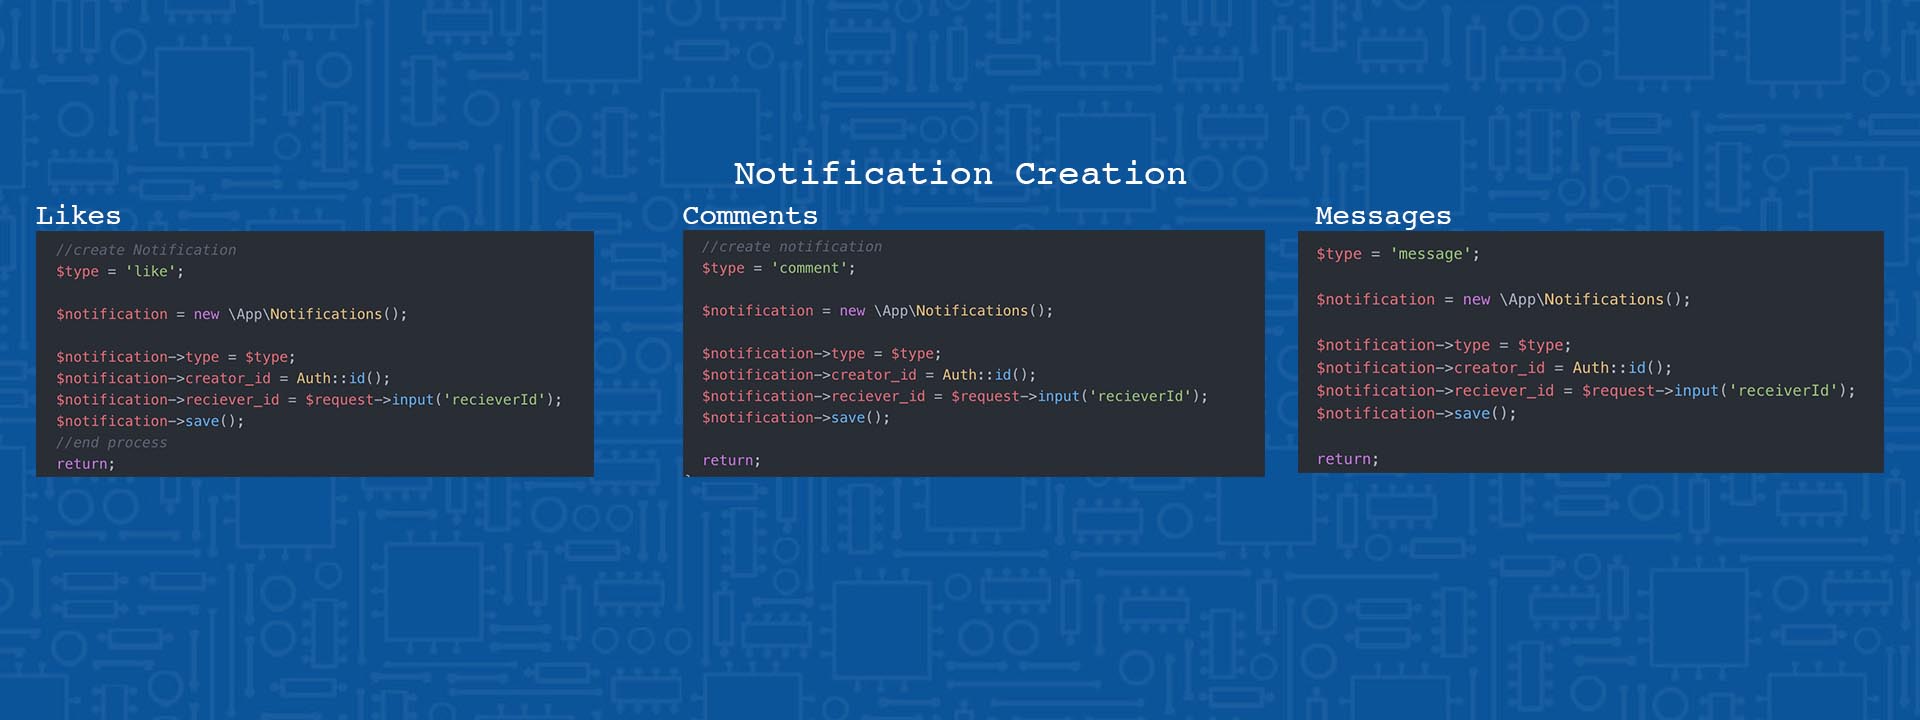
In order to create the notifications I added small bits of code to the end of functions, that simply add all the relevant data to to the notifications with the read column being set to zero.
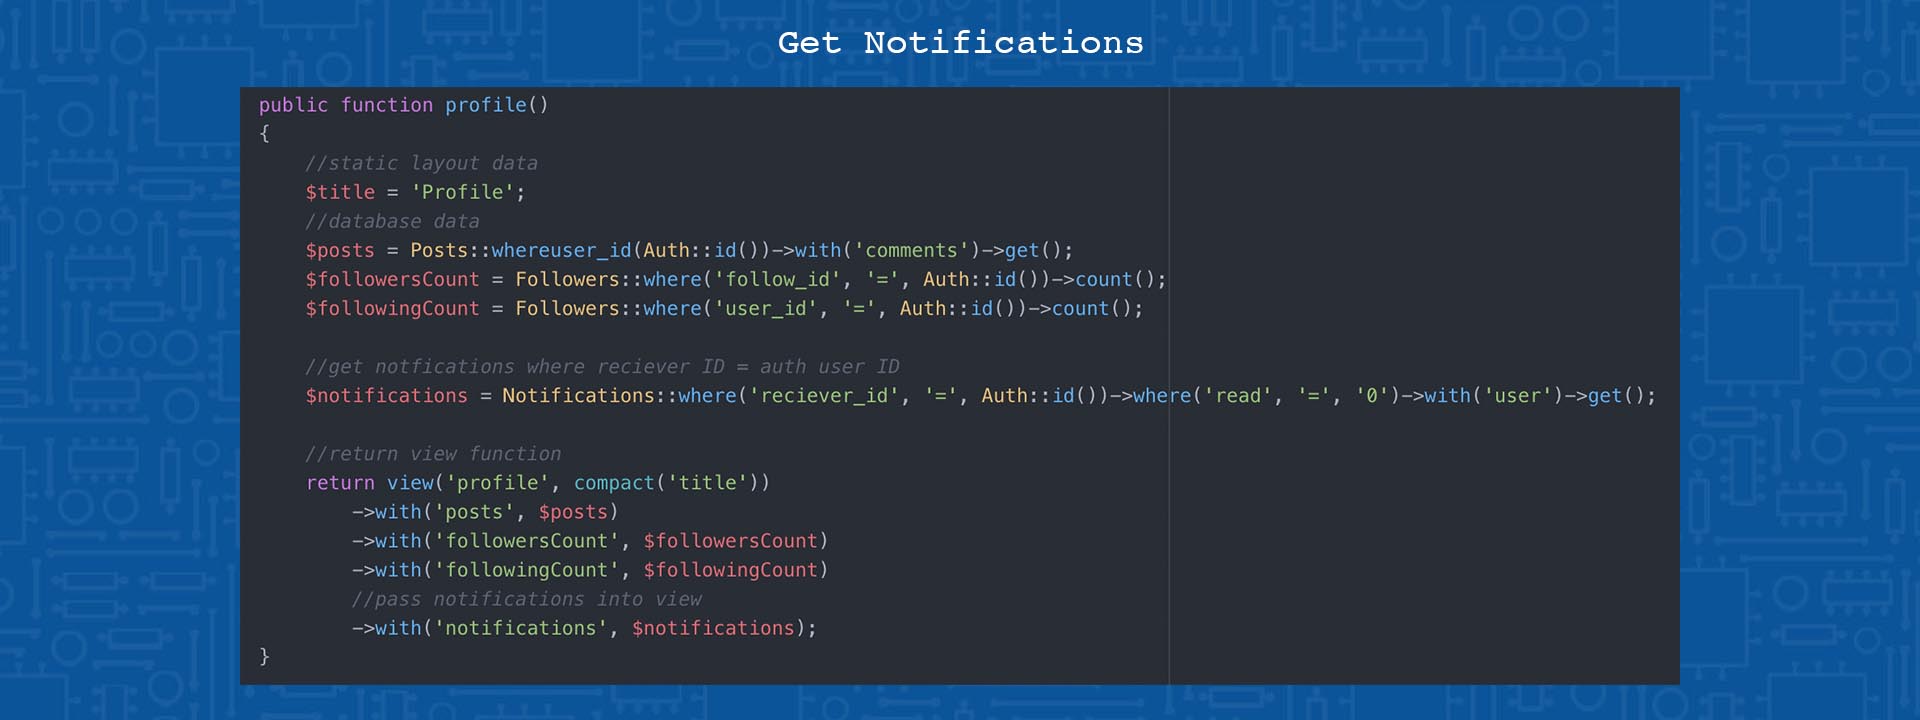
The read data column is used to indicate whether a notification has been received, this allows me to get all the notifications that have not yet been read by the user and pass them into the notifications section of the users profile page. The notifications use a query in which we get all notifications where the receiver ID is equal to the auth session ID and the read indicator is equal to 0, as shown in the code below.
To display the notifications I use an if statement wrapped in a foreach loop. The foreach loop will go through each of the notifications and display them, while the if statement figures out how to display them based on the notifications type for example if the notification is a comment it will display ‘Username has commented on your post’.
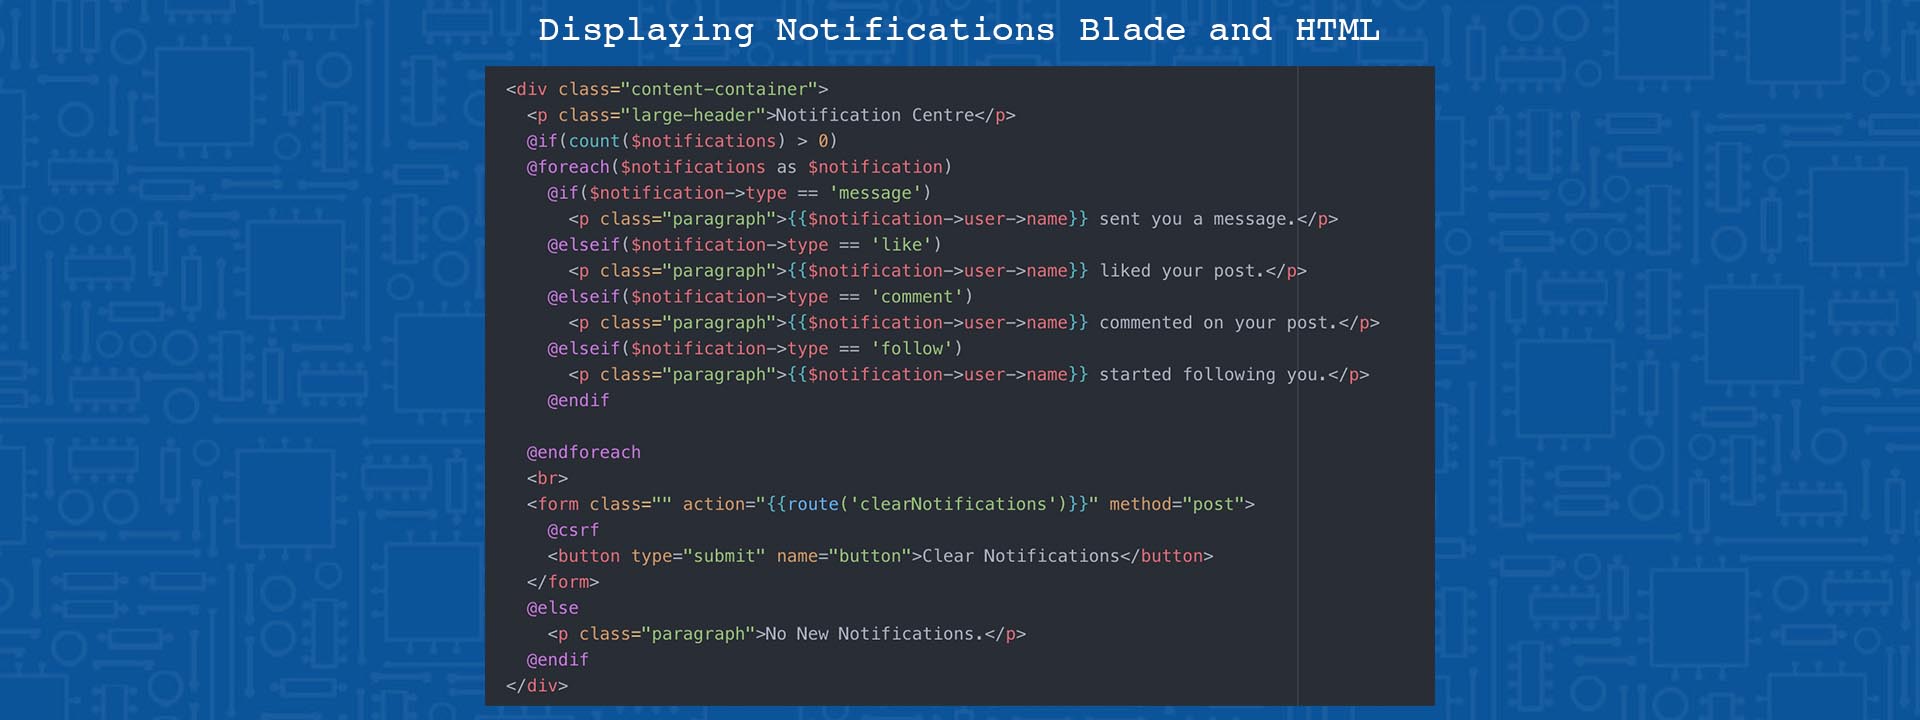
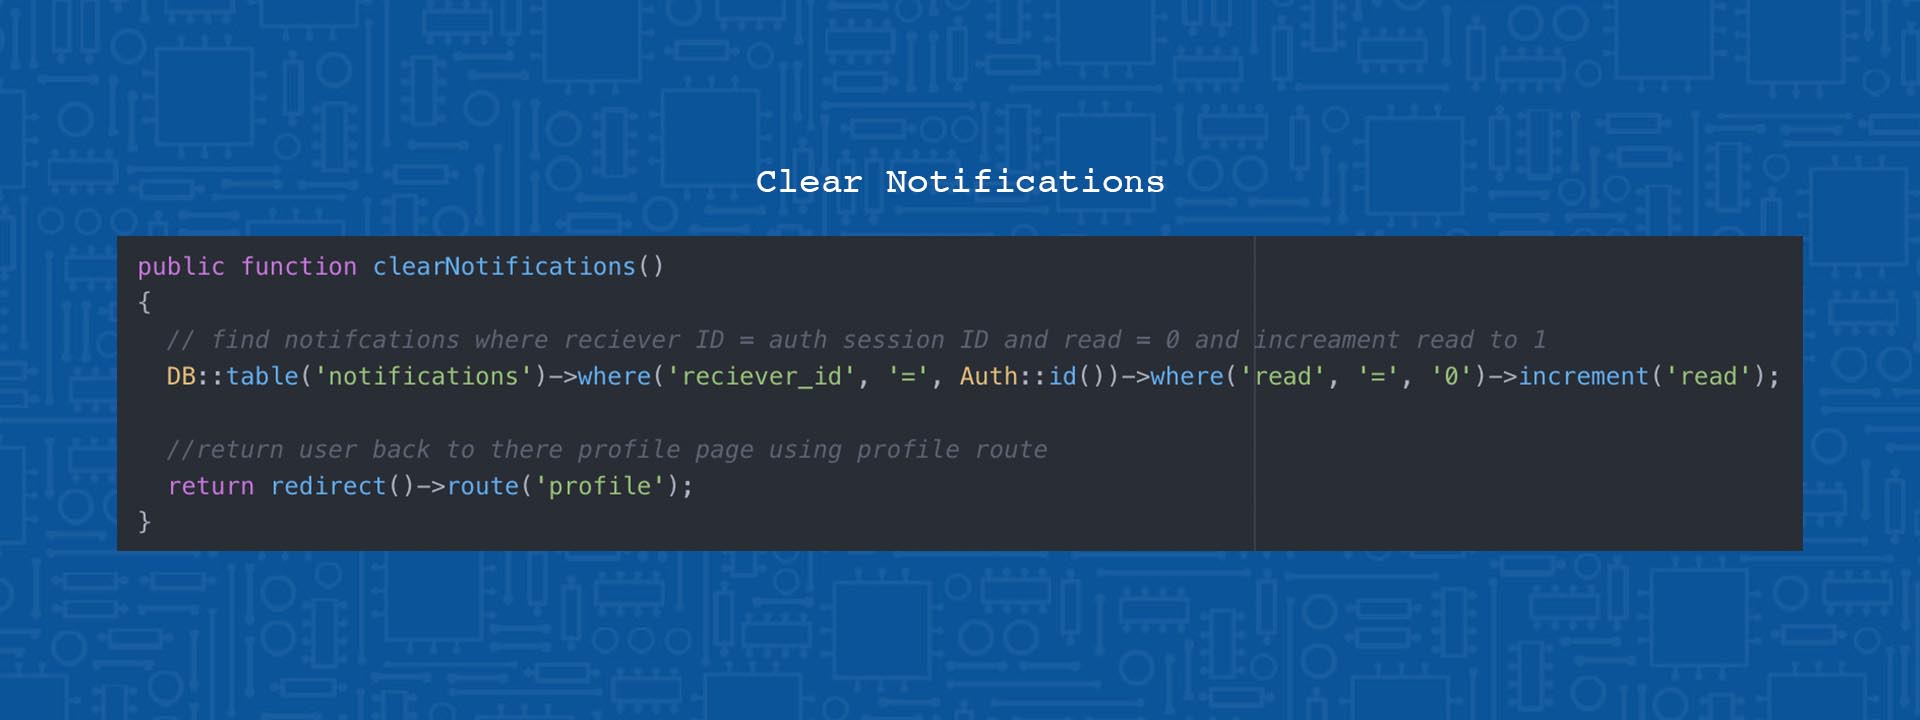
The final part of this system is button displayed at the bottom of the notification centre that allows users to clear their recent notifications. This simply links to a function in the User Controller that gets all notifications marked as unread (0) and sets them to read (1) so that the next time the user chooses to open their profile page the notifications aren’t displayed again.
Testing and Bug Fixes
Commenting Enter Button Bug
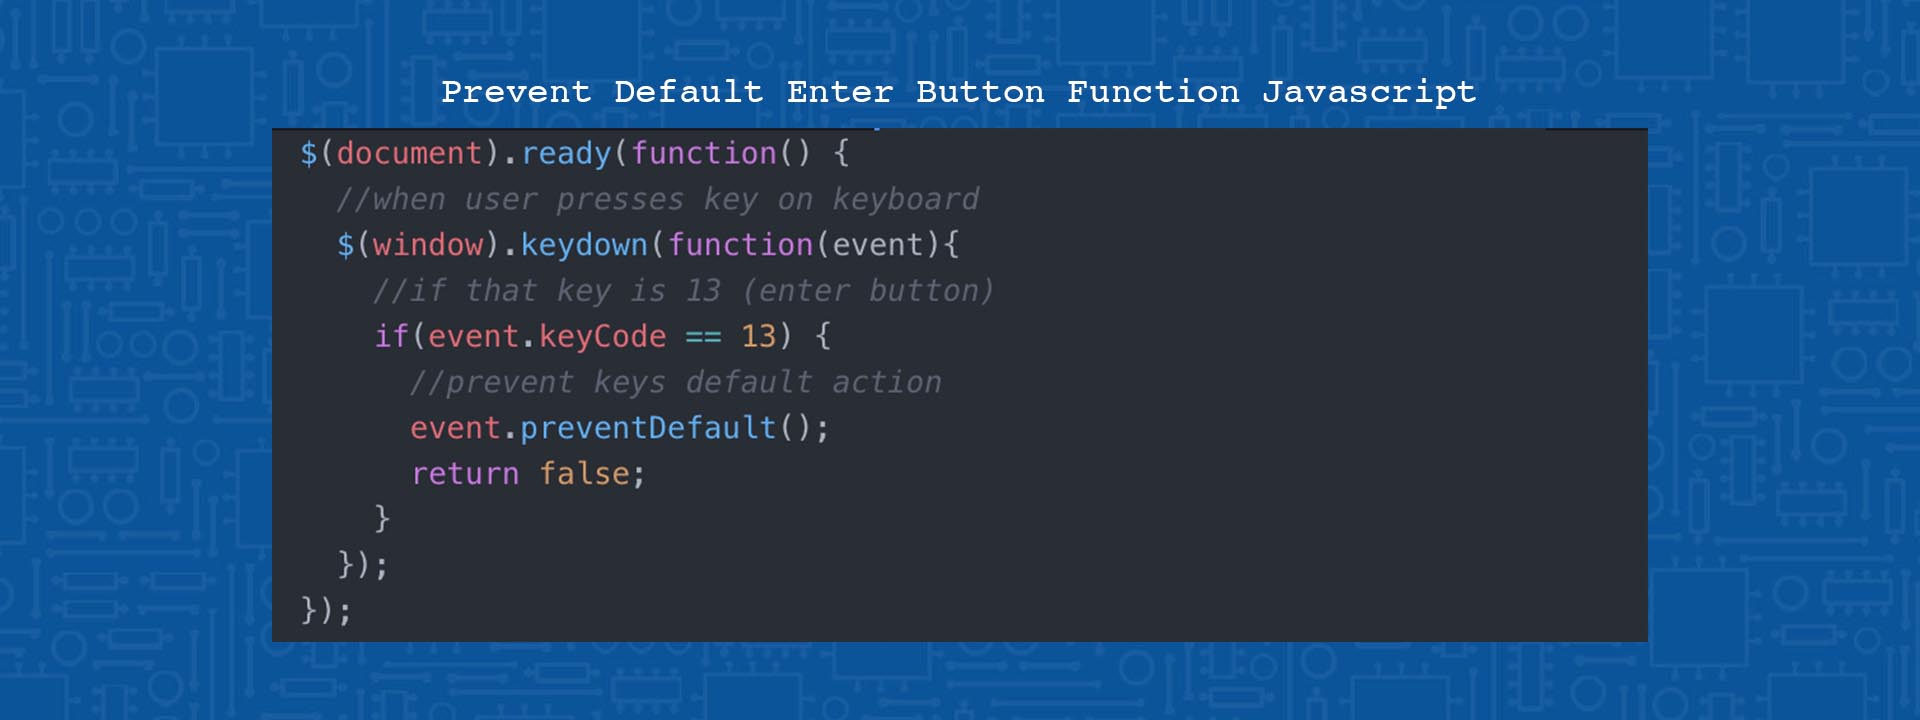
One of the fist bugs discovered during the development of the project was hitting the enter button on the keyboard while typing a comment, which would default to submitting the form and bypass the ajax function.To eliminate this across all forms on the site I wrote the JS script shown below, which prevents the keyboard enter button from performing its default action.
Filter Feed and User Search Pagination Bug
One of the biggest bugs I encountered was a problem with the pagination of the filter feed and user search functions. When first encountered I was unsure as to what had happened. In the case of the search function when trying to navigate to page two of the search results the page would take a while to load before returning a too many redirects error. While the filter feed pagination had a similar issue in which when navigating to the next page of results it would display a method not allowed error.
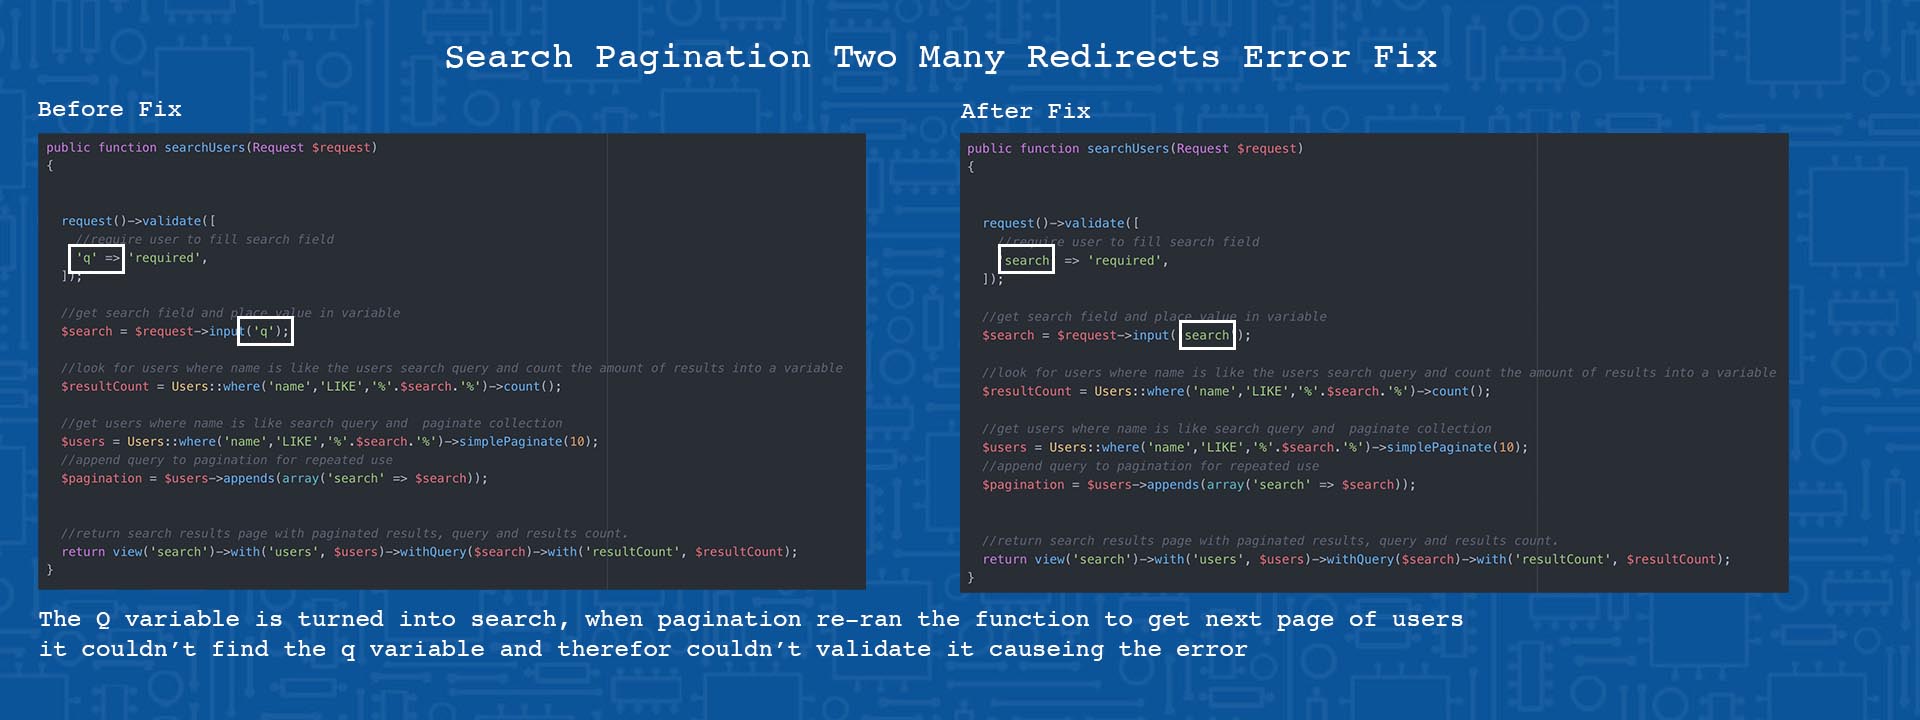
Search Pagination: After a few days of debugging I found that it was the validation I had added after writing the initial function that had caused the error. This was missed as when I tested the validation I didn’t think it would have any effect on the pagination controls, however when the pagination was ran it essentially repeats the same code written for returning the first page of results, meaning it would re validate the search query. This is what caused the error.
In the initial code run through, the query is selected from the navbar which was originally named ‘q’ after validating the ‘q’ variable it is stored in a new variable called ‘search’ this meant that when you tried to load the next page of results, the validation would be looking for the ‘q’ variable which had not been sent through the second time. This would cause the code to freeze and return the too many redirects error. To fix this I simply had to rename the search form field to match the name of the variable I would later send back through to validation when loading the following pages of results. Below is an example of the code before and after the bug was fixed.
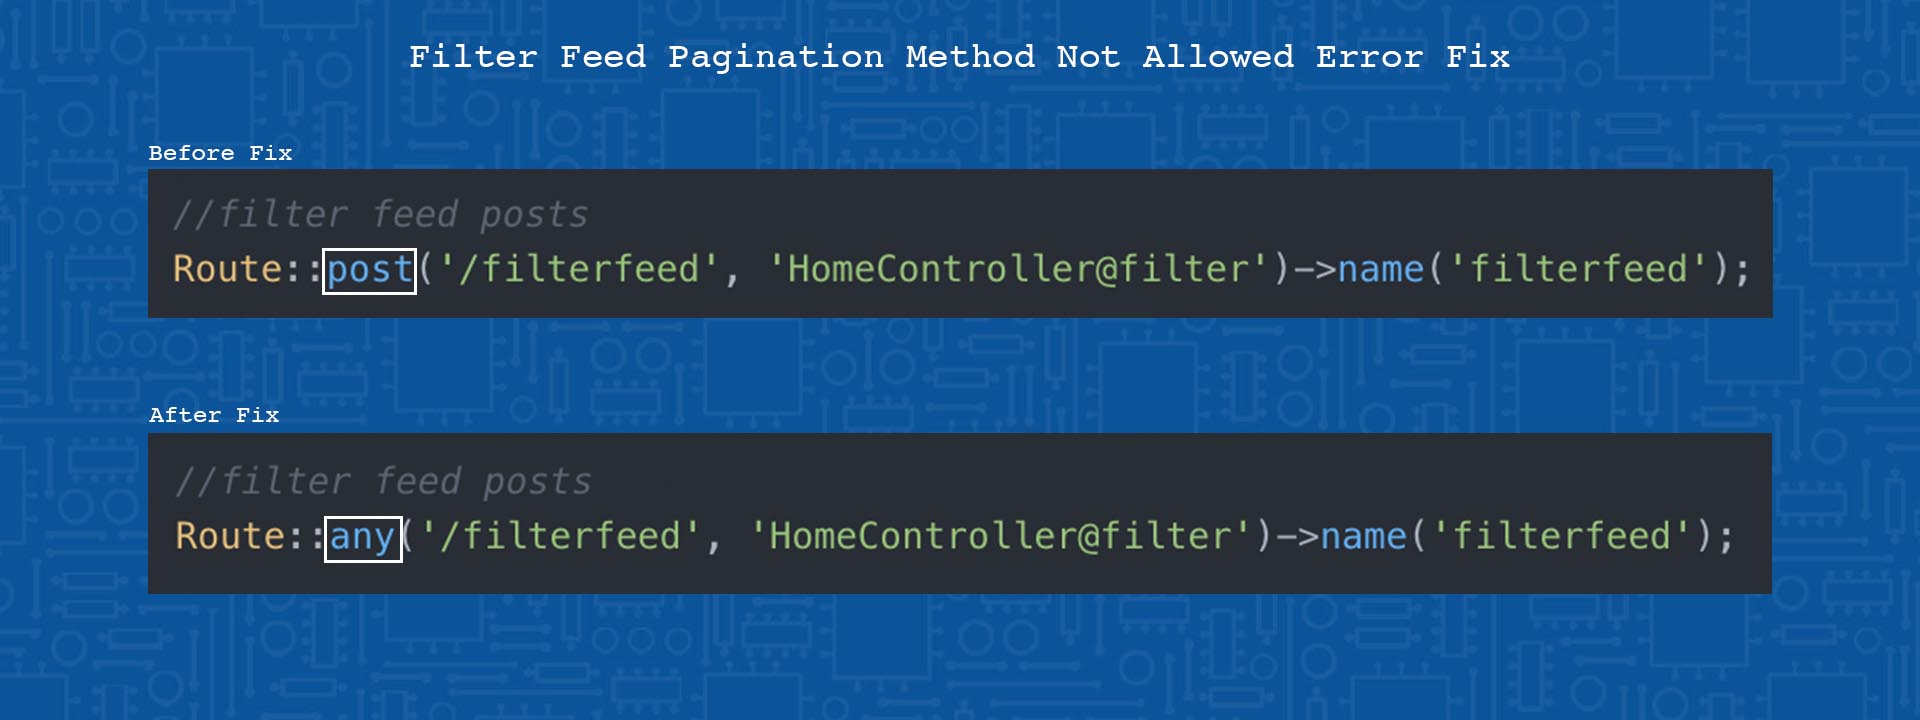
Filter Feed Pagination: The filter feed pagination bug was caused by an error in the route code used to pass the category through to the selection and pagination query. The route set up in semester one was using the post method to send the users category query through to the function which also acted as get function. Because of this I needed to change the post method to ‘any’. This would mean that the route could act as a post and get method allowing the function to use the users selected query and return the relevant posts. I also needed to append the category query to the pagination so that it could be reused when returning the results for the additional pages.
Errors Blocking Navigation On Mobile
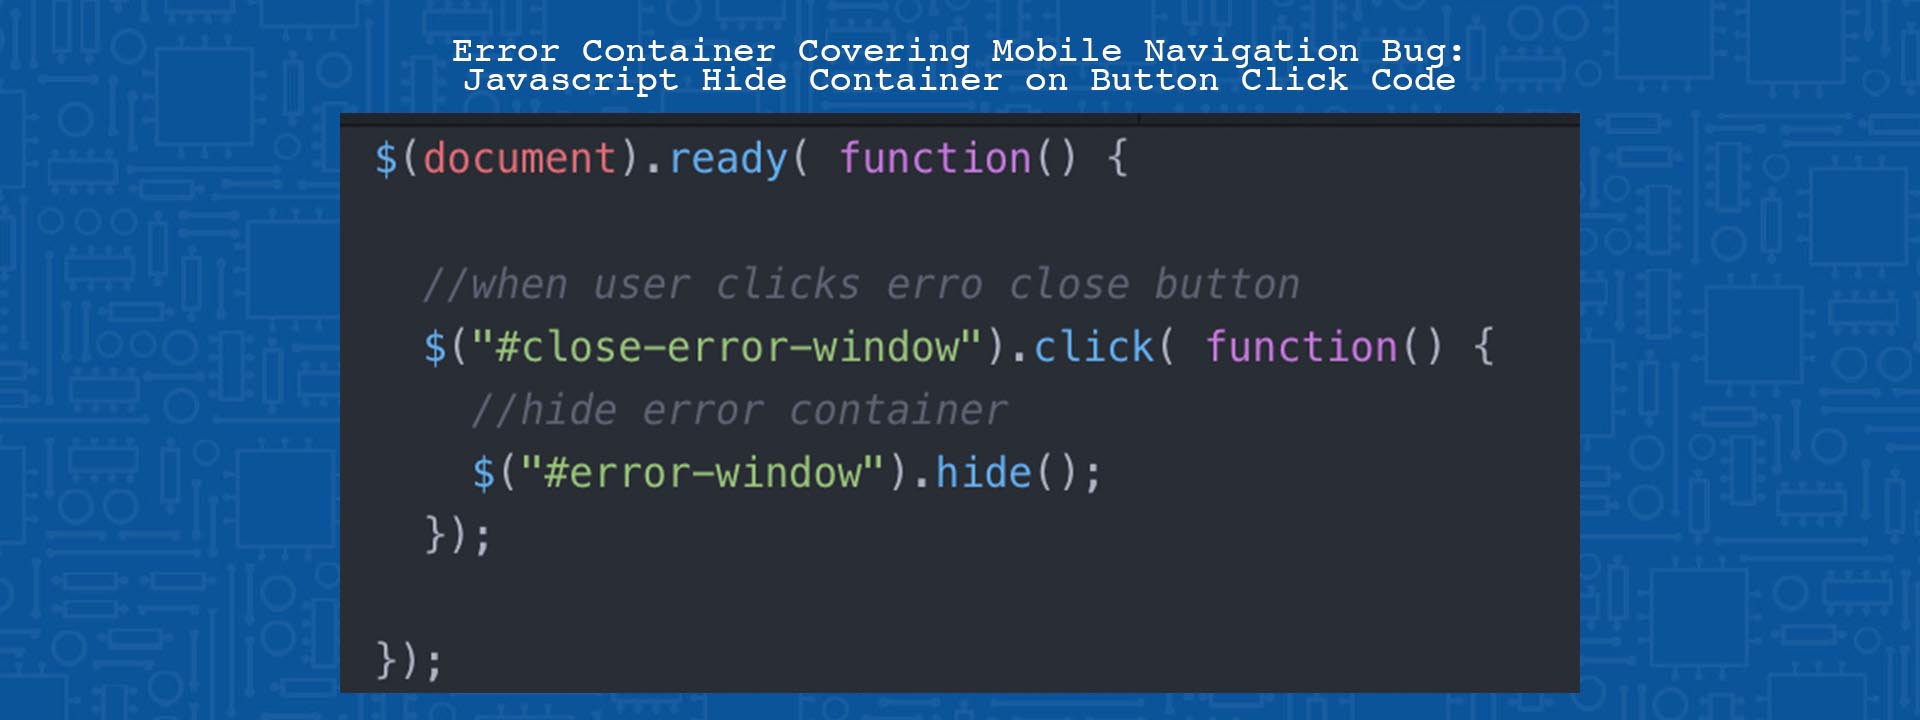
A small bug that was encountered during the live testing of the site, was the error messages container covering the mobile navigation as they are both positioned at the bottom of the page. To eliminate this issue without changing the error messages position I added a simple jQuery controlled close button. This would allow the user to close the error container and gain access to the navigation.
Chat System Security Flaw
One of the biggest security flaws discovered when testing was something I had completely overlooked. As the chat system posted the ID of the chat through the URL users would be able to change the ID to whatever they wanted essentially gaining access to chats they weren’t a part of. This resulted in a major security flaw in which users could read the messages of a chat they should not be able to view.
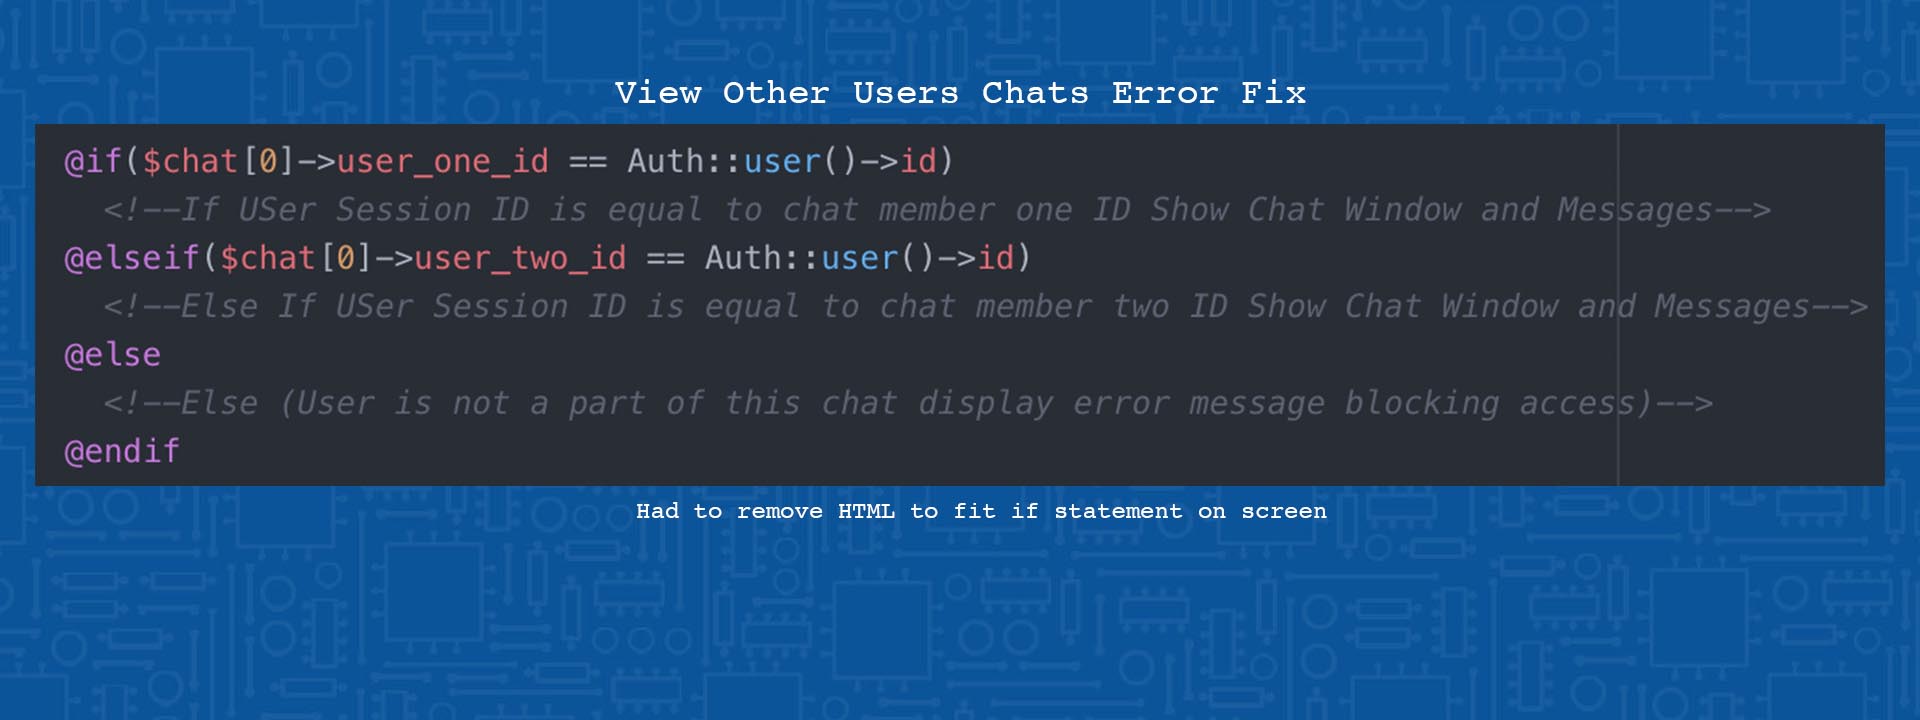
In order to fix this quickly, I added a simple blade if statement to the chat window markup that checks the session user ID against the users stored in that chats record, if they match it will load the messages and message send form. If however the IDs do not match the user is only able to view some text detailing the error, and informing them that they are not a part of that chat. The if statement used is shown below.
Conclusion
In conclusion I have found this project to not only be extremely fun, but extremely beneficial in progressing towards becoming a laravel developer. Throughout this project I was able to work with new and exciting technologies while exploring deeper levels of the Laravel Framework.
I also believe that I have achieved my two goals of becoming more competent with Laravel and creating a showpiece style project which I hope will help me find work as a Laravel developer upon finishing University.
Final Outcome
My Final outcome for this project is an extremely in depth social media web application that makes use of a range of technologies and code in order to offer a wide range of social features found on the most common social media websites. Using the links below you can visit Creanu live on my server and browse the codebase on github.
View Creanu Online!
Check Out The Code on GitHub!
I would recomend looking at github code as due to the scale of the project I was unable to write about every aspect of my code written this semester.
What I Have Learnt
By continuing with the Laravel Framework throughout this semester I have been able to gain experience using a range of technologies, which I hope will show that I have a competent understanding of laravel. Listed Below are a few of the key technologies I was able to learn and gain a better understanding of throughout the semester.
Installing Third Party Laravel Packages (Backpack)
Backpack CMS for Laravel
Javascript Ajax Posts and Returning Data
Javascript Prepend and Append Functions
Json Data Reading with Javascript
Laravel Pagination
Laravel Search Queries
Javascript Sessions and Cookies
Laravel Database Table relationships
Laravel Validation
SSH for setting up Laravel websites on servers and running terminal command remotely.
Special Thanks
Cain Mackenzie-Yapa - For Website Branding and UI Design
Digital Media Lectures - For help and feedback when required
Research Links
https://stackoverflow.com/questions/36585165/laravel-pagination-setpath-and-appends
https://stackoverflow.com/questions/55618737/laravel-search-query-pagination-page-2-returning -error-localhost-redirected-t
https://laracasts.com/discuss/channels/laravel/laravel-pagination-with-search-function
https://laravel.com/docs/5.0/pagination
https://laravel.com/docs/5.8/filesystem
https://laraget.com/blog/implementing-infinite-scroll-pagination-using-laravel-and-jscroll
https://gist.github.com/FilipQL/e873d321c3329068f34c58d0083749f9
https://www.youtube.com/watch?v=GLDjgbbBvOg&t=418s
https://laravel.com/docs/5.8/validation#quick-ajax-requests-and-validation
https://www.youtube.com/watch?v=eoGITOPpBfU
https://laracasts.com/discuss/channels/laravel/convert-json-to-array
https://www.w3schools.com/whatis/whatis_ajax.asp
https://laravel.com/docs/5.8/blade#if-statements
https://laravel.com/docs/5.8/eloquent-relationships
https://stackoverflow.com/questions/48419219/how-to-link-comments-to-each-post-by-id-with-laravel-blade
https://www.ssh.com/